Section 6
Groundwater and Surface Water Sampling
Public Review Draft – August 2021
Section 6.1 Introduction
Section 6.2 Hydrogeology of the Hawaiian Islands
6.2.1 Surface Water
6.2.2 Groundwater
6.2.2.1 Groundwater in Volcanic Formations
6.2.2.2 Groundwater in Caprock Formations
6.2.2.3 Perched Groundwater
6.2.2.4 Groundwater Classification
6.2.2.5 Fluctuation of Water Table
Section 6.3 Sampling Plan Design
Section 6.4 Investigation Objectives and Decision Unit Designation
6.4.1 Surface Water
6.4.1.1 Identify COPCs
6.4.1.2 Investigation Questions and Objectives
6.4.1.3 Decision Unit Designation
6.4.2 Groundwater
6.4.2.1 Identify COPCs
6.4.2.2 Investigation Questions and Objectives
6.4.2.3 Decision Unit Designation
6.4.3 Filtering of Water Samples
6.4.3.1 Filtering Rationale
6.4.3.2 Filtering Procedures
6.4.3.3 Filtering for Metals
6.4.3.4 Filtering for VOCs
Section 6.5 Surface Water Sample Collection
6.5.1 Surface Water Sample Collection Methods
6.5.1.1 Multi Increment-Type Samples
6.5.1.2 Discrete Samples
6.5.2 Surface Water Sample Collection Tools
6.5.2.1 Isokinetic Samplers
6.5.2.2 Non-Isokinetic Samplers
6.5.3 Additional Considerations
6.5.3.1 Currents and Shifting Tides
6.5.3.2 Stratified Water Column
6.5.3.3 Trace Elements
Section 6.6 Groundwater Sample Collection
6.6.1 Monitoring Well Location and Design
6.6.1.1 Monitoring Well Location
6.6.1.2 Monitoring Well Design
6.6.1.3 Initial Groundwater Investigation Phase
6.6.1.4 Subsequent Investigation Phases
6.6.2 Monitoring Well Construction and Installation
6.6.2.1 Drilling Methods
6.6.2.2 Permanent Monitoring Wells
6.6.3 Monitoring Well Development
6.6.3.1 Well Development Objectives
6.6.3.2 Well Development Methods
6.6.3.3 Well Development Criteria
6.6.4 Groundwater Gauging
6.6.4.1 Monitoring Well Equilibration
6.6.4.2 Depth-to-Water Measurement
6.6.4.3 Total Well Depth
6.6.4.4 Free Product Measurement
6.6.4.5 Well Gauging Log
6.6.4.6 Determination of Gradient and Flow Direction
6.6.5 Monitoring Well Purging
6.6.5.1 Objectives of Well Purging
6.6.5.2 Water Monitoring Parameters
6.6.5.3 Low-Flow Approach
6.6.5.4 Well Volume Approach
6.6.5.5 Purging Low Permeability Formations
6.6.5.6 No-Purge Method
6.6.5.7 Well Purging Log
6.6.5.8 Purge Water Re-Infiltration or Disposal
6.6.6 Groundwater Sample Collection Methods
6.6.6.1 Multi Increment-Type Sampling Methods
6.6.6.2 Discrete Samples
6.6.6.3 Low-Flow Sampling
6.6.6.4 No-Purge Sampling
6.6.7 Sample Collection Tools
6.6.7.1 Positive Displacement Pumps
6.6.7.2 Submersible Pumps
6.6.7.3 Suction Lift Pumps
6.6.7.4 Grab Samplers
6.6.7.5 Passive (No Purge) Samplers
6.6.7.6 Comparison of Passive Samplers
6.6.7.7 Order of Groundwater Sampling
6.6.8 Timeline for Well Development, Purging and Sampling
6.6.8.1 Drilling and Well Installation
6.6.8.2 Well Development
6.6.8.3 Gauging, Purging and Sampling
6.6.8.4 Temporal Factors
6.6.8.5 Frequency and Timing of Long-Term Groundwater Monitoring
6.6.9 Use of Temporary Wells, Micro Wells and Existing Production Wells
6.6.9.1 Temporary Monitoring Wells
6.6.9.2 Micro Wells
6.6.9.3 Existing Water Production Wells
6.6.10 Additional Monitoring Well Considerations
6.6.10.1 Monitoring Wells with Permanent Downhole Equipment
6.6.10.2 Monitoring Wells at Sites with LNAPL Plumes
6.6.10.3 Monitoring Wells at Sites with DNAPL Plumes
6.6.10.4 Monitoring Wells in Bedrock
6.6.10.5 Monitoring Wells in Confined Aquifers
Section 6.7 Data Quality Evaluation
6.7.1 Review of Sample Collection and Processing Methods
Section 6.8 Groundwater Transport Data Collection Methods
6.8.1 Slug Tests
6.8.2 Slug Tests in Stratified Groundwater Formations
6.8.3 Pumping Tests
6.8.4 Single Well Pumping Test
6.8.5 Multi-Well Pumping Tests
Section 6.9 Groundwater Monitoring Well Closure
6.9.1 Closure Considerations
6.9.1.1 Low-Risk Monitoring Wells
6.9.1.2 High-Risk Monitoring Wells
6.9.2 Well Closure Planning
6.9.3 Pre-Closure Review
6.9.4 Basic Well Closure Procedures
6.9.5 Detailed Well Closure Procedures
6.9.5.1 Partial of Full Removal of Casing and Screen
6.9.5.2 Well Sealing in Place
6.9.5.3 Well Sealing Material
6.9.5.4 Placement Method
6.9.6 Common Aspects of Monitoring Well Closure
6.9.7 Additional Hydrogeologic and Location Considerations
6.9.7.1 Wells Penetrating Contaminated Soil or Groundwater and Drinking Water Aquifers
6.9.7.2 Wells Penetrating Creviced or Fractured Rock
6.9.7.3 Deeper Wells/Wells in or Above Drinking Water Aquifers
6.9.7.4 Shallow Wells in Caprock Sediments
6.9.7.5 Wells in Unstable Material
6.9.7.6 Vapor Monitoring Wells
6.9.8 Unanticipated Site Conditions
6.9.9 Waste Management
6.9.10 Well Closure Reporting
Section 6.10 Groundwater Modeling
6.10.1 Gradient and Flow Direction Determination
6.10.2 Velocity, Transmissivity, Calculations
6.10.3 Computer Models
Section 6.11 Equipment Preparation/Decontamination/Blanks
Section 6.12 Investigation Derived Waste
Figures
Figure 6-1 Stream Flow Characteristics
Figure 6-2 Schematic of typical hydrogeology of Hawaiian Islands
Figure 6-3 Example designation of shallow, shoreline DUs (SDUs) and deep, swimming area DUs (DDUs) for assessment of bacteria along a public beach (for example only)
Figure 6-4 Designation of surface water DU outside of a silt curtain for monitoring of dredging turbidity. Top: No- or low-flow conditions; Bottom: Flow conditions
Figure 6-5 Designation of Decision Units for characterization of groundwater
Figure 6-6 Installation of monitor wells in DU areas and collection of “discrete” groundwater samples from each well
Figure 6-7 In-line water sample filter
Figure 6-8 Isokinetic Sampler Constructed of Teflon
Figure 6-9 The Aloha Sampler ™
Figure 6-10 Niskin Bottle Sampler
Figure 6-11 VOC sampler
Figure 6-12 Plastic Churn Splitter (left) and Fluoropolymer Churn Splitter (middle) with churn paddle (right)
Figure 6-13 Diagram of a Typical Groundwater Monitoring Well
Figure 6-14 Portion of PVC Well Screen and Flush Threaded Bottom Cap
Figure 6-15 Hollow Stem Auger with PVC Well Casing
Figure 6-16 Installation of Well Head Protection
Figure 6-17 Flush-mounted well head box installed in a parking lot
Figure 6-18 Traffic-Rated Well Head Box
Figure 6-19 Example Monitoring Well Installation Log
Figure 6-20 Example Well Development Log
Figure 6-21 Oil-water Interface Meter. [Source: Solinst, 2008]
Figure 6-22 Example Groundwater Sampling Log [Source: US Navy, 2007]
Figure 6-23 Low-flow bladder pump within a monitoring well 104
Figure 6-24 Field Setup for Purging and Sampling Well 105
Figure 6-25 Peristaltic Pump Head [Source: Environmental Pumping, 2008]
Figure 6-26 Example bailers. [Source: Eon, 2008]
Figure 6-27 Snap Sampler passive sampler device
Figure 6-28 HydraSleeve before and after filling
Figure 6-29 Illustrations of Why Water Quality Results May Differ from Permanent and Temporary Monitoring Wells
Figure 6-30a Diagram of Pre-Pack Monitoring Micro Well Assembly
Figure 6-30b Photograph of Pre-Pack Monitoring Micro Well Installation
Figure 6-31 Example micro well construction diagram
Tables
Table 6-1 Test Methods for Water Quality Parameters
Table 6-2 Potential for Representative Analytical Results for Commonly Utilized Groundwater Sampling Methods and Common Contaminants of Potential Concern
Table 6-3 Advantages and Disadvantages of Different Passive Sampler Types (see also Attachment 2 and ASTM 2020)
Table 6-4 Summary of Low-Risk Monitoring Well Closure Procedures
Appendices
Appendix 6-A: AMAP Guidelines and Sampling Notes (HDOH CWB 2015a,b)
Appendix 6-B: Groundwater Sampling (USEPA 2017)
Appendix 6-C: Groundwater Level and Well Depth Measurement (USEPA 2013)
Appendix 6-D: Passive Sampler Technologies (ITRC 2006, 2007)
Appendix 6-E: Field Equipment Decontamination (USEPA 2020a)
Appendix 6-F: Investigation Derived Waste Management (USEPA 1996, 2020b)
Return to the Top of the Page
6.1 Introduction
This section presents guidelines for the collection of surface water and groundwater sample data as part of an environmental investigations. The collection of surface water samples is not normally included in projects overseen by the HEER Office but is routine in other HDOH offices. Groundwater sample data are often collected and used in conjunction with soil and soil vapor data to assess environmental conditions at HEER Office project sites.
The information provided in this section is intended to serve as general guidance only and does represent strict requirements. The most appropriate methods for collection of surface water and groundwater samples will depend on investigation objectives and site-specific conditions and must be determined on a site-by-site basis. The representativeness of the data collected with respect to the site investigation questions being asked must, however, be demonstrated.
The collection of representative groundwater sample data can be especially challenging (ASTM, 2019). Variability in hydrogeologic conditions within a project site and even within a single borehole requires well-thought-out placement of well locations and placement of screened intervals in order to obtain usable data. Subsurface investigations in highly developed, urban areas can in particular be fraught with obstacles that are beyond the ability of this guidance to predict and address.
Information on actively used, subsurface water, sewer and fuel pipelines, power lines, data cables, etc., can normally be obtained and be reviewed prior to drilling or digging (Section 5.2.2). The unanticipated presence of abandoned utilities, foundations and footings of former buildings, localized areas of highly competent rock (e.g., volcanic units), etc., however, can disrupt initial sample collection plans and require decision making in the field to appropriately address.
Direct consultation with the overseeing HDOH project manager should be attempted if possible when problems arise in the field. The HDOH project manager should otherwise be notified as soon as possible following unanticipated modifications to pre-approved sampling plans.
Permits are not required for test borings and monitoring wells associated with environmental projects overseen by DOH (DLNR CWRM, 2004). The installation, use and closure of wells associated with environmental monitoring or remediation must, however, meet the requirements of the overseeing DOH office as described in this document and other pertinent guidance. Correspondence with the HEER Office is especially important for wells to be installed in an active, drinking water aquifer.
6.2 Hydrogeology of the Hawaiian Islands
The hydrology of the Hawaiian Islands can be discussed in terms of surface water and groundwater. Investigation of groundwater is more pertinent to projects overseen by the HEER Office, although some projects might require assessment of potential discharges of contaminated groundwater to a nearby surface water body.
6.2.1 Surface Water
Streams and surface water impoundments provide irrigation water and in some areas are an important source of drinking water USGS 2018a). Streams also serve as an important habitat for unique, native flora and fauna and can affect the chemical and physical quality of estuaries, bays and nearshore waters.
Streams in upland areas are fed by overland storm water runoff and localized springs of high-elevation groundwater (Figure 6-1; USGS 2003). In mid-elevation areas streams often infiltrate into the subsurface and recharge underlying groundwater. In lower-elevation areas, discharges of groundwater recharges streams (“base flow”) and feeds large springs along coastlines. Streams as well as nearshore waters can be directly affected by discharges of contaminated groundwater and might need to be included as part of a larger-scale, environmental investigation. Refer to publications by the U.S. Geological Survey and the University of Hawai`i for detailed information on surface water resources in specific areas of the islands.
Figure 6-1. Stream Flow Characteristics. A) Stream fed primarily by overland flow of rainfall with no direct connection to groundwater; B) Streams fed primarily by discharge of groundwater; C) Infiltration of stream water into subsurface during rainfall high stage; D) Temporary discharge of infiltrated water as stream level falls (low stage). [Source: USGS 2003]
Return to the Top of the Page
6.2.2 Groundwater
The islands of Hawai′i were and in the case of the Big Island are still being built by eruptions of mafic, normally basaltic lavas (Stearns, 1966, MacDonald et al., 1983). Basalts in low lying, shoreline areas of some islands are capped by up to 1,000’+ of marine sediment, alluvium and secondary volcanic formations.
Groundwater provides the majority of Hawaii’s domestic and commercial/industrial water use (USGS 2018a). Groundwater occurs in three distinct, geologic systems (Figure 6-2; (USGS 2000)): 1) Groundwater in fractured and porous basalt, 2) Groundwater in “caprock” marine and alluvial sediments that overlie the basal, basalt formation in some coastal areas of the islands and 3) Perched groundwater trapped above the normal water table by a localized, low permeability layer in rock or soil.
 Figure 6-2. Schematic of typical hydrogeology of Hawaiian Islands Source: USGS, 2000 |
6.2.2.1 Groundwater in Volcanic Formations
Groundwater in fractured basalt that makes up the core of the islands can extend over significant distances (Figure 6-2). Aquifers within these formations are highly productive and serve as a primary source of drinking water for many parts of the islands. The top of the groundwater is normally at or near sea level outside of dike complexes. This is often referred to as “basal” groundwater. Research has shown the interface between freshwater and saltwater units of groundwater to be characterized by alternating layers of fresh and saline water in both inland and offshore areas rather than the classic Ghyben-Herzberg lens of freshwater floating on saltwater depicted in Figure 6-2 (Attias et al., 2020).
Groundwater can also become trapped at high elevations within basalt formations due to the presence of near-impermeable, high-angle dike complexes (Figure 6-2). This type of groundwater is typically referred to as “high level” groundwater.
Much of the basal groundwater in Hawai`i is situated in viable aquifers that are typically unconfined except near the coast where the basal aquifer may be overlain and confined by sedimentary caprock. In these areas the basal water occurs under artesian conditions as it migrates seaward and becomes trapped under the overlying caprock formations. Springs of fresh groundwater from basal aquifers are common along the shoreline areas of the islands and may also occur offshore as submarine groundwater discharge.
6.2.2.2 Groundwater in Caprock Formations
Caprock formations tend to be more discontinuous and the groundwater brackish or less easily extracted due to low permeability. These formations are characterized by inter-bedded, unconsolidated, marine to alluvial clays, silts, sands, gravels and coralline sedimentary deposits with locally occurring layers of late-stage, volcanic tuff and basalt (Stearns and Vaksvik, 1935; Mink, 2006; Bauer, 1996; Hunt, 1996). Caprock formations can extend inland to elevations up to approximately 200 feet above current, mean sea level, reflecting past periods of higher sea stand.
Groundwater flow within caprock sediments can be highly complex due to small-scale variability in the permeability of geologic formations, which can be further complicated by tidal fluctuations. As a result, localized groundwater flow within a project area can differ dramatically from larger-scale groundwater flow patterns both spatially and temporally. This type of relatively complex hydrogeologic setting can complicate the accurate identification, characterization and monitoring of contaminant plumes within caprock formations.
Local confining conditions can exist in some areas of the caprock due to the presence of tight, clayey units. Artesian upwelling of trapped, caprock groundwater is sometimes encountered in construction projects that pierce overlying, impermeable layers of clays, tuffs or coral. This can cause unanticipated flooding during construction projects in shoreline areas or a mistaken belief that a subsurface water or sewer line has been accidentally ruptured.
6.2.2.3 Perched Groundwater
Isolated areas of perched groundwater above a basal aquifer are common in many areas, particularly where a thick cover of saprolite is present. Infiltrating groundwater in these areas can be trapped by localized layers of low-permeability, clayey or secondary volcanic units well above the water table of the basal aquifer.
Perched groundwater is typically not considered to be a drinking water resource, but leakage could in some cases pose a risk to deeper aquifers. Whether or not perched groundwater needs to be considered as part of a site characterization depends on the specific, potential environmental concerns under consideration.
Return to the Top of the Page
6.2.2.4 Groundwater Classification
Determining whether groundwater beneath a site is a current or potential source of drinking water is an important step in an environmental investigation. Classification of groundwater at site being investigated for potential contamination is used to select soil and groundwater Environmental Action Levels (EALs) in the HEER office Environmental Hazard Evaluation (EHE) guidance (see Section 13). In general, soil and groundwater action levels are more stringent for sites that threaten a potential source of drinking water. Action levels also consider the potential discharge of contaminated groundwater to surface water and aquatic habitats, regardless of utility as a potential drinking water resource.
Classification of groundwater as a current or potential source of drinking water is initially based on the location of the site with respect to Underground Injection Control (UIC) lines established for each island (HDOH 1992, 1995a; see also HDOH 2017 and updates). GIS-based maps that depict the location of the UIC for each island can be accessed on the HDOH Safe Drinking Water Branch website https://health.hawaii.gov/sdwb/underground-injection-control-program/.
Groundwater situated makai (oceanward) of the UIC line is generally considered to not be a potential source of drinking water due to high salinity, low permeability and production and/or historic contamination. The injection of industrial wastewater into groundwater in these areas is allowed under strict permit conditions.
Groundwater mauka (inland) of the UIC line is by default considered to be a potential source of drinking water unless otherwise noted. Refer to the Water Resources Research Center (WRRC) Aquifer Identification and Classification reports and other available geotechnical, hydrogeologic, and environmental reports to more closely determine the utility of the groundwater mauka of UIC line areas on a more site-specific basis for each island (Mink and Lau, 1990; 1990b; 1992; 1992b; 1993; 1993b); see also HDOH 2017 and updates).
Groundwater in low lying, coastal areas and geothermal fields often contains levels of dissolved solids that make the water unsuitable as a source of drinking water. In addition, the permeability of soils and sediments that lack a significant amount of coarse-grained material (or fractures, in the case of bedrock) could be too low to allow for an adequate, sustained yield of groundwater.
The utility of saturated units can also be considered on a site-specific basis. This can be especially important for groundwater in caprock formations situated mauka of the UIC line. The occurrence of groundwater does not necessarily indicate the presence of a viable aquifer that could be used as a source of drinking water. By definition, an aquifer is a saturated permeable geologic unit that can transmit significant quantities of water under ordinary hydraulic gradients (Freeze et al., 1979). Hydrogeologic criteria for inclusion of a given occurrence of groundwater as a potential source of drinking water typically include the following (after CalEPA, 2017).
- Total dissolved solids in groundwater is less than 3,000 milligrams per liter (mg/L); OR
- Water bearing unit is sufficiently permeable to produce an average, sustained yield of 200 gallons of water per day.
In general, unconsolidated geologic units that are comprised of less than 20% sand-size (or larger) material or more than 30% clay-size material are typically not considered to be viable aquifers or potential sources of useable groundwater (inferred from Fetter, 1994).
Groundwater in the caprock units is generally shallow, unconfined and highly susceptible to contamination. Permeable carbonate units in some areas of thick, caprock sediment serve as aquifers for irrigation purposes (e.g., Ewa plain area on O`ahu). Natural recharge in many of these areas is often minimal and the resulting salinity is too high for the water to serve as a drinking water resource without treatment.
The majority of the groundwater encountered in caprock areas is otherwise not situated in a formation that could be considered a viable, potable aquifer, although it may be “ecologically important” due to its connection and discharge to nearby, aquatic habitats (see WRRC reports; see also Section 13; and HDOH 2017 EHE guidance).
Return to the Top of the Page
6.2.2.5 Fluctuation of Water Table
Groundwater in highly permeable formations in shoreline areas can fluctuate by as much as approximately one to two feet due to daily tidal conditions and possibly more during especially high perigean spring (King) tide conditions that occur several times each year. The water table in inland areas, particularly in caprock formations, can vary by several tens of feet between wet and dry seasons. It is important to recognize and plan for such variability in the design of monitoring wells.
Be aware that the concept of a “water table” is somewhat misleading. The upper surface of unconfined groundwater is rarely flat and a true “table,” as might be misperceived based on observations of monitoring wells. This would only be the case for highly permeable, coarse-grained material (e.g., coarse sand or coralline gravel). In other cases, the upper surface of the groundwater will be characterized by a complex maze of fingers of water that extends from the saturated zone upwards into the vadose zone. This is referred to as the “capillary zone” (Freeze et al., 1979; Fetter 1994).
An understanding of the nature of the capillary zone is especially important for investigations of groundwater in caprock sediments and fill material. The capillary zone can extend several feet upwards from the top of the saturated zone in clayey and silty formations. Fuels and other “light, non-aqueous-phase liquids (LNAPL)” released into the subsurface will disperse within this zone and become intermixed with the water. This can make in situ removal of the LNAPL difficult if not impossible and require consideration of alternative, remedial options. Localized differences in the permeability of the vadose zone and deeper units can also cause the direction of LNAPL product migration to vary dramatically from the direction of the underlying groundwater flow.
These distinctions are important to recognize for HEER Office projects, since the nature of the groundwater encountered guides assessment and identification of potential environmental concerns (Section 13), design of monitoring wells and the collection of representative samples. The clayey and silty nature of caprock sediments in some areas can also impede adequate development of monitoring wells and require filtering of samples prior to analysis (see Section 6.4.3). Requirements for installation and abandonment of monitoring wells in caprock units or in formations that are otherwise not viable aquifers are also less stringent than might be required for situations where the presence of a drinking water aquifer and potential contamination of this type of groundwater resource is a concern (Section 6.4.3).
Note that concentrations of lead, barium, chromium, copper, selenium, nickel and other moderately soluble metals in caprock groundwater are often observed to slightly exceed HEER Office EALs for chronic aquatic toxicity in the absence of any obvious, anthropologic source and even after filtering. This is most likely associated with naturally occurring, metal-enriched, fine-grained, volcanic-related units within the screened interval of the well rather than actual contamination.
In most cases the presence of elevated but naturally occurring metals in groundwater can be ignored and no further action is necessary. The discharge of significant volumes of such groundwater into a storm drain and surface water body during construction-related, dewatering activities should, however, be discussed with the HEER Office and might require an NPDES permit from the Clean Water Branch.
6.3 Sampling Plan Design
A site-specific Sampling and Analysis Plan (SAP) should be prepared in accordance with guidance provided in Section 3.0 prior to the collection of water samples. Formal submittal and review of an SAP for review and approval might or might not be required, depending on the status of the site in agency records and the relative risk posed to human health and the environment by known or suspected contamination. Formal oversight of an environmental investigation is normally only initiated once contamination above HDOH Environmental Action Levels (EALs) has been identified and reported or when significant contamination can be reasonably anticipated based on the history of the site (refer to Section 2). In these cases, the need for submittal and review of detailed SAPs for individual stages of a project should be discussed with the HDOH project manager.
Submittal of SAPs is not required for due diligence-related investigations carried out as part of a routine property transaction or for sites where contamination has otherwise not been previously identified. Reviews of workplans and investigation reports and concurrence on the absence of contamination that could pose a risk to human health and the environment is normally not provided unless contamination above HDOH EALs has been identified or was initially suspected and an investigation was required by the HEER Office. Reference to the HEER Office Technical Guidance Manual and informal discussions with HDOH staff can, however, help ensure that the data collected will be adequate to support conclusions and guide follow up work if contamination above HDOH EALs is identified.
Basic components of the sampling plan can include all or some of the following information, depending on the complexity of the project (refer to Section 3.0):
- Overview of site history;
- Determination of contaminants of potential concern (COPCs);
- Determination of potential, environmental concerns associated with targeted COPCs;
- Development of investigation questions designed to assess these concerns;’
- Designation of Decision Units (DUs) for sample collection;
- Proposals for collection of sample data representative of the targeted, investigation questions;
- Decision statements for follow-up actions based on data obtained.
It is important that adequate time (and budget) be allotted for preparation of a well-thought-out sampling plan. As discussed in Section 3.0, premature collection of sample data without a plan for how the data will be utilized can lead to confusion over the presence or absence of potential environmental concerns. Poor data collection methods can also result in unnecessary delays in future property development projects as well as legal problems for responsible parties and property owners.
6.4 Investigation Objectives and Decision Unit Designation
Refer to Section 3.2 for a detailed review of the systematic planning process for design of an environmental investigation. The establishment of clear, investigation objectives and questions is critical to the successful completion of a surface water or groundwater investigation. An initial step of this process is preparation of a Conceptual Site Model (CSM) that summarizes known or suspected site conditions. The CSM should serve as the basis for design of a sampling plan. This includes the designation of risk-based or remediation-based DUs for sample collection and characterization. Update the CSM as additional information and data are gathered and use the results to guide subsequent phases of the investigation.
6.4.1 Surface Water
6.4.1.1 Identify COPCs
Identify COPCs based on the known or suspected history of the targeted surface water body, existing data, and information regarding surrounding area land uses (Step 2 in Section 3.2.1). This can include information on recent or past spills of chemicals or other pollutants, discharges from industrial outfalls, runoff from stormwater, etc. A list of COPCs might not be restricted to actual chemicals. Be as specific as possible to the known or suspected contaminants released. Do not simply include a long list of contaminants that happen to be reported under a specific lab method. Suspected sediment is a primary COPC for dredging or construction projects. Bacteria are a common COPC for spills of wastewater or surface runoff following a high-rainfall event.
The investigation might be associated with general water quality concerns or one-time spill events. This should be discussed in the SAP and used to select the most appropriate sampling method for individual DUs.
Return to the Top of the Page
6.4.1.2 Investigation Questions and Objectives
Specify the general location and nature of areas where the collection of surface water sample data is required. These can include:
- Lakes and ponds;
- Rivers and streams;
- Estuaries;
- Lagoons and canals
- Harbors;
- Offshore, open water;
- Stormwater or wastewater discharge outfalls.
Specify the investigation questions and objectives for which representative sample data are needed. Example investigation questions include:
- “Does contamination pose a health risk or taste and odor concern to drinking water resources?”;
- “Does contamination pose an acute or chronic toxicity risk to aquatic flora and fauna?”; and
- “Does contamination pose potential food chain uptake and bioaccumulation risk for aquatic organisms used as a food source?”
Refer to Section 21 for an overview of aquatic habitats and flora and fauna associated with estuarine and marine environments and specific to Hawai′i. Consult with research published by the USGS, the University of Hawai′i and other local experts for information on freshwater environments.
These concerns are assessed by designating specific DUs of surface water for investigation and the collection of a sample(s) from each DU that is directly representative of the question being asked. The resulting data are compared to published action levels and regulatory standards or evaluated in a site-specific risk assessment.
The concurrent collection of a representative sample(s) of aquatic flora and/or fauna from the same DU might be required for some projects. Detailed guidance on this issue is beyond the current scope of this section of the HEER TGM and should be discussed with the overseeing project manager. Data should normally be collected in a manner reflective of Multi Increment sampling methods described for soil and sediment in Section 4. Preliminary field studies might be required to prepare a formal investigation plan and ensure the collection of data representative of the investigation questions being asked. The collection and analysis of “discrete” sample data is discouraged due to the inability to assess the representativeness and reproducibility of such types of sample data.
Return to the Top of the Page
6.4.1.3 Decision Unit Designation
Basis of DU Designation
Designate DUs at the scale or “resolution” necessary to answer the site investigation questions. A DU can be thought of as the volume of surface water that would be collected as a single “sample” and submitted to the laboratory for testing (refer to Section 3). In most cases this will not be possible due to the volume of water involved. A representative sample of the DU volume of water must instead be collected. Note that designation of DUs is independent of the method ultimately used to collect the sample. This step of the systematic planning is used to specifically identify the area and volume of surface water that forthcoming sample data will be required to represent.
DU designation will necessarily be a site-specific process that should be discussed with the overseeing regulatory agency. Factors that might be considered in the development of investigation questions and designation of DUs for surface water in include:
- Current or potential use of the water body as a source of drinking water;
- Type and location of specific, aquatic habitats;
- Characterization of dissolved-phase versus suspended contaminants;
- Location of recreational areas;
- Moving versus stagnant water;
- Vertical stratification;
- Tidal influences;
- Construction areas that could affect water quality (e.g., dredging);
- Stormwater or wastewater outfalls;
- Other known or suspected contaminant source areas;
- Temporal considerations including storm events and seasonable variability.
The designation of DUs for sample collection can seem complex. Start by considering the entire water body as a single, lateral and vertical DU. This might be appropriate, for example, for characterization of a drinking water resource with no known or suspected sources of localized contamination. In cases where contamination has been identified or is suspected, however, isolation of suspect source areas through designation and testing of smaller DUs will be necessary to assist in the design of remedial actions. Develop initial investigation questions and divide the total area into smaller DUs accordingly, until sample data to be provided will adequately address the questions being asked.
Decision Units are often designated to reflect fixed areas of surface water, for example the boundaries of all or portions of a lake or stream or a specified swimming area associated with a beach or the vicinity of where a feature such as a swale, ditch, or pipe outfall discharges into the surface water body. Such scenarios normally reflect the designation of geographic, Exposure Area DUs to assess risk to specified receptors.
In other cases, a DU might be designated for a moving body of water that needs to be monitored over time. Examples include a volume of silt- or bacteria-laden water or otherwise contaminated water moving down a stream, along a beach front or into open water. These examples represent special case of a mobile, Source Area DUs. Identification and tracking of DUs in motion can be challenging and might require the use of buoys, dyes or other methods. Lateral and/or vertical boundaries of DU boundaries can change over time and should be documented. Development of well-thought-out investigation questions and decision statements is especially important in order to ensure that prompt and appropriate actions are taken when conditions within the DU volume of water change or the water moves into a more sensitive area.
Exposure Area DUs
Exposure Area DUs assess the risk posed to a receptor exposed to a specified area and volume of surface water (see
Section 3.4.2). For example, the investigation question might be “Does the mean bacteria count in the subject, surface water body (e.g., public beach) exceed a level that could pose a risk to recreational users?” A single or multiple DUs might be designated based on features such as distinct swimming or play areas, stormwater entry areas and water depth. The targeted depth interval of the DUs might be designated based on anticipated zones of highest contact or highest bacteria impact. Boundary DU areas can be designated to help isolate areas of particularly high bacteria count and optimize remedial actions and further monitoring.
In the example depicted in Figure 6-3, the 1,250-meter beach was initially divided into five, 250-meter long Exposure Area DU areas based on the range that park users were observed to play and swim. The beach was further divided into shallow, wading area DUs frequented by young children and deeper DU areas used by older children and adults for swimming, for a total of 10 DU areas for testing.
Return to the Top of the Page
Figure 6-3. Example designation of shallow, shoreline DUs (SDUs) and deep, swimming area DUs (DDUs) for assessment of bacteria along a public beach (for example only).
A vertical, targeted DU interval of 0-25 centimeters was designated based on the depth that waders and swimmers were assumed to potentially ingest small amounts of water. The investigation question can now be specifically presented as “Does the mean bacteria count for the total volume of water within a designated DU exceed the targeted action level?”
In the above example, each shallow area DU contains approximately 2,000 cubic meters of water. Each deep area DU contains approximately 4,000 cubic meters of water. The objective is again to estimate the mean bacteria count for each DU volume of water as a whole. The objective is not to determine if a single, “discrete” mouthful of water within any given DU exceeds the bacteria count action level. That is a different investigation question and would require that every potential mouthful of water within the beach area be designated as a DU. A completely different, sampling strategy and data collection would be required since individual testing of millions of DUs would not be practical (e.g., 59 mouthful-size DUs tested for 95% confidence that 95% of the total DUs do not exceed a target action level;
Section 3.4.8). This is unlikely to be practical or necessary under most circumstances.
Spill (Source) Area DUs
If localized areas of contamination that could cause the entire, purely risk-based DU to fail action levels are known or suspected, then characterization should be carried out in a manner that helps to isolate the boundaries of such areas and optimize remediation. In such cases, begin subdividing the water body into multiple, smaller DUs until the resulting data will satisfactorily answer both risk- and remediation-based investigation questions. Exclude areas that are not pertinent to the investigation questions.
As one example, a common surface water investigation scenario in Hawai`i is the need to monitor sediment discharge and turbidity associated with construction or dredging projects in canals, harbors and other coastal areas (Figure 6-4; HDOH 2015a,b). Silt curtains are commonly placed at the margins of the work area in order to minimize the escape of suspended sediment to outside areas. The investigation question might be “Does the concentration of total suspended solids within one-meter of the outside edge of the silt curtain exceed permitted levels?”
In this example, a series of one-meter wide DUs are designated adjacent to the outside face of the silt curtain. The length and depth of individual DUs is based on the location of work activities, water flow direction within and outside of the curtain, location of sensitive, aquatic habitat areas, etc. (see Figure 6-4). A single DU might extend from the top to the bottom of the surface water body or a partial distance downward. Multiple, vertically stacked DUs, might be desired to provide greater resolution of suspended sediment stratification. These and similar details should be discussed with the overseeing regulatory agency as well as the entity carrying out the actual project.
Note that DUs designated under such field scenarios might be geographically fixed, as in the example discussed, or mobile. In case of the latter, an area of silt-laden water that has moved away from the dredge area might need to be tracked and monitored over time until turbidity has reached an acceptable level or to prepare remedial actions and minimize damage to sensitive, downstream (current) areas. The same could be true for tracking of releases of oil or other contaminants to a body of surface water.
Return to the Top of the Page
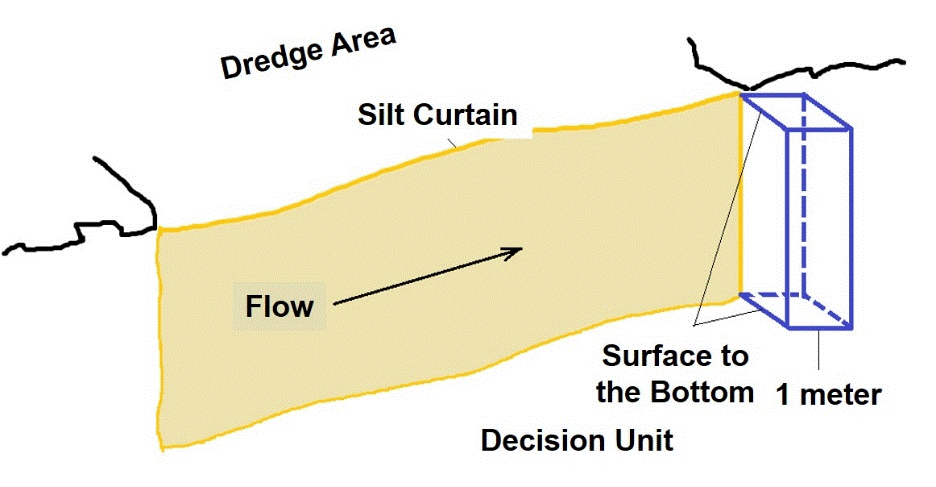
Figure 6-4. Designation of surface water DU outside of a silt curtain for monitoring of dredging turbidity. Top: No- or low-flow conditions; Bottom: Flow conditions.
Return to the Top of the Page
6.4.2 Groundwater
6.4.2.1 Identify COPCs
Identify COPCs based on the known or suspected history of the project site and existing data (Step 2 in
Section 3.2.1). This can include information on past and current industrial activity, chemicals used or stored at the site, interviews and records of recent or past spills, etc. List specific COPCs known or suspected to be present at the site and state why the chemicals were selected. Do not simply list chemicals associated with specific laboratory methods that will be utilized to test samples collected at the site.
Return to the Top of the Page
6.4.2.2 Investigation Questions and Objectives
Summarize the hydrogeologic setting and general nature of the groundwater under investigation (refer to Section 6.2 and Section 2 of the HDOH EHE guidance; HDOH 2017). Factors to consider include:
- Caprock or basal groundwater;
- Current or potential source of drinking water;
- Depth below ground surface;
- Subsurface stratigraphy;
- Proximity to existing potable water supply wells, underground injection wells. and offsite monitoring wells;
- Proximity to a surface water body or storm water drains that might be connected to groundwater;
- Proximity to overlying buildings that could be impacted by emitted vapors (contamination with VOCs only).
Specify the investigation questions and objectives for which representative sample data are needed. Example investigation questions include:
- “Does the contamination pose a health risk or taste and odor concern to drinking water resources?”;
- “Does the contamination pose a toxicity risk or nuisance concerns to aquatic habitats in nearby surface water bodies (e.g., due to natural or human-induced offsite migration of the groundwater)?”;
- “Do vapor emissions pose a risk to indoor air in existing or future buildings?”; and
- “Is the groundwater otherwise contaminated to levels that could pose short-term risks (e.g., strong vapors emitted from exposed, free product) or general management problems during planned or future construction work?”
The latter issue will often be an important, environmental concern in highly developed, urban areas where shallow groundwater (e.g., <25 feet bgs) could be encountered during subsurface utility or construction activities. This is particularly a problem for areas of widespread, petroleum contamination associated with leaking pipelines and above or underground fuel storage tanks.
Return to the Top of the Page
6.4.2.3 Decision Unit Designation
Basis of DU Designation
Designate and discuss DUs for the proposed groundwater investigation. DUs are designated to assess risk or isolate areas of contamination and optimize remedial efforts ( Section 3). Examples of both for groundwater are given below.
The concept of a “Decision Unit” is fundamental to the design of a sampling plan and understanding the representativeness and limitations of the resulting data. Similar to the investigation of surface water, a DU can be thought of as the volume of the entire portion of the body of groundwater under investigation that would be collected and submitted to the laboratory as a single sample for analysis, if feasible (refer to Section 3.0). Because this will never be possible, a representative sample of the targeted DU volume of groundwater must be collected. The DU volume of groundwater directly represented by sample data is restricted to groundwater that was in the immediate vicinity of the monitoring well location and accessible for possible inclusion in the sample during collection.
Examples of DU concepts for groundwater are provided below. Discussions of “Exposure Volume DUs” and “Source Area DUs” are largely hypothetical and will be further developed as experience is gained. The ideas presented are intended to encourage discussion on the collection of sample data more representative of the investigation questions being asked. The approaches discussed do not need to be incorporated into groundwater investigation workplans unless deemed useful by the responsible party and their consultant or directed by the HEER Office project manager. Reliance on large-scale extrapolation of data representative of individual, “Exploratory Monitoring Well DUs” as discussed at the end of this section will continue to be the norm in most cases until more practical approaches for the larger-scale investigation of risk- and remediation-based groundwater DUs is developed.
Keep in mind that, as is the case for soil, risk-based action levels used to identify potential environmental concerns apply to the mean concentration of the contaminant for relatively large, DU volumes of water. Although a common practice in the environmental industry, action levels do not directly apply to individual, small volumes of water typically submitted to a laboratory for testing. When use of data only directly representative of sub-DU volumes of water is required as will often be the case (see Exploratory Monitoring Well DUs), uncertainty in representativeness of the investigation question being asked and limitations in use of the data for final decision making should be noted.
Exposure Volume DUs
Assessment of drinking water toxicity or toxicity to aquatic habits requires designation of “Exposure Volume” groundwater DUs. Exposure to contaminants in groundwater typically focuses on two pathways – use of the groundwater as a source of drinking water and intrusion of volatile chemicals emitted from the groundwater into overlying buildings. Other pathways that could require evaluation on a case-specific basis include the use of groundwater for irrigation of food crops or use as a water supply for livestock or the need to assess the potential impact of shallow DNAPL on deeper aquifers if a well is installed in the area.
In the latter case, a relatively thin layer (e.g., 25cm) at the top of the water table should be designated as a “Vapor Intrusion DU.” The size of the DU area should be appropriate for the overlying building footprint and design (default 100 m²; refer to Section 13.2 and Volume 2, Appendix 1 of HDOH EHE guidance – HDOH 2017). A representative sample(s) of soil vapor from the DU is more appropriate to assessment of potential vapor emissions and vapor intrusion risks to overlying buildings. Collection of soil vapor samples is recommended if a groundwater action level for potential vapor intrusion concerns approached or exceeded or if free product is present at the top of the water table (refer to Section 7). If contamination is related to a release of hydrocarbons, then collection of soil vapor samples and testing for Total Petroleum Hydrocarbons (TPH) is also required, since action levels for TPH in groundwater are not available (see Section 7.13).
If a drinking water resource has been impacted, then an investigation should be carried out to assess the health risk posed by the contaminant of potential concern. For example, the investigation question asked by the risk assessor might be “What is the mean concentration of the targeted contaminant(s) in drinking water to be produced from the targeted well over the next six years (assessment of noncancer hazard) or 30 years (assessment of cancer risk)?” The collection of multiple rounds of soil vapor data to assess VOC concentrations over time might be necessary to fully answer this question, especially in cases where initial data suggest concentrations just under levels that would require some type of remedial action. This should be discussed with the HEER Office project manager on a case-specific basis.
This can be thought of as an “Exposure Volume DU,” similar to the concept of an “Exposure Area DU” for assessment of risk associated with exposure to contaminated soil (Section 3.4.2). The corresponding volumes of groundwater for which the sample data should be representative of are very large. Assuming a minimum, sustainable pumping rate of approximately 750 liters (200 gallons) per day (Section 6.2), this equates to Exposure Volume DU volume of over 438,000 gallons (approximately 1,700 m³) for assessment of noncancer health risk and 2,200,000 gallons (approximately 8,000 m³) for assessment of cancer risk. This is also similar to the average volume of water used by a family of 3-4 per day over the targeted exposure duration. It is the task of the environmental field team to collect sample data that are as representative of these targeted, DU volumes of groundwater possible.
Several approaches could be taken. Under ideal circumstances, the volume of groundwater to be produced by the well over the next six to 30 years would be identified and a sufficient number of wells installed to collect a single, representative sample of this groundwater. The concentration of the targeted contaminant would then be compared to the appropriate, risk-based action level.
In practice, this is unlikely to be technically or economically feasible. As an alternative, the entire, DU volume of groundwater could be pumped from the well, placed in a large storage tank, and a single, representative sample collected and tested. This is again unlikely to be practical given the large volumes of water involved.
The third and currently most achievable alternative, is to collect a sample representative of a much smaller volume of groundwater directly from the well and assume that the sample is reasonably representative of groundwater within the nearby capture zone. An effort should be made to collect data that directly represent as large a volume of water as possible. The longer the time period represented by the volume of water tested the better. For example, the minimum volume of water produced by the well in a single day – 750 liters (200 gallons), could be pumped into a holding tank for testing.
The resulting data would be more directly applicable in terms of assessment of drinking water risk than the collection and testing of the minimum volume of water required for testing by the laboratory (e.g., 40 ml to 1 liter). Excess water can be re-infiltrated into the area where the sample was collected or otherwise disposed of in the same manner as described for management of excess purge water in Section 6.6.5.8.
While a significant improvement over current, discrete/small0-volume sampling methods in terms of data representativeness, the implementation of such approaches is limited due to both logistical and cost constraints. Decontamination of large holding containers in order to prevent potential carry over from one well or site to another would be difficult. Storage space for active sites with multiple wells is often very limited (e.g., an active gas station). Offsite recycling/disposal costs can run several dollars a gallon.
The collection of only the minimum volume of water required by the laboratory for testing will continue to be necessary in most cases. The limitations of the data should be noted, however, and the cost-benefit of obtaining data that directly represent more representative, larger volumes of water evaluated. This can become especially important when concentrations of contaminants in drinking water begin to approach action levels or when expensive remedial actions are recommended.
Similar, site-specific, risk-based DU volumes of groundwater that pose an aquatic toxicity risk to nearby surface water bodies or a vapor intrusion risk to the indoor air of overlying buildings could in theory be designated for testing. The thickness of the plume discharging into a surface water body will be an important factor in the former, while the aerial extent of the plume will be an important factor in the latter. Targeted DU volumes of groundwater could also be designated for testing and optimization or confirmation of remedial actions. Properly used and interpreted, passive samplers can also be used to provide data for larger volume of water over time (refer to Section 6.6.7.5.
Remedial Optimization DUs
Source (“Spill”) Area DUs are designated based on known or suspect release areas (see Section 3.4.3). Single, or multiple upgradient, cross-gradient and downgradient Boundary DUs of groundwater anticipated to meet target action levels are then designated for testing.
For example, Figure 5 depicts a gas station where a release to groundwater from the underground storage tanks (USTs) and the dispenser area is suspected. The area encompassing the USTs and dispensers is designated as a single Source Area DU. This area of groundwater is anticipated to have the highest probability of contamination above action levels (depicted in orange on figures). This area is surrounded by two rings of Boundary (“Perimeter”) DU locations for the installation of monitoring wells (see Section 3.4.5). The area/volume of groundwater depicted in yellow is anticipated to be contaminated but at a mean concentration below applicable action levels. Detectable levels of petroleum are not anticipated in the area/volume of groundwater depicted in blue. This initial CSM will be updated as data are collected.
Return to the Top of the Page
A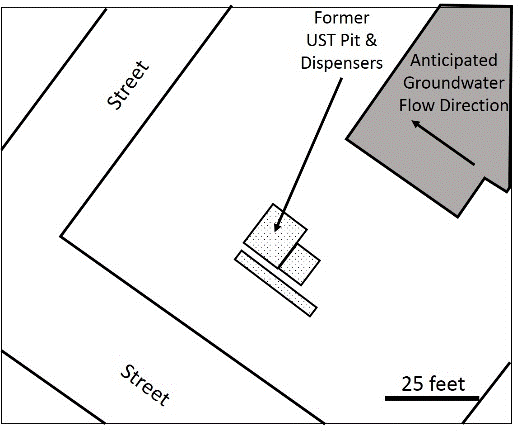 |
B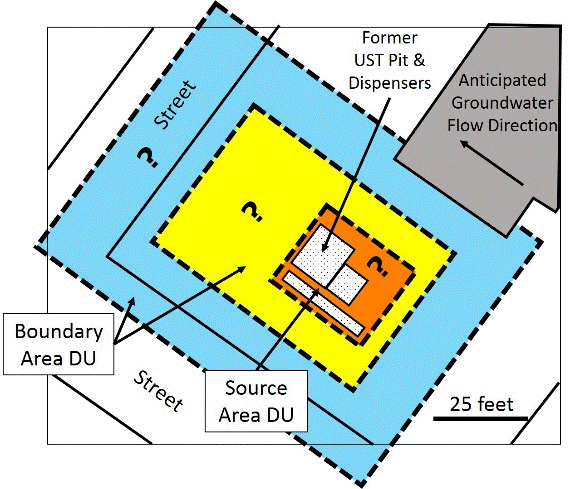 |
C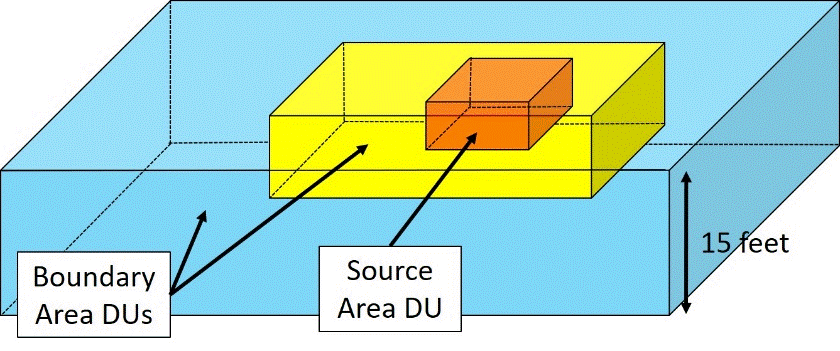 |
|
Figure 6-5. Designation of Decision Units for characterization of groundwater. A) Gas station layout; B) Designation of Source Area DU (orange) and Boundary Area DUs (yellow, blue); C) Depiction of vertical DU depth intervals (for example only; depth intervals site-specific).
Designation of the specific depth interval of the DU for characterization is critical for proper characterization of groundwater impacts (USEPA 2002b). This will ultimately guide the length and placement of screens in wells for the collection of groundwater samples.
Designation of DU intervals should be based on the environmental concerns of interest and other, site-specific factors including the stratigraphy of the formation holding the groundwater, location of subsurface conduits such as storm sewers or other utility trenches and the nature of the contaminant released (e.g., dissolved in wastewater, light or dense non-aqueous liquid, etc.).
The maximum area and volume of the groundwater formation DUs for which a mean is calculated should be discussed with remediation experts and the overseeing regulatory agency. Similar discussions typically guide the number of placement of monitoring wells in traditional investigations. For example, testing of multiple DU depth intervals is normally required to identify the vertical extent of groundwater contaminated above drinking water action levels when a currently used drinking water aquifer is impacted. Initial designation of only the upper few meters of impacted groundwater for characterization might be adequate, however, to assess potential impacts to nearby, surface water bodies and aquatic habitats due to known or potential offsite migration of the plume.
A greater lateral and/or vertical resolution of groundwater contamination might be required for optimization of remedial actions (i.e., larger number of DUs and narrower depth intervals). Information regarding known or suspected source zones, subsurface soil type and stratigraphy and data from membrane interface probes, in situ strings of passive diffusion bags or closely spaced, preliminary grab samples can be especially useful for identification of high-concentration source zones and designation of DU intervals for targeted treatment and monitoring.
These types of considerations should be discussed in the SAP and used to support the designation of DU intervals of a groundwater formation for targeted sample collection. This information should then be used to specify the placement of well screens within the boring for the collection of water samples.
Return to the Top of the Page
Exploratory Monitoring Well DUs
Collection of a single, representative, Multi Increment-type sample from a large number of points within a targeted DU area and volume of groundwater will not be practical in many if not most cases due to logistical and cost limitations. Research on the number of points (increments) necessary to reliably capture and represent small-scale variability within a DU is also lacking. As an alternative, continued reliance on sample data collected for individual well points will be necessary.
These are referred to as “Exploratory Monitoring Wells” for use in this guidance document. This is similar in concept to the use of s “Exploratory Borings” for initial approximation of the extent and magnitude of contaminated, subsurface soil (refer to Section 3.4.4). Be aware that in most cases this type of “discrete sample” data collection will lead to an underestimate of the extent and magnitude of contamination actually present (refer to Section 4.1 and Section 4.3). The field worker must work with the risk assessor and/or the remediation expert to ensure that data for samples collected from a well are adequate to address the investigation questions being asked and that limitations in data reliability are fully understood.
This of course is also reflective of reliance on traditional groundwater sample data from individual monitoring wells. In such cases, the actual “DU” upon which decisions will be made is the volume of groundwater in the immediate proximity of the well for samples collected after purging and within the well itself for no-purge samples. Emphasis is, however, placed on the designation of well-thought-out intervals of groundwater that samples collected from a well are intended to represent (Section 6.6). Decisions must also be made on whether to include or filter out suspected sediment and other particles in the DU volume of groundwater (Section 6.4.3), similar to the need to sieve soil samples to a targeted particle size (Step 4 in Systematic Planning process; refer to Section 3.2.1 and Section 4.2.6.3).
Referring to the above example, nine “exploratory” monitoring wells were installed in each of the hypothetical service station DU areas described previously (Figure 6-6a). The wells were to be used to identify the presence or absence of free product on top of the water table and to assess the magnitude of contamination within the upper five feet of groundwater (latter assumed to be most heavily impacted). Data regarding these investigation objectives will be used to evaluate the need to collect soil vapor samples (e.g., to assess vapor intrusion risk if free product present) as well as initial design of remedial actions. If this an older, full service station with a used oil UST is being investigated, then it might also be appropriate to install deeper borings to determine if DNAPL is present at the base of the shallow aquifer.
A single groundwater sample was collected from the top of the water table to a depth of 5 feet (1.5 meters). The results of the sample data are noted in Figure 6-6c. The small dots represented by each well represent the true resolution of the sample data, since each sample was collected from a discrete location rather than throughout each DU.
Return to the Top of the Page
A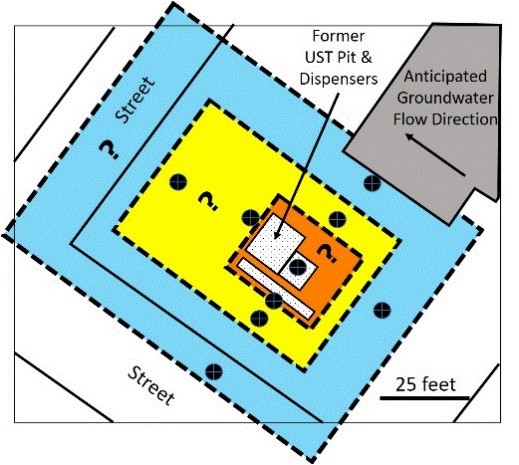 |
B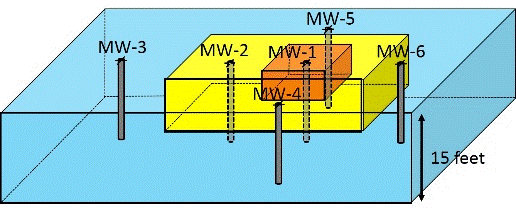 |
C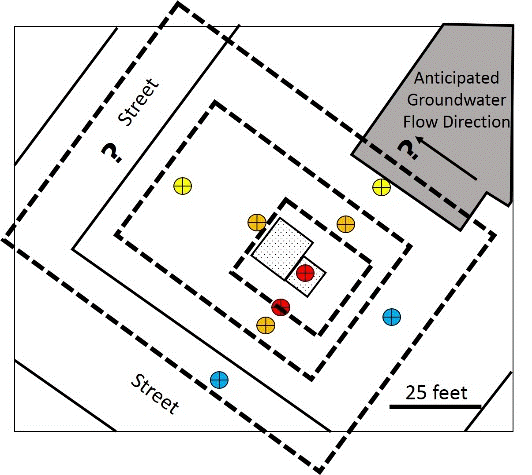 |
D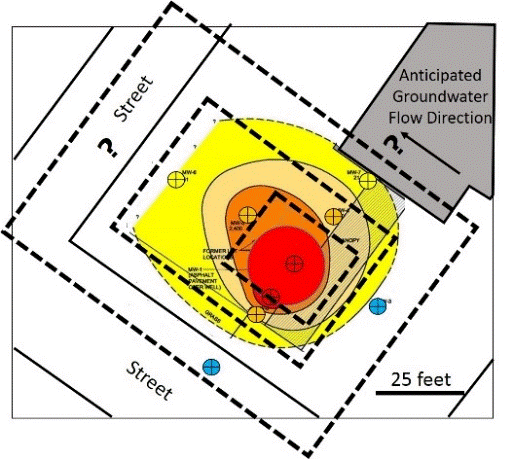 |
Figure 6-6. Installation of monitor wells in DU areas and collection of “discrete” groundwater samples from each well. A) Location of monitoring wells within DU areas; B) Exploratory Monitoring Wells used to approximately extent and magnitude of contaminated groundwater; C) Monitoring well sample data (red=>2X action level; yellow=> action level; C=< action level; D) Use of isoconcentration mapping program to estimate extent and magnitude of groundwater plume.
An isoconcentration mapping program was used to predict concentration trends between individual wells and large-scale patterns of contaminant distribution within the plume (Figure 6-6c). Note that all contour lines presented on isoconcentration maps should be dashed to indicate limitations in the data. The accuracy of isoconcentration maps based on data from individual, “exploratory” monitoring well is limited by two critical assumptions: 1) Data for an individual point (e.g., monitoring well) are reasonably representative of the immediately surrounding groundwater and 2) The trend of contaminant concentrations between sample points is linear.
This challenges the traditional approach of using solid lines for contours within two wells and dashed lines outside of points with known concentrations to distinguish between inferred and “known” concentrations. Note that all contours on Figure 6-6c (taken from an actual report) are not dashed. Only the one outside contour is dashed, which is consistent with the more traditional approach.
While large-scale patterns generated by such programs might be reasonably accurate, these factors can result in inaccurate concentration trends individual wells and false, small-scale patterns around individual wells (refer to Brewer et al. 2017b). This can lead to significant errors in the assessment of risk as well as in the design of remedial actions. Such limitations should be discussed in the report and incorporated into the EHE and design of any proposed remedial actions.
Note that the standalone use of groundwater data to estimate total contaminant mass can be highly unreliable since the majority of the mass is likely to be sorbed to or diffused into soil particles. This is true even for solvents. The collection and use of Multi Increment soil sample data is recommended for cases where in situ treatment of contamination is being considered in order to optimize design of the remedial action.
6.4.3 Filtering of Water Samples
6.4.3.1 Filtering Rationale
Specify the inclusion or exclusion of suspended sediment in groundwater as part of the surface water or groundwater investigation question and DU designation process. This is similar to the need to consider particle size in the designation of DUs for soil or sediment (Step 4 in Systematic Planning Process; Section 3.2.1).
Filtration is used to remove particles from a water sample that are not part of the targeted, Decision Unit of water under investigation (ASTM 2018). This is similar to sieving of soil and sediment samples to remove large particles that are not part of the targeted soil fraction (e.g., >2mm particles). Note that groundwater action levels presented in the HDPH EHE guidance should be compared to dissolved-phase chemical concentrations unless instructed by the overseeing regulatory agency (Volume 1, Section 2.4.3; HDOH 2017).
For example, suspended sediment in surface water or groundwater would not be part of the DU for an investigation of dissolved-phase contaminants. This is generally the case for groundwater. Including the sediment in the sample could yield false, high levels of metals or highly sorbent organic compounds originally bound to the sediment to be stripped from the particles and erroneously reported as dissolved-phase contaminants. In other cases, for example investigations of stormwater runoff, turbidity (Total Suspended Solids) itself might be a targeted parameter of concern and filtering of samples prior to testing would not be appropriate.
The majority of the HEER Office EALs for groundwater are dissolved-phase contaminants (HDOH, 2017)WHICH ONE<link>. Filtering of samples is therefore acceptable (see exception for VOCs below). This can be especially important for samples to be tested for metals and other highly sorptive contaminants where the main mass of the chemical is likely to be attached to sediment particles rather than dissolved in the water. Testing without filtering or adding a preservative such as an acid prior to filtering can bias the reported concentration of dissolved-phased contaminants in the sample high and lead to erroneous conclusions of groundwater contamination.
The collection of non-turbid samples from surface water or groundwater monitoring wells installed in fine-grained soil and sediment might still be unavoidable and is common for projects located in areas underlain by fill material or caprock sediments. In such cases, consider filtering the sample in the field or laboratory prior to preservation and analysis. Filtering of samples should only be carried out for non-volatile contaminants, including metals, non-fumigant pesticides, PAHs, PCBs and TPH associated with non-volatile, residual fuels or fully degraded, lighter fuels. The filtering method used should be documented in the work plan and concurrence obtained from the HEER Office prior to field investigation.
Filtration should not be used to compensate for turbidity associated with poor well construction, development, purging or sample collection methods. Proper installation and development of wells can significantly reduce the turbidity of water samples, even when installed in relatively fine-grained soil (refer to Section 6.6.3). Redevelop or replace existing groundwater wells prone to siltation prior to sample collection. Low-flow purging and sampling techniques with dedicated pumps can help reduce resuspension or infiltration of fines from the surrounding formation. Avoid use of a bailer in cases where sediment is potentially present in the bottom of the well or be prepared to filter samples in the field if other sample collection tools are not available.
Return to the Top of the Page
6.4.3.2 Filtering Procedures
A detailed discussion of sample filtering methods is provided in the ASTM document Standard Guide for Field Filtration of Groundwater Samples (ASTM 2018a). Filtration methods can be divided into positive pressure filtration, where a sample is pushed through the filter and negative pressure (vacuum) filtration, where the sample is pulled through the filter. Positive pressure methods are preferred due to the potential for vacuum methods to aerate or otherwise alter the chemistry of the water sample.
Samples should be filtered immediately upon collection and prior to addition of a chemical preservative. Ensure use of the filter in accordance with the manufacturer’s instructions, including preconditioning to remove any residues or leachable material present. Ensure that the filter material will not absorb otherwise dissolved-phase contaminants or otherwise bias the sample data.
[Source: Aqua Merik, 2008]
A default, filter pore size of 0.45 micron is acceptable for projects unless otherwise determined appropriate for the project and approved by the HEER Office. These filters were originally designed to remove bacteria from water and are adequate for removal of most suspended, clay-size and greater particles from samples that would otherwise settle out of the sample over time. Use of a finer-mesh filter (e.g., 0.20 microns) is allowable in cases where the transport of colloidal material through a groundwater formation under natural, groundwater flow or pumping conditions is not of concern. This could be of concern for groundwater that is immediately adjacent to and discharging into a surface water body and should be discussed with the HEER Office project manager.
Select a filter apparatus made of an appropriate material that minimizes adsorption and loss of the targeted contaminants of concern from the sample (e.g., polyethylene, polypropylene or borosilicate glass). The filters are to be one-time use and disposable that have a laboratory certification available from the manufacturer.
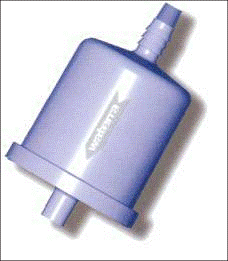
An example of an in-line filter used in the field for the collection of a water sample prior to preservation is illustrated in Figure 6-7. This filter type is typically used in the field collecting a filtered groundwater sample. An arrow on the body of the filter indicates the proper water flow direction.
6.4.3.3 Filtering for Metals
Groundwater samples to be tested for metals should be preserved, preferably using nitric acid to avoid precipitation of dissolved metals after filtration unless otherwise directed by the laboratory. Lowering the pH of an unfiltered sample by adding a preservative can dissolve metals bound to suspended particles and yield false, elevated levels of dissolved-phase metals. Samples to be analyzed for metals should therefore be filtered prior to preservation and analysis.
The proper preservation of filtered metals samples results in a pH lower than 2, which keeps the dissolved metals in solution.
In-situ groundwater is also often under-saturated relative to the oxygen concentration in air. The introduction of oxygen into a sample during filtering can result in an increase in the oxidation-reduction potential and cause originally dissolved-phase metals to precipitate. It is therefore important to avoid aeration of groundwater collected for metals analysis.
Return to the Top of the Page
6.4.3.4 Filtering for VOCs
Filtering is not normally allowed for samples to be tested for volatile chemicals due to potential off gassing as the sample is pushed through the filter. Volatile, organic chemicals are significantly less sorptive to soil particles than most non-volatile, organic chemicals. The main mass of the chemical present in the monitoring well water column is therefore likely to be dissolved in the water rather than adsorbed to particulate matter, negating the need for filtration. If turbid water is still believed to be biasing the sample data high then alternative methods of sample collection should be evaluated, including the use of passive diffusion samplers.
Return to the Top of the Page
6.5 Surface Water Sample Collection
Detailed guidance on the investigation of surface water has not yet been prepared by the HEER Office. A general overview of sampling plan considerations, Decision Unit designations and sample collection methods is provided below. Refer to surface water investigation guidance published by the HDOH Clean Water Branch for preparation of Applicable Monitoring and Assessment Plans (AMAP) provided in Attachment 1 in the interim (HDOH 2015a, b; and updates). Environmental investigation sites featuring adjoining surface water bodies may require the collection of surface water samples to assess environmental impacts. Well-thought-out Decision Units (DUs) should be designated for characterization and sample collection using a systematic planning approach similar to that discussed in Section 3Section 3. Select the sampling approach and sampling equipment based on the investigation questions and objectives, the type of surface water (e.g., flowing versus still), the sampling platform and the contaminant characteristics.
Return to the Top of the Page
6.5.1 Surface Water Sample Collection Methods
A surface water sample should be reliably representative of the targeted DU area and volume of water that it is collected from. Different strategies for the collection of a water sample (or samples) are described below. Collection of a single, Multi Increment-type sample that includes water from throughout the targeted DU is normally the reliable method to collect data representative of the investigation questions.
Laboratories only test a small, random volume of water from the samples submitted. Unlike soil and sediment, however, it is generally reasonable to assume that the data generated are representative of the sample submitted. Care must be taken, however, to include initially suspended particles in the subsample collected for analysis if these particles are to be included as part of the DU.
Return to the Top of the Page
6.5.1.1 Multi Increment-Type Samples
Multi Increment (MI) Sample collection methods should be combined with Decision Unit designation strategies whenever possible to characterize targeted surface water DUs. Triplicate samples should be collected from 10% of the DUs tested (minimum one set) in order to assess total sampling method precision (refer to Section 4.2.7).
Discussions of different sampling methods and tools are provided below. Isokinetic samplers are used to collect representative samples from moving water. These devices are designed to minimize changes in natural, water flow velocity as a sample is collected. Consider the use of an “Aloha Sampler™” type sampler for still water. Aloha Sampler™ is a trademark of EnviroStat, Inc.
Alternatively, collect individual “discrete” or “grab” increments of water in a systematic random fashion throughout the targeted DU and combine to prepare a final sample in a churn sampler. Maintain an approximate equal increment spacing both vertically and laterally, similar to the method used to collect increments from a soil DU (Section 4.2). Determine the total water volume needed to fill all the sample bottles and add at least 10% for filter losses etc.
The collection of replicate samples (triplicates) from 10% of the targeted DUs is recommended to tests the overall reproducibility and precision of the sampling method. Discuss optimal sample containers with the laboratory in order to minimize the introduction of contaminants into a sample or sorption of targeted contaminants to the container walls (see also (NJDEP 2005). Glass samplers are preferred for most contaminants. Bacteriological samples are normally collected in autoclaved plastic.
Return to the Top of the Page
6.5.1.2 Discrete Samples
Discrete samples, also refer to as “grab” or “point” samples, are small-volume of water (e.g., <1 liter) collected from a single location and single point in time. Discrete sample data are only directly representative of the actual sample of water collected. Such data are not normally appropriate to answer the types of investigation questions most commonly encountered in environmental studies overseen by HDOH, where the mean concentration of the targeted contaminant for the targeted area and volume of water as a whole is needed.
Sampling devices used to collect discrete water samples include bottles provided by the laboratory, bailers, dip samplers, Van Dorn samplers and Niskin bottle samplers. In shallow water collect the sample by submerging the closed sample containers by hand to the desired depth. Open the lid, let the container fill and replace the top, while the container remains at the sampling depth. Once the lid is in place remove the container from the water. In deeper water, lower the sampler to the target depth and trigger the closing mechanism.
It is possible that discrete sample data will be adequately representative of the dissolved-phase concentration of the contaminant of interest for a targeted DU area and volume of water as a whole. Random variability of suspended analytes of interest, including sediment load and bacteria, however, can introduce significant error into discrete sample data and lead to erroneous decision making.
If collected, the representativeness of discrete sample data with respect to the investigation objectives in question should be demonstrated on a site-specific basis. Consider the collection of co-located samples as well as replicate (triplicate) sets of samples in 10% of the DUs tested. Discuss the limitations of the data collected and measures taken to address these limitations.
Return to the Top of the Page
6.5.2 Surface Water Sample Collection Tools
Tools used to collect surface water samples should allow the collection of Multi Increment-type samples (i.e., sample composed of water from throughout the targeted DU) whenever possible. In general, isokinetic water samplers are used to collect a sample from water flowing faster than 1.5 to 2 feet per second. Non-isokinetic water samplers are used for all other surface water sampling applications.
In flowing water, always position the sampler upstream of any disturbance caused by sampling activities. In standing water deploy the sampler away from any disturbance caused by sampling. Avoid contact of sampling equipment with the bottom sediment. Deploy the samplers in a fashion that minimizes disturbance and suspension of sediments.
Return to the Top of the Page
6.5.2.1 Isokinetic Samplers
An example of this type of sampler is illustrated in Figure 6-8. Isokinetic samplers are used to collect a depth integrated, water sample continuously in a manner that ensures that the water approaching and entering the sampler intake does not change with respect to its normal velocity during sample collection. The sample is collected across a targeted depth interval of a stream while transiting the interval at a uniform
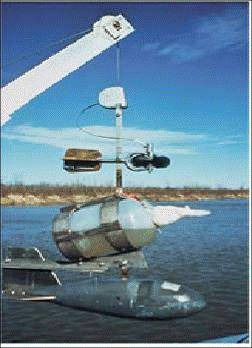
Constructed of Teflon.
[Source: USGS, 2008b]
rate.
An isokinetic sampler is constructed of a cap with a nozzle and a bottle or bag for sample collection. Fins are attached to the downstream end of the sampler, i.e. away from the nozzle, to keep the sampler aligned with the flow direction in the stream. Select the nozzle, cap and bottle material to be compatible with the contaminants of concern. Consult the manufacturer’s specifications for limitations on the use of each sampler. Refer to the USGS document Handbooks for Water-Resources Investigations—National Field Manual for the Collection of Water-Quality Data for more information on isokinetic samplers (USGS, 2002).
Isokinetic samplers are rated for their maximum allowable transit rate based on the stream velocity. Refer to the manufacturer’s rating to calculate the maximum allowable transit velocity. Use a lower than maximum transit velocity to ensure that a representative velocity-weighted sample is collected. Do not overfill the sampler bottle (USGS, 2002).
Return to the Top of the Page
6.5.2.2 Non-Isokinetic Samplers
The Aloha Sampler
“The Aloha Sampler ™ was developed as a tool for collecting Multi Increment samples of surface water (Figure 6-9; refer to Clean Water Branch guidance in Attachment 1). Aloha Sampler™ is a trademark of EnviroStat, Inc. The sampler consists of a standard one-liter, high density polyethylene (HDPE) sample bottle with two, quarter-inch holes drilled in the cap.
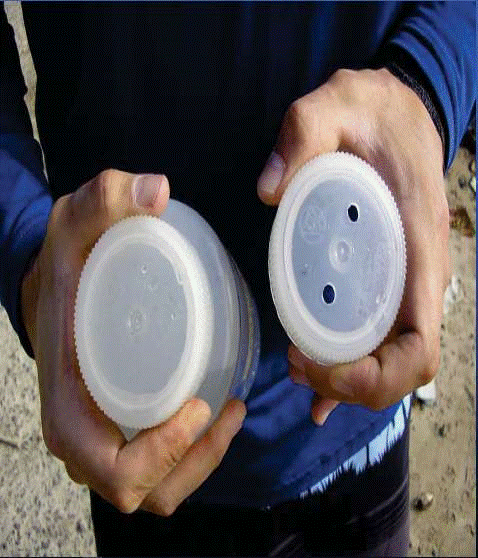
The bottle is immersed horizontally with the holes aligned vertically (one above the other). This arrangement allows for the bottle to fill slowly, approximately one minute to fill completely. The sampler must move the bottle throughout the entire DU during this time window. Care must be taken to ensure that the bottle is neither under-filled, nor completely filled before the entire DU is traversed.
Use of The Aloha Sampler or equivalent sampling device that allows the collection of a single sample from within the entire, surface water DU is recommended over other sampling methods described below.
Pond Sampler
The pond sampler may also be commonly referred to as a “Dipper”. The pond sampler consists of an arm or handle with a clamp to attach a sampling beaker. The construction materials vary and are selected to be compatible with the site contaminants. Pond samplers can be assembled from equipment found in swimming pool supply stores and laboratory supply stores (NJDEP, 2005).
Slowly submerge and retrieve the sampling beaker with minimal surface disturbance. Transfer the sample slowly into a laboratory supplied sample bottle, allowing the water to flow gently down the inside of the bottle. Avoid turbulence in the sample stream. Always collect samples for volatile and semi-volatile analyses first.
Wheaton Dip Sampler
The Wheaton Dip Sampler consists of a glass bottle mounted at the end of a metal pole of fixed length. The bottle lid is rigidly attached to a second metal pole, which is loosely attached to the main pole. The second pole is used to unscrew the bottle cap at the required sampling depth.
Use the Wheaton Dip Sampler to collect samples in shallow surface water. With the bottle cap closed, lower the sampler to the required depth and unscrew the bottle cap. Once the bottle is filled, (i.e. when no more bubbles reach the water surface) screw the bottle cap back on and retrieve the bottle.
Transfer the sample slowly into a laboratory supplied sample bottle, allowing the water to flow gently down the inside of the bottle. Avoid turbulence in the sample stream. Always collect samples for volatile and semi-volatile analyses first.
VanDorn Sampler & Niskin Bottle Sampler
The Van Dorn sampler and Niskin bottle sampler are cylindrical samplers closed with water-tight stoppers on both ends. An example Niskin bottler sampler is illustrated in Figure 6-10.The stoppers are connected through an elastic band that runs through the inside of the sample collection cylinder. The stoppers can be pulled out and locked to the outside of the cylinder, leaving both pipe openings unobstructed, which allows for water to enter the cylinder.
Return to the Top of the Page
Figure 6-10. Niskin Bottle Sampler. Sampler shown with the end stoppers open (left) prior to immersion in the surface water body and closed (right) following sample collection. [Source: General Oceanics, 2008]
After the sampler has been placed at the pre-determined sampling depth, the lock on the stoppers can be triggered to release, causing the stoppers to close. The elastic band pulls the stoppers into their seat and maintains the closed position to create a water-tight seal. A valve at the bottom of the cylinder together with a vent at the top are used to drain the samplers while the stoppers remain in the closed position.
These samplers are commonly deployed from a boat. The Van Dorn sampler must be suspended on a dedicated line, while the Niskin bottles may be attached in series on a line and the closing mechanism triggered with auxiliary messengers.
Open the samplers and suspend them on a line to the sampling depth. Trigger the closing mechanism and retrieve the sampler. Transfer the sample slowly from the sampler drain valve into a laboratory supplied sample bottle, allowing the water to flow gently down the inside of the bottle. Avoid turbulence in the sample stream. Always collect samples for volatile and semi-volatile analyses first.
VOC Sampler
The VOC sampler has been manufactured for the USGS and is used to collect open water samples for volatile organic compound analysis (Figure 6-11). The device has been tested in the laboratory and field for analyte loss, reproducibility and cross contamination. The sampler is constructed of stainless steel and copper and consists of a cylinder that holds four 40-milliliter VOA (volatile organic analysis) vials. Filling tubes extend from the sampler lid into the bottom of the vials.
Return to the Top of the Page
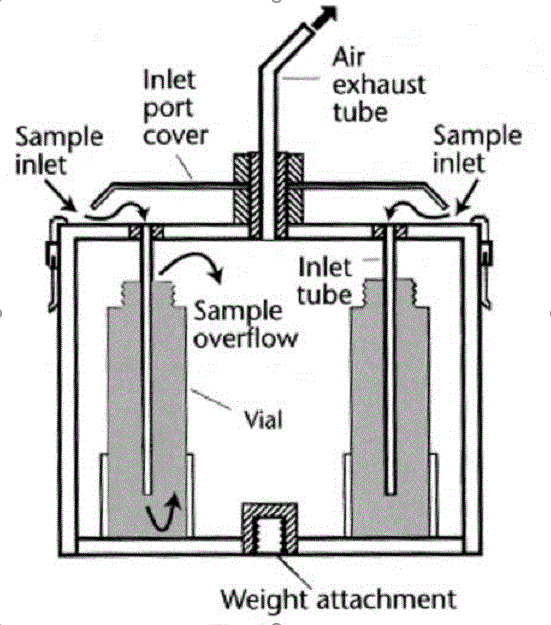
Figure 6-11. VOC sampler. Sampler contains 40-mL glass septum vials. [Source: Rickly, 2008]
When the sampler is lowered into water, the vials start to fill. The vials overflow into the inside of the cylinder, which has sufficient volume to let the vials overflow by seven times their volume. This allows sufficient time (i.e. 3 to 4 minutes) to lower the sampler to the required sampling depth. A cover over the inlet ports prevents contamination by surface oil and debris (NJDEP, 2005). It is important to evacuate air and other gases from the sampler prior to sample collection. Close and remove the vials from the sampler immediately upon retrieval.
Double Check Valve Bailers
A double check valve bailer is a cylinder that is equipped with a check valve on both ends. Both check valves are designed to open as the bailer is lowered into water and to close when it is retrieved.
Dedicate the bailer to one sample location, when feasible. Suspend the bailer on rope to the selected sampling depth and then retrieve. Do not use the bailer for sampling air sensitive parameters (NJDEP, 2005). Transfer the sample slowly from the sampler drain valve into a laboratory supplied sample bottle, allowing the water to flow gently down the inside of the bottle. Avoid turbulence in the sample stream. Always collect samples for volatile and semi-volatile analyses first. Use a bottom emptying device with flow control when the bailer is used to collect water for volatile analysis.
Churn Splitter
Individual (“grab”) increments of surface water can be combined into a single sample using a churn splitter (Figure 6-12; USGS, 2002). A churn splitter is an 8 or 14-liter plastic container equipped with a churning paddle and a drain valve. Subsamples can be collected from the container and submitted for analysis.
Return to the Top of the Page
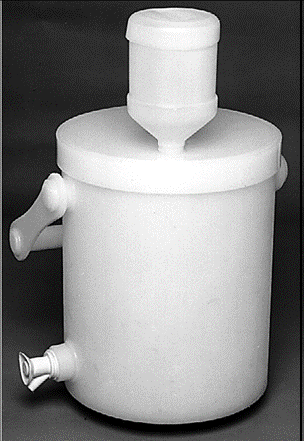 |
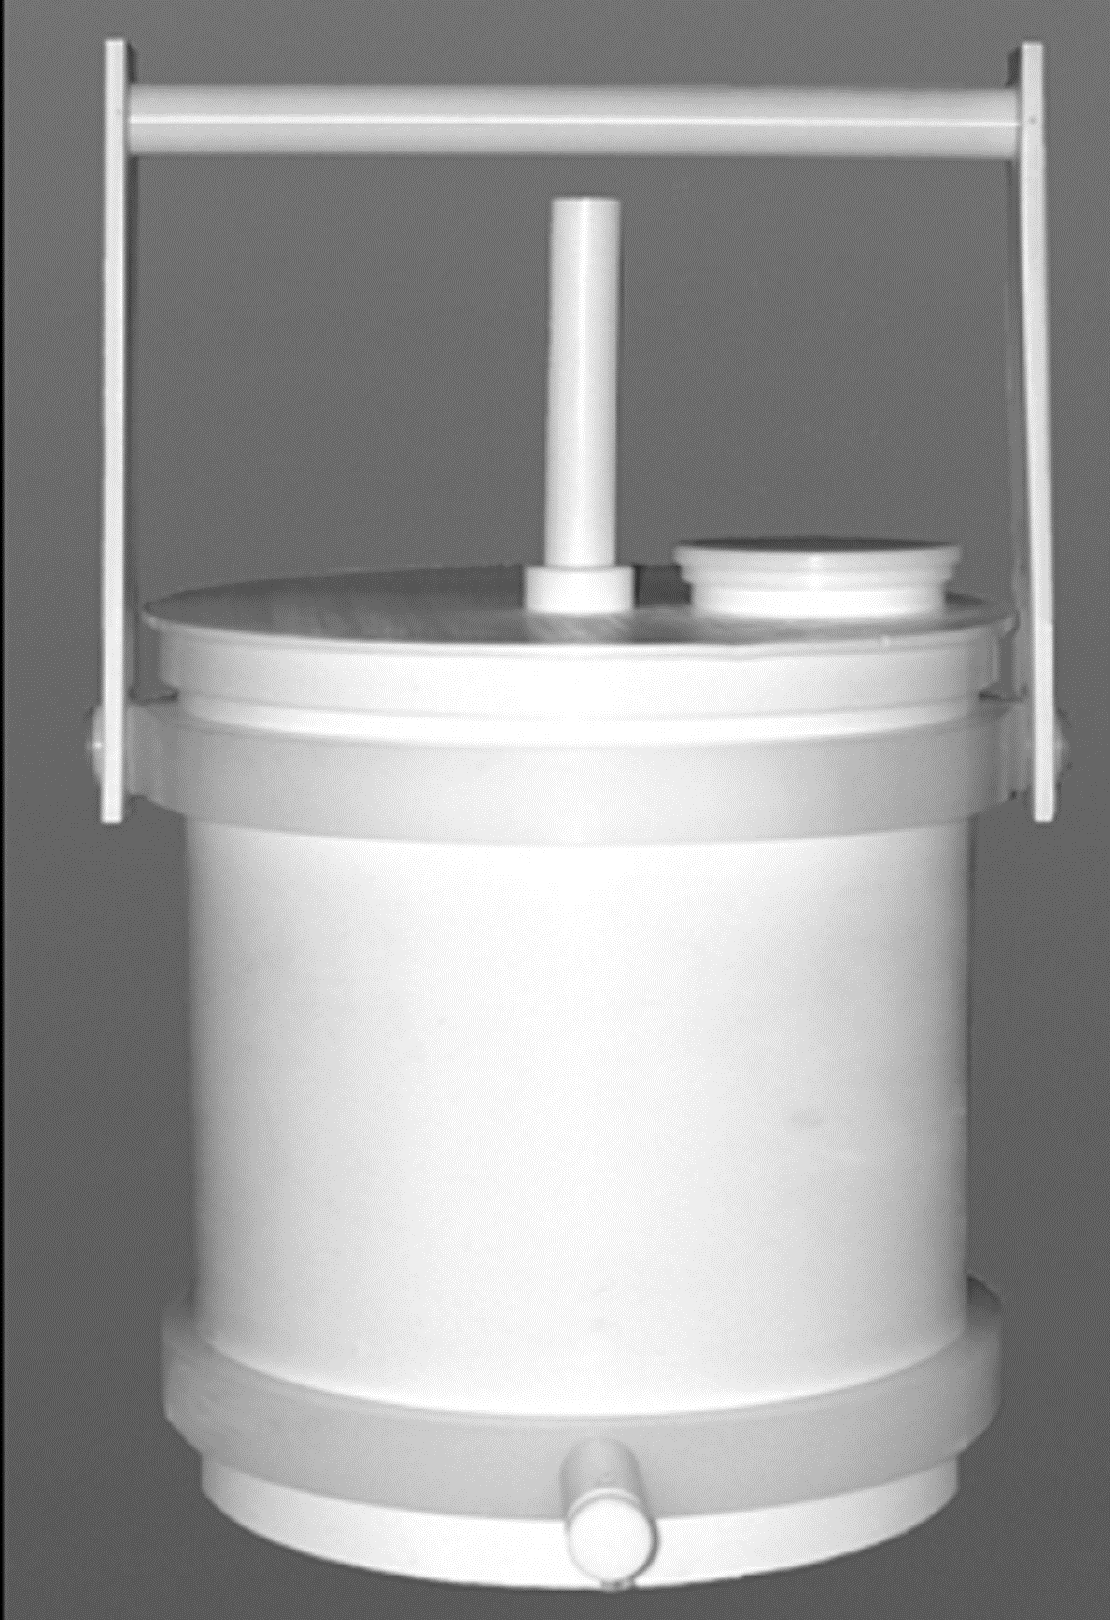 |
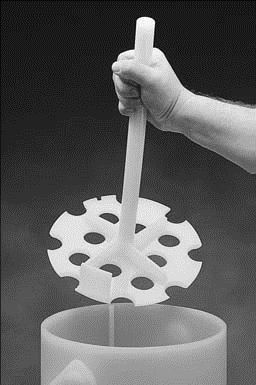 |
Figure 6-12. Plastic Churn Splitter (left) and Fluoropolymer Churn Splitter (middle) with churn paddle (right).
Churn splitters are especially useful for the collection of representative subsamples from turbid water and testing of unfiltered samples. In such cases, collection of a minimum, 4-liter volume of water is recommended. Use a single container collection container to collect all increments in order to minimize the loss of sediment during transfer to the churn splitter (remaining sediment flushed into container with next increment).
When all increments have been collected, mix the sample in the container by slowly raising and lowering the churn paddle. The paddle should touch the bottom of the container on each stroke and come as close to the top as possible without breaking the surface.
Decontaminate the churn splitter between samples using a triple-wash procedure for the site contaminants. The following, triple-wash approach is recommended as a default procedure:
- Removed caked sediment and other debris by hand;
- Wash with light detergent;
- Rinse with tap-water;
- Rinse a second time with tap-water.
Let the sample water drain from the drain valve each time. Additional decontamination procedures might be required for samples that require “ultraclean” collection and testing methods. For example, ultraclean sampling methods are often required for the collection of water samples to be tested for compounds with action levels below one-part-per billion (e.g., mercury, PFASs, etc.; USEPA, 1996d).
Collect the required number of sample increments and add to the churn. Keep the churn closed at all times except when adding subsamples. Mix the water by moving the paddle up and down at least 10 times achieving a churning rate of 9 inches per second before collection of a subsample water for testing (NJDEP, 2005). Faster or slower churning rates can decrease the representativeness of the subsample. The same rate of churning should be sustained throughout sample withdrawal.
Increase the round-trip frequency as the water volume in the splitter decreases so that the churning disc velocity is constant. The disc should touch bottom and every stroke length should be as long as possible without breaking the water surface. Increase of the stroke length and/or disc velocity beyond the recommended rate will lead to a sudden change in sound and churning effort. This is accompanied by the introduction of excessive air into the mixture. This is undesirable because excessive air may tend to change the dissolved gases, bicarbonate, pH and other characteristics (NJDEP, 2005). However, inadequate stirring may result in non-representative sample splits.
Withdraw filtered samples last, directly from the mixing tank using a peristaltic pump or other device. Once all sample bottles have been filled, rinse the churn thoroughly with deionized water, allowing the rinse water to flow through the drain valve. Keep the churn lid closed at all times to avoid contamination with airborne particles.
Double bag the churn sampler during transport and storage to avoid contamination by airborne particles.
Return to the Top of the Page
6.5.3 Additional Considerations
6.5.3.1 Currents and Shifting Tides
Consider tidal stages and currents in the timing of sample collection. Collect samples away from the stern of a boat and after the turbulence of the wake has subsided. Approach any sampling site from downstream and sample upstream of the boat.
6.5.3.2 Stratified Water Column
Surface water bodies might be stratified in terms of temperature and/or salinity. This should be taken into consideration for designation of water layer DUs, if needed to meet the objectives of the investigation.
Discuss the rationale and designation of surface water DU layers in the SAP. Take care not to disturb the stratification during sampling activities, including use of a boat, wading or sampler deployment. Record field parameters to document that the samples collected were taken from the targeted stratification layers. The stability of a surface water body’s stratification depends on many factors, including currents, inflows and outflows of water, wind, storm events and temperature-driven, seasonal overturning. Consider collection of samples on calm days, when the surface water body is less agitated and stratification is more stable and identifiable.
Return to the Top of the Page
6.5.3.3 Trace Elements
Sampling for parts-per-trillion levels of targeted contaminants or trace elements requires a more rigorous sampling procedure. Follow the ultraclean sampling procedure recommended by the USEPA in its publication Sampling Ambient Water for Trace Metals at EPA Water Quality Criteria Levels (USEPA, 1996d) and updated guidance, as available.
Return to the Top of the Page
6.6 Groundwater Sample Collection
This subsection discusses the placement, design, installation and development of monitoring wells and the preparation of wells for sample collection. The information presented in this subsection is largely adapted from CalDWR 1990; USEPA 1991; CalEPA 1995b; SDDEH 2009; OhEPA 2012 and , among other references, in addition to experience gained at sites in Hawai′i. Refer in particular to the USEPA Region 4 documents Groundwater Sampling (USEPA 2017 and Groundwater Level and Well Depth Measurement (USEPA 2013) in Attachments 2 and 3 for addition guidance well gauging, purging and sample collection.
Groundwater samples are normally collected from wells dedicated for this purpose but in some cases can include testing of water emerging from springs or seeps that discharge into surface water bodies. The final method used to collect groundwater samples will necessarily be site specific and tied to the objectives of the investigation. Criteria used to select the most appropriate sample collection method should be presented and justified in the project workplan. Consult the references provided and local drillers for additional guidance.
The following sections discuss the placement, installation and development of monitoring wells and the preparation of wells for sample collection. The method used to collect samples is necessarily site-specific and tied to the objectives of the groundwater investigation. Criteria used to select the most appropriate well installation and sample collection method should be presented and justified in the project workplan.
Return to the Top of the Page
6.6.1 Monitoring Well Location and Design
6.6.1.1 Monitoring Well Location
A preliminary conceptual site model should be developed at the SAP stage to ensure optimal well placement, design and construction (refer to Section 3). Understanding the project objectives, site features, subsurface geology and hydrogeology and preparation of a preliminary CSM of the suspected or known contaminant release is necessary before wells can be successfully completed and a groundwater monitoring program established.
A preliminary CSM can be initially developed through a review of past investigation results, a site inspection, literature reviews, records search and screening-level field investigations using non-evasive or evasive data collection techniques. Non-evasive data collection techniques include geophysical methods such as electrical conductivity/resistivity, electrical magnetics, seismic, gravity, or ground penetrating radar whereas evasive techniques include exploratory soil borings for lithological logging, soil sampling, soil vapor sampling and collection of grab groundwater samples.
The SAP should identify the site-specific monitoring well design and include a map showing the proposed well locations together with the area(s) of known or potential, environmental concerns and site boundaries. A to-scale map(s) sufficient to relocate monitoring wells in the field should be provided. A maximum map scale of 1 inch equal to 50 feet is preferred for most projects, although this will necessarily be site specific. A bar scale should be included on all maps.
The rationale for well placement and design should be described and based on:
- The Preliminary Conceptual Site Model and other site characteristics data (discussed in Section 3) that describe the site topography, the geologic setting, known or suspect contaminant source areas, subsurface hydrogeology and predicted groundwater flow direction;
- The contaminants of potential concern;
- Potential environmental concerns posed by contaminated groundwater, if present (e.g., potential impacts to drinking water or irrigation wells, discharge to surface water bodies, vapor intrusion, etc.; refer to Section 13);
- Influences on hydrology such as areas of upgradient recharge, injection wells or tidal fluctuation;
- Obstacles to subsurface investigations (e.g., restricted access, buildings, roadways, subsurface utilities, etc.);
- Other pertinent information based on a review of site conditions;
Refer to Section 6.4.2 for guidance on groundwater DU designation and monitoring well design. Data quality objectives and goals must be considered in selecting monitoring well locations and configurations. At least one background well is needed to determine naturally occurring (undisturbed) groundwater quality conditions. The background well(s) should be located upgradient of the contaminant source area and screened within the same hydrostratigraphic horizon as the wells that are within, cross-gradient, or hydraulically downgradient of the suspected contaminant plume investigation area. The number and locations of in-plume, downgradient, or cross-gradient wells should be determined based on the intended purpose for the groundwater monitoring which may include detection monitoring, data collection to determine the presence, extent and concentrations of potential contaminants, or long-term monitoring (ASTM, 2010c).
An effort must be made to gather information on underground utilities or features at the investigation site. This should include a review of as-built plans, historical photos, utility maps and other available information concerning subsurface utilities and/or subsurface features at a site. Refer to Section 5.2.2 for guidance on information sources should be contacted prior to the initiation of subsurface activities.
Return to the Top of the Page
6.6.1.2 Monitoring Well Design
State the rationale for the design of each monitoring well in the SAP. The design, including placement of the screen(s), should reflect site investigation objectives and the collection of samples from targeted, DU intervals within the groundwater formation (see Section 6.4.2). This is necessarily a site-specific process. Information provided in the following sections is for initial guidance only and should be reviewed for applicability to the investigation in question.
For example, if an objective of the investigation is to assess the presence or absence of light, non-aqueous-phase liquids (LNAPL) at or near the top of the water table then the well should be screened across this interval. Dense, non-aqueous-phase liquids (DNAPL) will in contrast often migrate downwards through the water-saturated unit until it becomes trapped by capillary forces or encounters an impermeable unit. If an objective of the investigation is identify the presence or absence of DNAPL, the well screen must be placed within units where it could be trapped or immediately above impermeable units that block continued, downward migration. If the contaminant is soluble in water, it may impact the entire saturated zone. In this case, multiple screen intervals may be required to assess the vertical extent of the dissolved contaminant plume.
In some cases, a mixture of different chemicals will be present that includes both highly soluble and low solubility chemicals. As a practical matter, monitoring wells might be designed differently to assess different types of contamination on the same site.
Return to the Top of the Page
6.6.1.3 Initial Groundwater Investigation Phase
The initial investigation phase described in this section assumes a straightforward scenario consisting of the following conditions: (1) a single point source or area of suspected contamination and (2) a prior groundwater investigation has not been conducted.
The preliminary conceptual site model (see Section 3) developed during this phase should include consideration of groundwater utility as described in Section 6.2. The initial phase of the investigation typically determines whether contaminants have impacted the uppermost water bearing zone, including perched groundwater. During this phase, a minimum of three wells are normally required to assess groundwater impacts in the known or suspect release area and approximate groundwater flow directions. Additional wells might be required to assess both small- and large-scale, groundwater flow patterns in fluvial, alluvial or saprolite subsurface conditions where localized groundwater flow can be very complex due to very heterogeneous differences in permeability. This is common in coastal, caprock sediments where groundwater flow is further complicated by tidal fluctuations (refer to Section 6.2).
Place at least one of these wells in proximity to the source area (i.e., the area known or suspected to have the greatest levels of contaminants). Place at least one of these wells slightly down gradient of the source area (USEPA, 1995c). Place the third well cross gradient so the three wells form a triangle. Differences in groundwater elevation between these three wells can be used to assess slope of the water table piezometric surface and approximate the local groundwater flow direction.
Exceptions include groundwater caprock sediments with highly variably differences in permeability over short distances. Small-scale variability in apparent groundwater flow direction can be significant, making estimation of the large-scale groundwater flow direction challenging. A larger number of wells and review of contaminant data might be required to fully to assess overall groundwater migration under these conditions. The number of wells needed to accomplish the objectives of an investigation will necessarily be site-by-site decision, based on both the nature of the release and the risk posed by the contamination present.
During the initial investigation phase, the well screens must extend across the water table and groundwater sampling must include the uppermost water bearing zone, including perched groundwater. Monitoring wells with screens extending across the water table are typically installed with 7 feet of screen interval below the water table (i.e., the saturated interval) and 3 feet of screen interval above the water table. This allows for the assessment of groundwater level fluctuations as well as the accumulation of free product on the water table surface. A greater screen length (e.g., 15-20 feet) above and/or below the elevation of the water table as measured at the time of the investigation will be necessary in areas where there is a significant, seasonable fluctuation in the depth to groundwater.
Return to the Top of the Page
6.6.1.4 Subsequent Investigation Phases
If contamination is confirmed during the initial investigation phase, additional wells may be required to delineate the horizontal and/or vertical extent of groundwater contamination above potential levels of concern. In general, contamination resulting from the release of petroleum products requires less vertical delineation than contamination resulting from releases of chlorinated solvents. Petroleum products, referred to as Light Non-Aqueous Phase Liquids (LNAPL), are normally less dense than water and tend to spread out within the capillary fringe on the upper surface of the groundwater. Fluctuations in the water table or downward pressure associated with a large release of product can, however, cause petroleum to become trapped within the formation below the water table. Understanding the nature of a petroleum release can also be complicated by the dissolution of vapor-phase hydrocarbons into groundwater in the absence of LNAPL from shallower, vadose-zone sources.
Chlorinated solvents, referred to as Dense, Non-Aqueous Phase Liquids (DNAPL), are typically denser than water and can continue to migrate downwards through soil and fractured rock below the water table. The presence of ppm-level concentrations of chlorinated solvents in groundwater often indicates the release of pure product (e.g., trichloroethylene and tetrachloroethylene). Maximum concentrations below 1ppm are typically indicative of releases of wastewater containing dissolved-phase solvents, with no DNAPL present below the water table or the dissolution of vapors into groundwater from overlying sources in the vadose zone.
To delineate the horizontal extent of identified, groundwater impacts, additional monitoring wells are installed cross gradient, up gradient and/or down gradient of the source area. Installation of one or more wells upgradient in unaffected areas for the collection of background data is recommended. This will help assess natural, background conditions as well as the potential for upgradient sources to contribute to contamination identified on the site. Background data are especially important if one or more contaminants of concern occur naturally in the soil and groundwater. Soil vapor data (Section 7) can also be very useful, although the location of the core of the vapor plume in the vadose zone might not always correlate with the location of the area of maximum contamination in the groundwater.
To delineate the vertical extent of groundwater impacts, monitoring wells are installed with successively deeper screen intervals based on the subsurface geology and considerations of contaminant fate and transport. Screen intervals at multiple subsurface horizons can be accomplished through the use of multi-level wells or through the use of multiple wells in clusters or nests (see Subsection 6.6.2); (USACE, 1998).
When delineating the vertical extent of the plume, it is important to maintain the integrity of any confining units between upper and lower groundwater formations to prevent the vertical spread of groundwater contamination. This is especially important for groundwater formations that serve as potential or current drinking water aquifers. Collect geotechnical samples from the confining unit to test the permeability without compromising the integrity of the unit. Pumping tests may be required to establish that the confining unit is impermeable and that the underlying water bearing unit is not hydraulically connected to the impacted upper water bearing unit.
Return to the Top of the Page
6.6.2 Monitoring Well Construction and Installation
Monitoring wells at investigation sites can serve several purposes, including the determination of the magnitude, extent and movement of contaminant plumes in groundwater, as well as characterization of the formation that the groundwater is contained in (e.g., hydraulic conductivity, gradient, etc.) for use in groundwater fate and transport models. Monitoring wells must be designed to meet the objectives of the current and potential future objectives of the investigation on a site-by-site basis. There is no standard monitoring well design for uniformly achieving all objectives.
Monitoring well construction and materials are a function of the anticipated nature of the contaminants, groundwater quality, desired sampling depth(s), the groundwater formation lithology and overburden, the borehole diameter and the drilling procedure. Chemical incompatibility could preclude the use of some materials. Soil grain size may dictate the filter material grain size. A deeper or larger diameter well will need a stronger casing than a shallow or smaller diameter well.
Wells that penetrate viable aquifers that are a current or potential source of drinking water must be in particular be designed to be protective of the aquifer. The well must not provide a pathway for surface contaminants into the aquifer or for contaminant transport between hydraulically separated water bearing units. Submittal of an SAP to HDOH for review is required for all wells installed in viable aquifers.
Return to the Top of the Page
6.6.2.1 Drilling Methods
Refer to Section 5.4 in the discussion of soil and sediment sample collection for a brief overview of drilling methods. A detailed review of drilling methods is beyond the scope of this technical guidance manual but reviewed in-depth in the publicly available documents referenced Section 5.4 and below.
Direct push rigs or hollow stem augers are typically used to install groundwater monitoring wells in caprock sediments or saprolite. Additional information on the use of push rigs is provided in the below section that describes the installation and use of micro wells. Air rotary rigs are normally used to install wells in competent bedrock. Rotary sonic rigs can also be used for drilling in bedrock, when available. The use of mud rotary rigs or equipment that requires the addition of drilling fluids into the borehole is generally not allowed due to the potential to affect groundwater in the surrounding formation.
Consult the driller for recommendations on the installation of monitoring wells at a specific location. Experience drillers offer a wealth of knowledge about local conditions and alternatives for well installation in different, geologic scenarios.
Return to the Top of the Page
6.6.2.2 Permanent Monitoring Wells
This subsection focuses on the installation of permanent, two-inch or greater diameter monitoring wells. Refer to Subsection 6.6.8 for information on the collection of groundwater samples from temporary wells, micro wells and existing production wells.
All permanent groundwater monitoring wells have certain design components in common. A schematic of a standard groundwater monitoring well is presented in Figure 6-13. The monitoring well design components are:
- Casing consisting of solid riser, screen intervals and a top and bottom cap
- Filter pack(s)
- Annular seal(s)
- Well head protection
Return to the Top of the Page
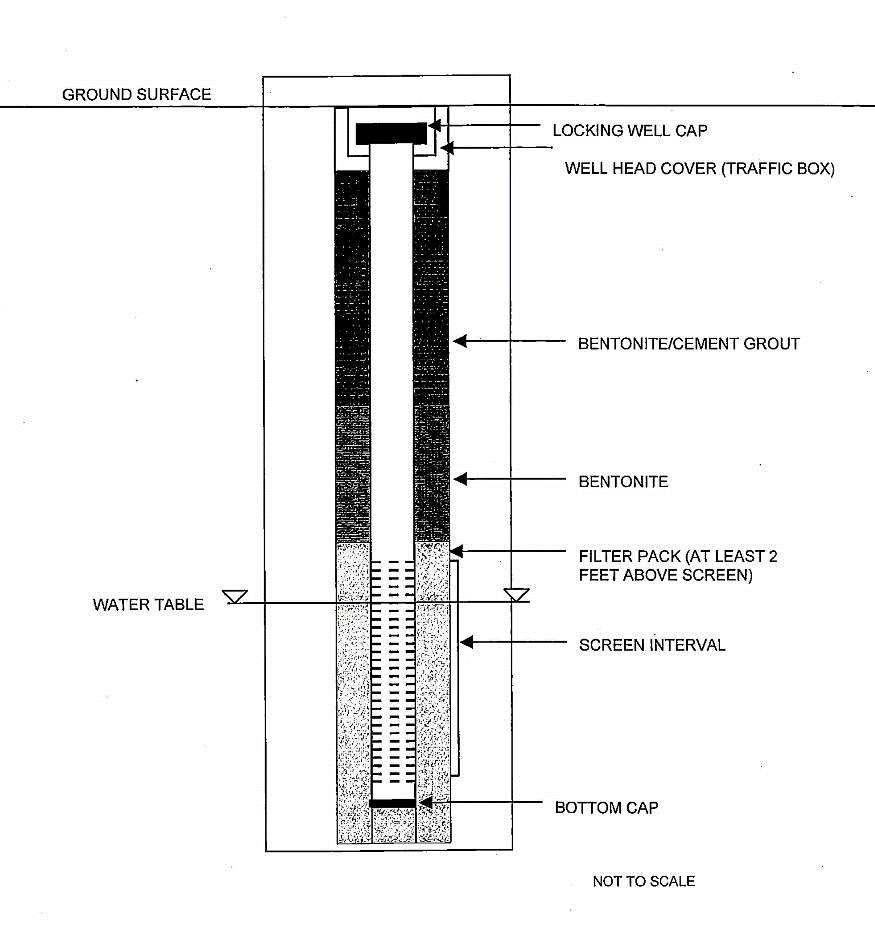
Figure 6-13. Diagram of a Typical Groundwater Monitoring Well
This illustration shows the screen interval across the water table, which is used for the assessment of LNAPLs.
[Source: US Navy, 2007.]
Well Casing
In general, the casing consists of a solid well riser and a well screen, which keeps the borehole open and provides access to groundwater for the collection of a water sample. The casing should always include a bottom cap to exclude material from entering the bottom of the well and a top cap to exclude surface material or water from entering the well from the surface.
Well casing materials include steel, polyvinyl chloride (PVC), fiberglass, ABS plastic and polytetrafluoroethylene (PTFE) commonly referred to as Teflon®.
Well diameters range from 1 inch to greater than 12 inches and depend upon the proposed well use. Typical well diameters for environmental investigations are 2 to 4 inches, depending on the objective of the well installation (e.g., site investigation or groundwater remediation) and the proposed monitoring and test equipment. When practical, the casing diameter should not exceed 4 inches to avoid generating large volumes of potentially contaminated soil and groundwater requiring management and disposal during well installation, development and purging activities. Larger diameter wells may be considered for use in free product recovery activities. In terms of cost and ease of installation, several closely spaced, small-diameter wells, might be more effective for characterization purposes than a single, large-diameter well.
Consider the following in the selection of the casing material:
- The casing material must not alter the groundwater chemistry by leaching, sorbing or desorbing;
- It must be strong enough to withstand the forces acting upon it, such as the hydrostatic pressure ;
- It must be resistant to chemical or physical deterioration for the life of the well.
For additional guidance on casing material selection, see the following:
- Standard Practice for Design and Installation of Ground Water Monitoring Wells, (ASTM, 2004)
- Handbook of Suggested Practices for the Design and Installation of Groundwater-Monitoring Wells (USEPA, 1991)
- Test Methods for Evaluating Solid Waste, Volume II, Chapter 11. SW-846 (USEPA, 1991c)
- Monitoring Well Design and Construction for Hydrogeologic Characterization, Guidance Manual for Ground Water Investigations (CalEPA, 1995b)
- The Chemical Composition of Leachate from a Two-Week Dwell-Time Study of PVC Well Casing and Three-Week Dwell-Time Study of Fiberglass Reinforced Epoxy Well Casing (Cowgill, 1988)
- Sorption of Aromatic Hydrocarbons by Materials Used in Construction of Ground-Water Sampling Wells (Gillham et al., 1990).
- Adsorption of Selected Organic Contaminants onto Possible Well Casing Materials (Jones et al., 1988)
- Evaluation of Four Well Casing Materials for Monitoring Selected Trace Level Organics in Ground Water (Parker et al., 1989).
In general, the well riser and well screen should be of the same material. Various mechanisms are used to join the casing sections. The recommended method uses flush threaded joints, which ease the installation process and the later use of downhole equipment by eliminating ridges on the outside and inside of the casing. An example of a well screen with a flush-threaded bottom cap is illustrated in Figure 6-14.
Joining methods that use solvent welding are not acceptable (USEPA, 1991), since the practice may introduce solvents into the well. The United States Environmental Protection Agency (USEPA) also excludes the use of welding for stainless steel casings (USEPA, 1991).
Return to the Top of the Page
Figure 6-14. Portion of PVC Well Screen and Flush Threaded Bottom Cap
The filter pack, typically consisting of clean silica sand is installed around the well screen and allows groundwater to flow into the monitoring well for the collection of groundwater samples.
Select the screen for a large percentage of open area, non-clogging slots, resistance to corrosion and sufficient structural strength (USEPA, 1995c). Select the screen slot size such that it will retain 90 to 100 percent of the filter pack material (USEPA, 1991). For typical investigations of shallow groundwater in Hawai`i, a 2-inch diameter PVC casing with a screen slot size of 0.020 inches combined with a filter pack constructed of clean silica sand is typically employed.
The placement and length of the screened length of a monitoring well is necessarily site-specific and should be based on site investigation objectives outlined in the CSM and confirmed in the field (see Section 6.4.2 and Section 6.6.1). Screened well casing is typically sold in lengths of 5 and 10 feet but can be custom-made for a site as needed. A minimum screen length of 5 feet is normally adequate to address site investigation objectives. Longer screen lengths, e.g., 10 feet, are often necessary to ensure access to the top of the water table during seasonal fluctuations.
Leaving the borehole temporarily open to evaluate where the water table stabilizes can be very useful in areas that are unfamiliar to the driller. For initial investigations or sites where LNAPLs might be present, monitoring wells are typically constructed with 7 feet of screen interval below the water table (i.e., the saturated interval) and 3 feet of screen interval above the water table. This allows the screened interval to remain above the water table at sites with relatively small-scale groundwater level fluctuations and also allows mobile, free product to flow into the well and be identified. Longer screen lengths are required in areas where there is a very large fluctuation in the water table. The depth to the water table in some inland areas of O′ahu, for example, can vary by 10 to 20 feet between rainy and dry seasons.
The casing at the bottom of the well screen must be capped in order to prevent soil from infiltrating into the well. The bottom of the casing, including the cap, should in most situations not be more than 0.5 foot below the bottom of the lowest screen. A solid riser below the screen may lead to stagnant water, which could alter the overall chemistry of the groundwater in the well (USACE, 1998).
The total borehole depth should not be more than 1 meter below the planned bottom of the monitoring well in order to avoid preferential vertical flow of groundwater flow below the well screen. If a borehole extends greater than 3 feet below the planned bottom of a monitoring well installed in a low-permeability formation or in a formation where vertical movement of groundwater needs to be strictly controlled, then backfill the lower portion of the borehole with a chemically inert, low permeability material such as bentonite grout. In highly permeable groundwater formations, where vertical flow is not a concern, the borehole can be backfilled with chemically inert sand up to the design depth. For cases where the screen will extend to the bottom of the well, consider adding at least 6” of sand in the bottom of the boring before installation in order to help keep mud out of the well tip.
The well casing must be free of foreign matter before installation (labels, soil, grease, etc.). Utilize a new and factory cleaned well casing when possible or wash the casing prior to installation. Washing is not normally necessary if the casing is used directly out of its intact manufacturer’s packaging.
Return to the Top of the Page
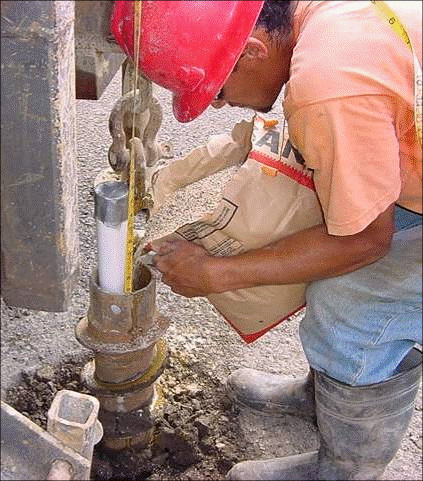
Figure 6-15. Hollow Stem Auger with PVC Well Casing.
Hollow stem auger with 2-inch diameter PVC well casing. To form the filter pack surrounding the well screen, clean silica sand is poured down the center of the auger as the auger is slowly withdrawn from the subsurface.
Whenever possible, install the well screen and casing within the center of the drill casing. In most cases this will involve the use of a hollow stem auger. Following placement of the well screen and casing, install the filter pack and annular seal while slowly removing the drill casing from the subsurface. Exercise caution to prevent borehole collapse during installation of the filter pack and annular seal. “Bridging,” where gaps in the well annular are created by partial collapse of sidewall material or improper placement of annulus material, is often a common problem. Figure 6-15 illustrates a 2-inch diameter PVC well casing in place in the center of a hollow stem auger drill rod and the placement of a filter sand pack.
Filter Pack
The purpose of the filter pack is to prevent particles of soil and other material in the surrounding formation from infiltrating into the well. The filter pack is installed in the annular space surrounding the well casing. An artificial filter pack is necessary in most geologic settings. Use of natural formation material as the filter pack only is not normally adequate.
The filter pack must be a chemically inert granular material with a grain-size that is ideally larger than the screen slots but smaller than the particles in the surrounding formation. The latter might not be possible for the installation of a monitoring well in clayey or silty formations and periodic removal of sediment from the well might be required. This is a common problem in areas of fine-grained, caprock sediments.
Due to its chemical inertness and its abundant natural occurrence, the use of well-rounded, well-sorted silica sand is encouraged. For permanent wells, there should be at least a 2-inch clearance around the screen (but no more than 8 inches) to allow for installation of the filter pack and to help prevent open gaps or bridging in the filter pack during placement (USEPA, 1991a). For example, for 2-inch and 4-inch diameter monitoring well screens/casings, the borehole or auger used should have an inside diameter of at least 6 and 8 inches. Placing the filter pack slowly down the borehole will minimize bridging and surging of groundwater and suspension of fine particles during well installation.
The use of monitoring well centralizers may be considered for wells deeper than 20 feet. These are attached to the outside of the well casing in order to keep the casing centered as it is lowered into the borehole. When used, they should be made of PVC, PTFE, or stainless steel and attached to the casing at regular intervals by means of stainless steel fasteners or strapping. Centralizers should not be attached to any portion of the well screen.
The filter pack should extend from below the bottom of the well screen to 2 to 5 feet above the well screen. Extending the filter pack above the screen interval buffers any settling during well development and maintains the separation of the annular seal from the screen. A 2- to 5-foot filter pack above the screened interval and below the annular seal might not be possible at sites with very shallow groundwater. If this is the case then this should be discussed in the site-specific SAP and strategies to prevent the above-noted problems described.
In deep wells, the filter pack material may not adequately compress when initially installed and subsequent settling may be significant. Therefore, the deeper the well the higher the filter pack must be installed above the top of the screen. In wells more than 200 feet deep, the filter pack must be installed to a minimum of 5 feet above the screen. Care must be taken to ensure that filter material does not extend across a confining layer into an overlying groundwater formation.
To prevent intrusion of annular sealant material into the top of the filter pack, consider installing an additional layer of fine sand between the primary filter pack and the annular seal (CAEPA, 1995b). The secondary filter pack should be at least 6 inches thick but should not exceed 2 feet.
Calculate and record the volume of filter pack material expected based on the construction design. Also record the actual volume used during well construction. Explain any discrepancy between the calculated and actual volume.
Some types of micro wells come with pre-constructed filter packs built around the well screen (Subsection 6.6.9). While typically more expensive than a standard well, they can be quickly installed with a push rig in soft substrate and reduce concerns related to bridging and other related problems.
Annular Seal
The annular seal normally consists of at least two feet of cement at the top of the well overlying at least two feet of bentonite (see Figure 6-13). The bentonite seal is underlain by the filter pack, which should extend at least two feet above screened interval, as described above.
The seal is intended to prevent vertical migration of water or other liquids into the borehole annular space from the ground surface or from overlying formations. The annular seal should:
- Provide a lasting seal between the borehole and casing that is less permeable than the surrounding formation;
- Be chemically inert to resist chemical deterioration;
- Resist physical deterioration.
The design and placement of the annular seal is dependent upon multiple site-specific factors, including whether the screen interval is below the water table (fully saturated screen interval) or extends across the water table and the depth to the water table from the ground surface. Factors considered in final design of the seal should be discussed in the SAP.
For a fully saturated screen interval (i.e., entire well screen below the water table), a 3- to 5-foot-thick bentonite seal, if feasible, is installed above the filter pack. Bentonite, a naturally occurring clay, is placed into the well annulus dry and then hydrated by adding water and allowed to swell to form a tight seal. Pelletized bentonite is preferred for this application. The thickness of the bentonite is measured prior to hydration. The pelletized bentonite must be allowed to completely hydrate in conformance with the manufacturer’s instructions prior to filling the remainder of the annular space with neat cement, as described below.
If the well screen does not extend above the water table, a bentonite seal can also be installed through the use of a slurry mixed from powdered bentonite and clean water. The mixture should contain a minimum of 20 percent solids by weight and have a density of 9.4 pounds per gallon or greater. The slurry should have a batter-like, high viscosity consistency. The project plan should provide and discuss the design and installation details for slurry seals since the cement seal installed above the slurry seal is usually denser and may intrude into the slurry.
When possible, a minimum, two foot-thick bentonite seal should be installed in the upper portion of the well annulus for scenarios where the well screen interval extends above the water table. The total thickness of the annular seal might need to be reduced in areas of very shallow groundwater and should be assessed on a site-specific basis. The use of slurry seals when the filter pack is above the saturated zone is not recommended due to the potential for infiltration and clogging of the filter pack. Bentonite pellets and tablets are preferred over bentonite chips, since chips tend to have higher, initial moisture content and are slower to swell (USACE, 1998). The bentonite should be installed in 6- to 12-inch lifts. Individual lifts should be allowed to hydrate for approximately 30 minutes prior to installation of the next lift. The bentonite must be allowed to completely hydrate in conformance with the manufacturer’s instructions prior to filling the remainder of the annular space with cement.
Following hydration of the bentonite seal, the remainder of the annular space to the ground surface is filled with a neat cement. Neat cement is a mixture of Portland cement (Type I for general use) and water, at a ratio of 5 to 6 gallons of water per 94-pound bag of cement. Sand is not added to the mixture. The cement forms a stable seal at the top of the well annulus and prevents the additional expansion and eruption of inadequately hydrated bentonite at the ground surface during rain events.
Well head consists of flush-mounted well vault sealed with cement above the annular seal.
When installing the bentonite seal and the cement cap, calculate and record the volume of bentonite and cement expected based on the drilling log and the borehole diameter. Record the actual volume used during well construction and explain any discrepancy between the calculated and actual volume.
Return to the Top of the Page
 Figure 6-16. Installation of Well Head Protection |
Well Head Protection
The purpose of the well-head box is to prevent contaminant infiltration into the subsurface and vandalism or damage of the monitoring well. The well head box must allow access to the well with all anticipated measuring devices. A flush-mounted, well head box during installation is illustrated in Figure 6-16. A traffic-rated flush-mounted well head box installed in a parking lot is illustrated in Figure 6-17.
Return to the Top of the Page
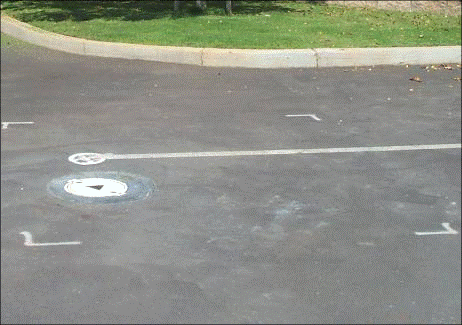 Figure 6-17. Flush-mounted well head box installed in a parking lot |
A flush-mounted well-head box should be set slightly above the surrounding elevation to prevent pooling of surface water on the well. Ensure that the top of the well casing is centered within the well head box. Avoid the creation of trip hazards for other users of the site due to vault installation.
Provide protection from infiltration into the annular space by installing a surface seal made of a water-tight material such as neat cement or concrete. Install the surface seal on top of the annular grout seal so that it extends down to at least one foot below ground surface. Ensure that the well-head box is anchored in the seal. The final surface seal should form an apron at ground surface that is at least 2 feet wide and 4 inches thick. The concrete apron should slope away from the well (a minimum of 1 percent) to prevent surface water leakage into the well head.
Return to the Top of the Page
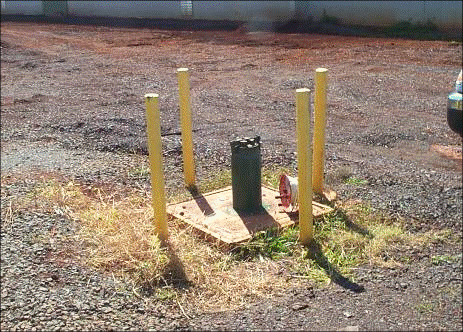 Figure 6-18. Traffic-Rated Well Head Box |
The top of the well casing should be closed with a water-tight cap, such as a compression cap. Protect the well head from unauthorized access by using well head boxes and well caps equipped with locking or tamper proof mechanisms. As needed, install concrete or steel bollards to prevent accidental damage to the well head projecting from the ground surface. Install bollards outside the surface seal apron. An installation featuring guards is illustrated in Figure 6-18. Bumper guards must not be installed in the protective apron to avoid cracking of the surface seal, should a vehicle accidentally hit the guard. In instances where wells are installed in areas where heavy machinery is operated, wellhead protection may require enhanced construction such as installing well boxes specifically designed to withstand heavy vehicle traffic and reinforcing the concrete.
Well Installation Log
Throughout the drilling and well installation process, record detailed observations. It is essential that all relevant data be recorded during the field activities, so that detailed well logs may be generated for inclusion in the final report. Prepare a well installation log for each monitoring well. An example well installation log is illustrated in Figure 6-19.
At a minimum, the log will include:
- Project name and location;
- Well designation and location relative to contaminant source;
- Date and time of well installation start and completion;
- Environmental consulting company and on-site consultant;
- Drilling company;
- Drilling method;
- Volume of drill fluid and/or pre-development fluid lost into well during installation;
- A graphical depiction of the well;
- Casing material type, diameter, joint type and screen slot size;
- Filter pack material, calculated and actual volume;
- Annular seal material, calculated and actual volume;
- Annular grout seal material, calculated and actual volume;
- Placement method for filter pack, seal and grout (tremie, pumped, gravity);
- Borehole diameter;
- Depth to bottom of borehole; Depth to bottom of casing
- Depth to bottom and top of screen interval;
- Depth to bottom and top of solid riser;
- Depth to bottom and top of filter pack;
- Depth to bottom and top of annular bentonite seal;
- Depth to bottom and top of annular grout;
- Depth to bottom of surface seal;
- Depth to the water table;
- Surface seal and well apron design;
- Protective box/casing and cap designs;
- Ground surface elevation;
- Top of casing elevation.
 Figure 6-19. Example Monitoring Well Installation Log |
Well Survey
All wells being used to assess the hydraulic gradient and the groundwater flow direction must be surveyed by a licensed professional surveyor. Record the well locations in the Hawai`i State Plane Coordinate System. Determine the top of casing elevations within ±0.01 foot. Reference the elevations to an established National Geodetic Vertical Datum. Resurvey the top of well casing if the protective cover and/or well casing sustain damage.
The surveyor must mark the surveyed reference point on the top of the casing. Reference all downhole measurements to the surveyed reference point. Using a reference point on other parts of the well head is not acceptable, since other parts of the well head are exposed and therefore are more readily disturbed.
Return to the Top of the Page
6.6.3 Monitoring Well Development
6.6.3.1 Well Development Objectives
The purpose of development is to restore the groundwater formations hydraulic conductivity within the screening interval of the well remove extraneous material following drilling and monitoring well installation. All drilling, including direct push well installation, leads to some type of damage to the surrounding, natural formation and borehole wall (e.g., clogging, smearing, coating and compaction) that can alter the hydraulic conductivity of the formation. The guidance presented below reflects a compilation of guidance from CalDWR 1990; USEPA 1991; CalEPA 1995b; SDDEH 2009; OhEPA 2012; USEPA 2013 and USEPA 2017, as well as experience gained in Hawai′i.
All types of materials can end up in the drill hole even during the most carefully installed well installations. Items introduced can include all type of material ranging from tools accidently dropped into the boreholes to topsoil, grass, or lubricants, hydraulic fluids, or degreasers stuck to drillers gloves. In addition, cation exchange capacity of clays in formations or bentonite in grout could have an effect on the cations in the groundwater. It is virtually impossible to exclude any kind of contamination or disruption of the natural surrounding formation.
Well production is most commonly affected by smearing of thin layers of clay interbedded with more permeable units along the sides of the borehole. This can especially be a problem for wells installed in caprock sediments or saprolite using a push rig. Removal of this clayey smear in order to allow a more natural flow of groundwater into and through the well is the primary goal of well development.
Development typically includes pumping and/or surging or water within a well. This helps to remove drill cuttings, mud and other mobile particulates from the well, the filter pack and the adjacent formation. Fine particles will be removed from the filter pack during well development that otherwise could clog the filter pack and thus reduce the natural hydraulic flow from the formation which can lead to siltation inside the well or to entrainment of fine particles into future groundwater samples. This helps to restore the original equilibrium with groundwater in the surrounding formation so that more representative sample data can be collected.
Most EALs for groundwater are based on the dissolved-phase concentration of the contaminant (Section 13). Contaminants sorbed to fine particles entrained in a sample can bias the laboratory results high and overstate potential environmental concerns. Although filtration of samples prior to analysis is acceptable for nonvolatile chemicals (see Subsection 6.4.3), filtration should not be viewed as a substitute for proper well development.
Removal of fines also minimizes the potential for clogging and damaging sampling equipment. For example, fine particles are known to clog bladder pumps, which can lead to spurting of water from the pump and a loss of volatile organic compounds (VOCs). This limits the use of a bladder pump to collect samples to be tested for VOCs under these types of site conditions (see Subsection 6.6.6).
Development can be performed in two stages: pre well completion and post well completion (SDDEH 2009). Well development can cause a filter pack to settle and compromise the surface seal, if already emplaced. Partial development of the well prior to the placement of sealing material is therefore recommended. Initial development of a well prior to the installation of casing might for borings that remain open can also help to remove drill cuttings and fluids (e.g., open borehole in basalt bedrock).
After the filter pack is installed and prior the installation of the annual seal, surging (high-permeable formations; see below) and/or removal of water (low-permeability formations) is recommended. Pre-completion development and allowance of time for equilibrium to be established can be especially useful for wells screened across a low-permeability formation, where the final level of the water table within the well casing is uncertain. This allows adjustment of the screen elevation as needed before adding the seal.
Final well development proceeds after well installation is completed and the grout has had time to cure. Generally, a waiting time span of 48 hours is recommended for development after well installation (USEPA, 2001). However, the time interval between well installation and well development is a function of well construction, type of grout and conditions under which grout was installed. See
Subsection 6.6.7 for a detailed discussion on waiting periods between well installation, development and sampling.
Return to the Top of the Page
6.6.3.2 Well Development Methods
Potential well development methods include pumping, mechanical surging, backwashing, bailing and high velocity hydraulic jetting. The use of air for well development is not acceptable CAEPA, 1995b; USACE, 1998).
During well development by pumping, water is extracted from the well at high rates. Consultants in Hawai`i report that progressively pumping approximately 30 to 50 gallons of water is normally adequate to restore normal groundwater flow into and through the well. The drop in the water level within the well allows the natural water pressure in more permeable zones of the screened interval to break up and push any clayey smear present on the walls of the borehole into the well casing, where it and any other loose material can be removed. This is practice is common to most monitoring well installations.
Well development by surging involves movement of a surge block up and down in the well similar to a piston in a cylinder. The surge block is usually attached to a drill rod or stem and operated by a drill rig. The movement of the surge block pushes and pulls water through the well screen, dislodging fine particulates from the screen, filter pack and adjacent formation. In some cases, additional development of a well by surging might be required. Surging during initial well installation can cause localized compaction and collapse of the filter pack and cause fine-grained material to move into the well. Some degree of surging is, however, often needed to remove sediment that has built up over time in existing wells. Use of a vented, rather than unvented, surge block is recommended to minimize the volume of water in the well that is forced into the formation on the down stroke of the surge block.
Surging is alternated with groundwater pumping to remove groundwater and accumulated sediment. Continue surging and pumping until the water contains no visible sediment.
Although less efficient than a surge block, a bailer can be used in a similar manner as a surge block to agitate the well water and dislodge particulates in the filter pack and well screen. After surging, water is removed from the well by using the bailer or a pump. When surging with a bailer, a surging period of 10 to 20 minutes is recommended prior to removing water from the well.
Surging is not recommended in very fine-grained formations since this could increase rather than decrease turbidity. Repeated removal of at least three volumes of water from the well by simple pumping is recommended for these scenarios. A finer-grained sand pack can also be used to reduce the migration of fines into the well (see Section 6.6.2).
Additional well development methods include backwashing and high-velocity jetting. Well development by backwashing involves pumping water through the well and into the filter pack and formation. Note that the introduction of clean water into a monitoring well intended to test for contamination in the surrounding formation is not generally allowed. Backwashing dislodges particulates stuck in the well screen and filter pack. Backwashing is alternated with groundwater pumping to remove groundwater and the sediment suspended in the groundwater due to well development.
During well development by high velocity hydraulic jetting, water is jetted through the well screen from several horizontal jets. The water jet dislodges particulates from the well screen, filter pack and adjacent formation. Hydraulic jetting is alternated with groundwater pumping to remove groundwater and sediment accumulated in the well by jetting. This method is again not generally allowed for wells to be used for assessment of natural groundwater conditions.
When using water during drilling, development of open boreholes or hydraulic jetting, at least three times the volume of water added should be removed. This helps to ensure that water entering the well during the collection of samples is representative of the surrounding formation.
Return to the Top of the Page
6.6.3.3 Well Development Criteria
The following criteria are ideally achieved during well development (USEPA, 2002b):
- Removal of at least three times the calculated volume of standing water in the well. The calculated volume of standing water should include the saturated filter pack (assume 30 percent porosity).
- The well water pH stabilizes to within plus or minus (±) 0.1 pH units for three successive readings. Readings are separated by the removal of one well volume of water.
- Well water temperature stabilizes to within ±1 degree Celsius.
- Well water conductivity stabilizes to within ±3 percent.
- Well water oxidation-reduction potential stabilizes to within ±10 millivolts.
- Well water dissolved oxygen concentration stabilizes to within ±0.3 mg/L.
- The well water is clear to the unaided eye, in areas where the local groundwater is known to be clear and the turbidity readings are below 10 nephelometric turbidity units (NTUs).
- Turbidity stabilizes to within ±10 percent at concentrations larger than 10 NTU. In areas of known turbid groundwater, the final well water may be turbid to the eye.
- The sediment thickness in the well is less than 1 percent of the well screen length or less than 0.1 foot for wells with screens less than 10 feet long.
Use the methods listed in Table 6-1 to determine the water quality parameters. For the specific methods refer to the USEPA document Methods for Chemical Analysis of Water and Wastes (USEPA, 1983); and the ASTM standards identified in the table.
Return to the Top of the Page
Table 6-1 Test Methods for Water Quality Parameters
| Water Quality Parameter | EPA Method | ASTM Standard |
| pH | 0150.1 | D1293, D5464 |
| Temperature | 0170.1 | |
| Conductivity | 0120.1 | D1125 |
| Turbidity | 0180.1 | D1889 |
| Oxidation Reduction Potential | D1498 | |
| Dissolved Oxygen | D888, D5462 |
If the well recharge rate is so slow that: (1) the required volume of water volume for successful development cannot be removed within 48 hours, (2) excessive sediment remains in the well after development or (3) high turbidity persists, then the HDOH HEER Office should be contacted for consultation.
Consider also the objectives for testing. Water in such low-permeability formations is unlikely to be considered a potential source of drinking water, although in some cases slow diffusion and spread of the contamination to drinking water aquifers might be of concern. The need to discharge or dispose of excess groundwater during future construction and dewatering activities could also be a concern. The use of passive samplers (e.g., passive diffusion bags) might offer one solution. Note that discharge permits applicable to the latter scenario might require testing of unfiltered samples from excavations. Groundwater data based on in situ testing using passive samplers might not be representative of these conditions.
If vapor intrusion is the only potential environmental concern, then the stand-alone collection of soil vapor data as part of site characterization is acceptable (see Section 7 and Section 13). The collection of vapor samples in low-permeability formations can also be challenging, however. The collection of Multi Increment soil sample data from impacted, groundwater bearing formations should be considered for design and confirmation of in situ remedial actions, since the bulk of the contaminant is likely to be adsorbed to or diffused into soil particles (Section 4).
During all purging and sampling activities, prevent potentially contaminated water from spilling onto the ground surface surrounding the well. All water and sediment extracted during well development must be placed in containers conforming to requirements of the United States Department of Transportation. The containers must be properly labeled and stored on site pending onsite re-infiltration or offsite disposal. The label should include at a minimum: project name, project location, date, container contents, emergency contact name and phone number.
Present a well development log for each monitoring well. ASTM Standard D5521 (ASTM, 2005); presents additional guidance on groundwater well development. An example well development log is illustrated on Figure 6-20.
At a minimum, the log should include the following information:
- Project name and location;
- Well designation and location;
- Well construction including total depth of well and screen length;
- Date and time of well completion;
- Date and time of well development;
- Well development technique;
- Average pumping or water extraction rate;
- Estimated recharge rate;
- Static water level from top of casing before development;
- Sediment level from top of casing prior to development;
- Static water level from top of casing 24 hours after development;
- Sediment level from top of casing 24 hours after development;
- Volume of liquids lost into well during drilling, predevelopment and development;
- Volume of water standing in the well casing and saturated filter pack, assuming a 30 percent filter pack porosity;
- A running log of:
- Time;
- Water volume removed, both incremental and total;
- Field measurement of pH, temperature, conductivity, oxidation-reduction potential and turbidity;
- Field measurements of dissolved oxygen;
- Visual and olfactory observations such as color, clarity, passive odor observations, particulates, etc.;
- Total volume of water removed;
- Total time needed for development;
- Investigation derived waste (IDW) inventory including type and number of IDW containers, location of IDW storage.
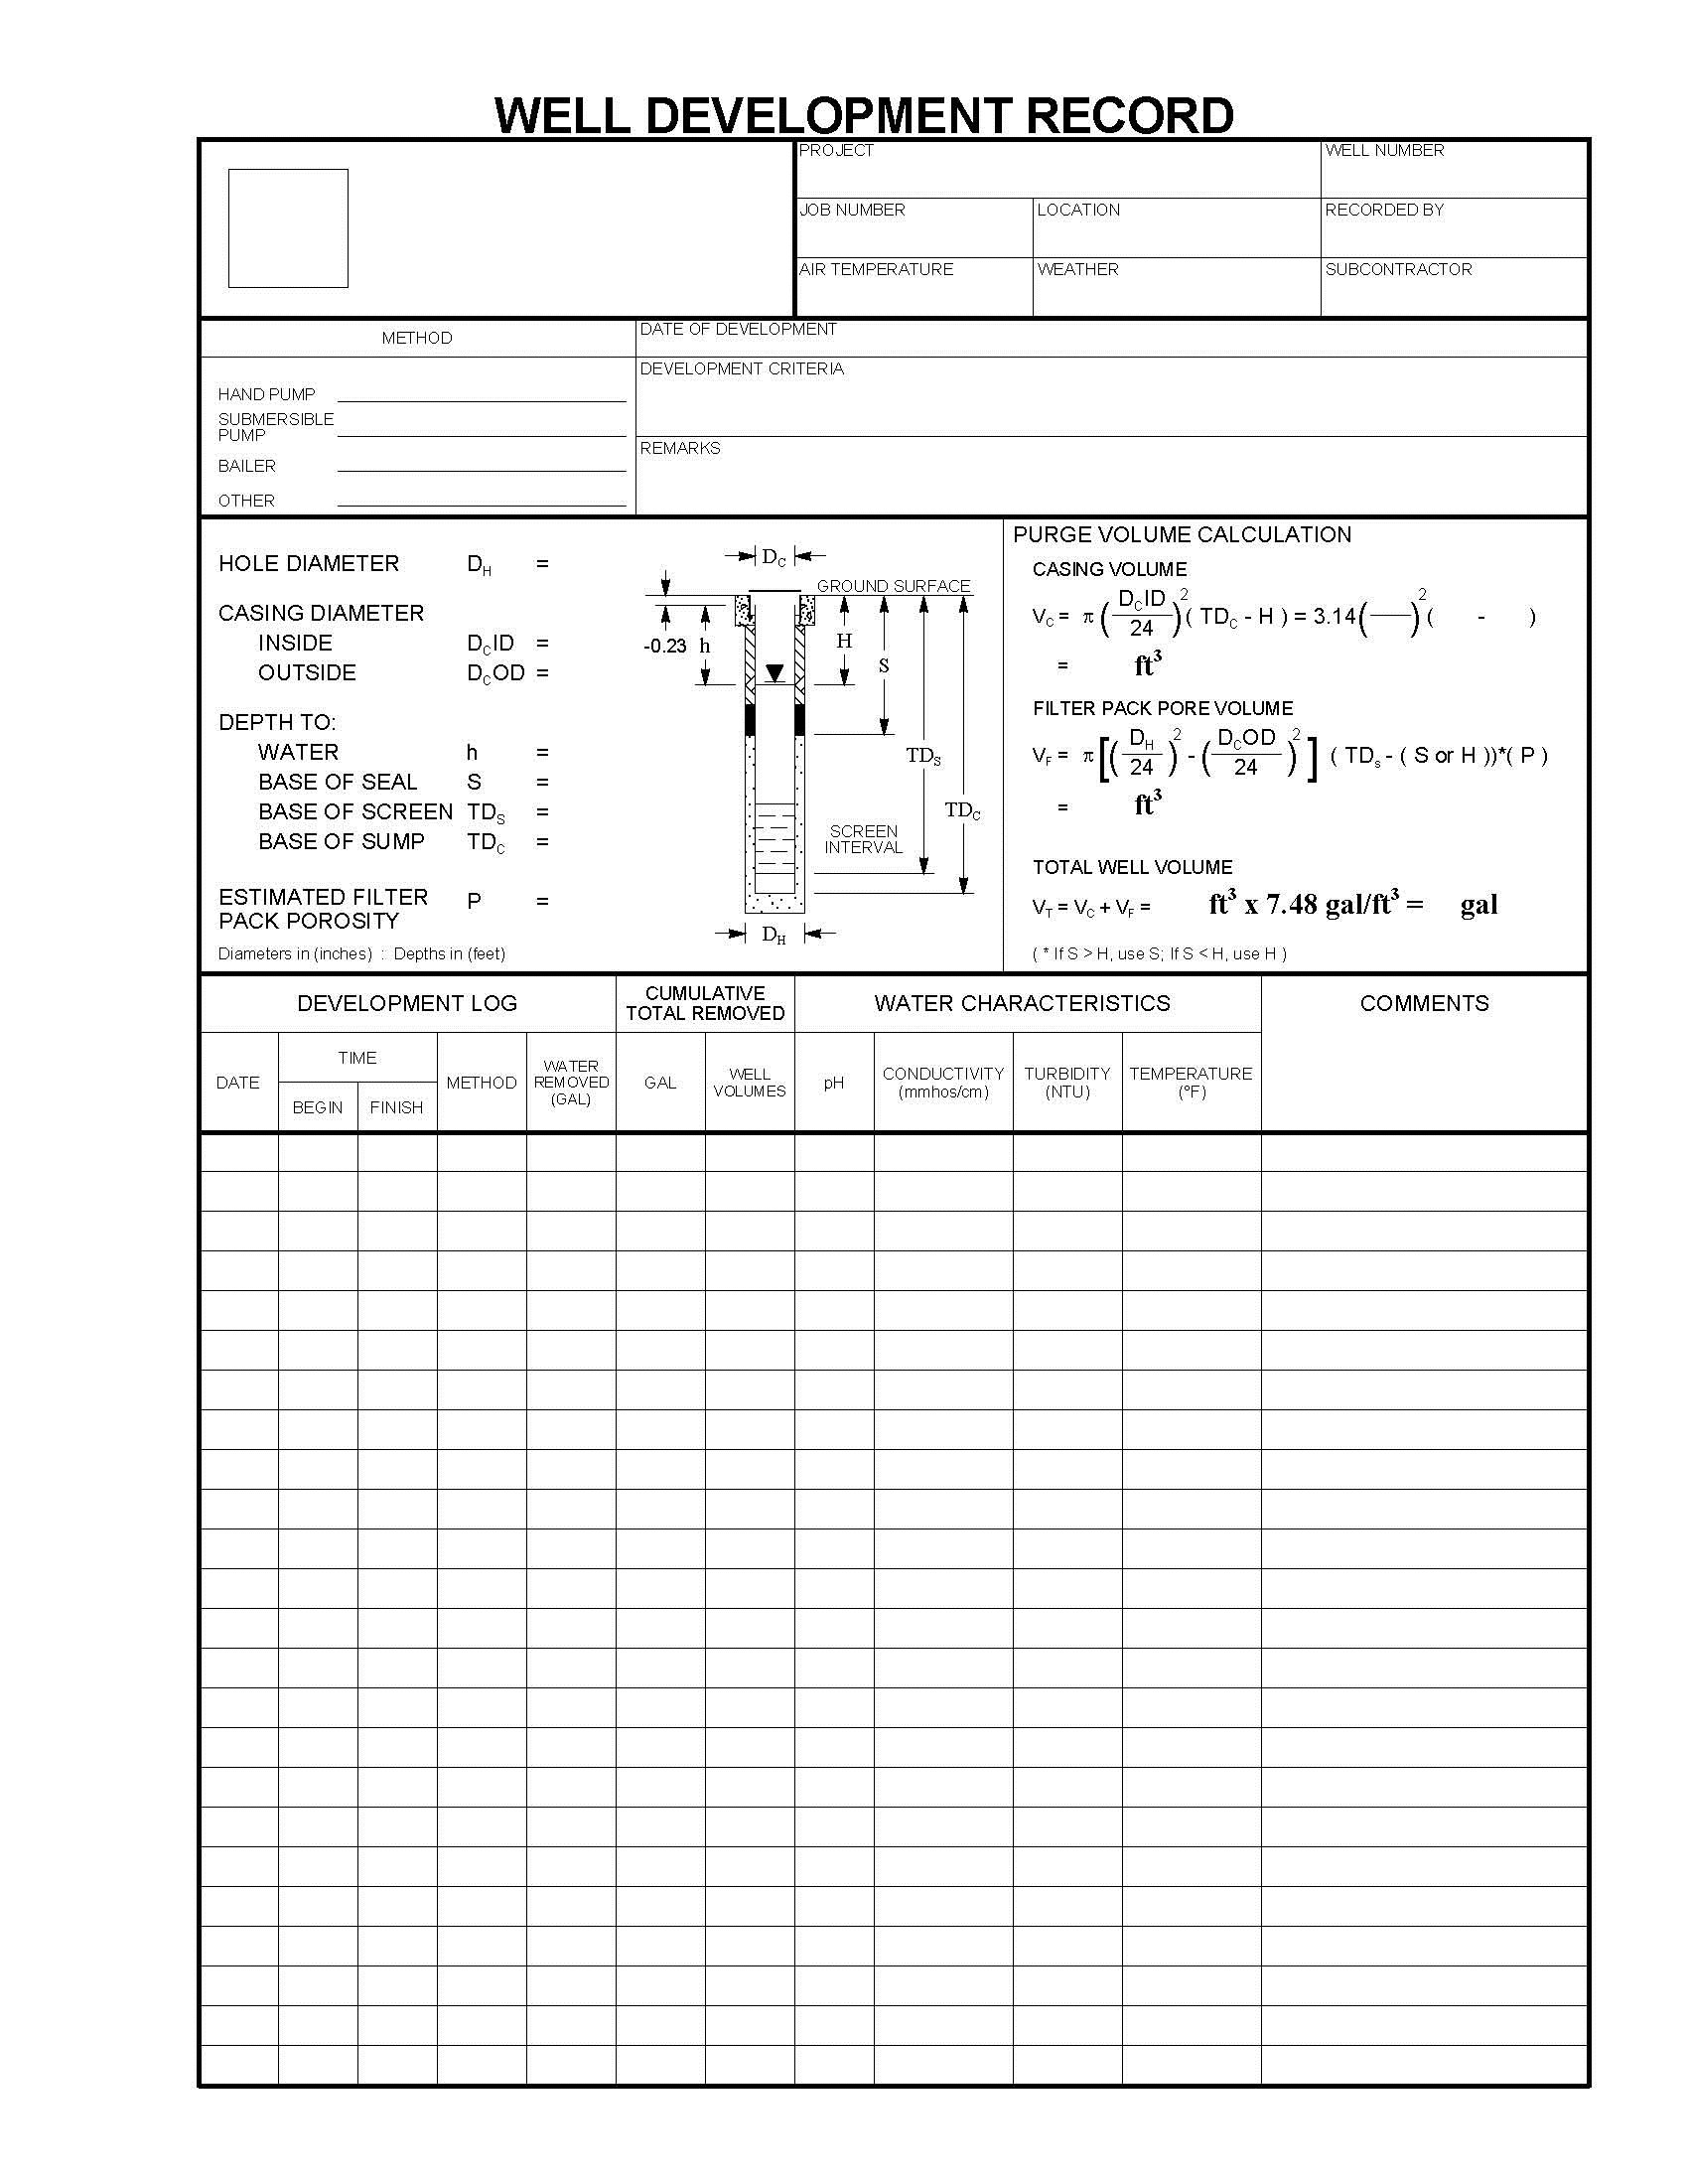 Figure 6-20. Example Well Development Log |
6.6.4 Groundwater Gauging
Refer to the USEPA document Groundwater Level and Well Depth Measurement (USEPA 2013) in Attachment 3 for detailed guidance on field gauging of monitoring wells. Determination of the elevation of the water table at specific well locations is referred to as “gauging.” The purpose of groundwater gauging is to construct a groundwater table map or a potentiometric surface map for the site under investigation. The data are used to calculate the hydraulic gradient(s) and the horizontal groundwater flow direction(s) across the site.
All measurements must be taken within a 24-hour period or less. Certain conditions require that measurements are taken within a shorter time period. These conditions include (USEPA, 1999):
- The magnitude of the observed changes between wells appears too large;
- Atmospheric pressure changes occur;
- Groundwater formation is tidally influenced;
- Groundwater formation is affected by river impoundments and/or unlined ditches;
- Groundwater formation is stressed by intermittent pumping of production wells;
- Groundwater formation is recharged due to precipitation events or irrigation.
If time restrictions require the use of more than one measuring device, calibrate the devices against each other at the start or end of the work day. Calibrate the devices by comparing measurements in a single well. If free phase product is present at the site, the calibration well must contain free phase product to ensure proper calibration. In this case, calibrate the devices at the end of the day. To calibrate instruments at the start of the day, select a clean or the least contaminated well.
Gauge wells starting with the cleanest well and proceed in order of increasing contaminant levels. Decontaminate the measuring device at the start and end of the day and between wells. Ensure that the decontamination procedures are adequate for the contaminants present.
The HEER Office requires a minimum of two rounds of groundwater gauging to verify the groundwater gradient(s) and flow direction(s). The two gauging events must be separated by a minimum of 30 days. Ensure that wells are continually connected to the groundwater formation if gauging events are repeated over prolonged periods of time. Purge/redevelop wells as needed to reestablish hydraulic connectivity and equilibration with the formation.
On sites that are tidally influenced, perform a tidal study to determine the net groundwater flow direction. If site investigation, monitoring and remedial efforts continue over a year, include seasonal groundwater gauging into the investigation to determine the influence of seasonal variations in the groundwater formation.
Correct the measured groundwater elevations for tidal influences, barometric influences and overlying free product thickness.
Return to the Top of the Page
6.6.4.1 Monitoring Well Equilibration
During well development, a large amount of groundwater is pulled through the surrounding formation as well as the filter pack and the well casing. This may disturb the chemical equilibrium of the surrounding formation with the groundwater. In addition, the filter pack may not reach chemical equilibrium with the groundwater formation.
Time must be allowed for chemical equilibration of the filter pack and the surrounding formation with the groundwater formation before the well may be sampled. At the same time, hydraulic equilibrium with the groundwater formation should be attained. This is especially important in low permeability formations, where water extraction during well development may draw down the water level adjacent to the well.
As a default, the HEER Office recommends that groundwater gauging and sampling be conducted no sooner than 72 hours after well development for high-permeability formations and 7-14 days for low permeability formations. However, equilibration time may be based on site-specific factors. If a different time frame is proposed based upon known site conditions (e.g., evidence of high hydraulic conductivity, either for the site itself or immediately surrounding area), overall project considerations, or other pertinent information, the interval, rationale and evidence supporting the proposal should be noted in detail in the SAP or documented through consultation with the HEER Office. Additional discussion on equilibration is provided in a Subsection 6.6.7.
Return to the Top of the Page
6.6.4.2 Depth-to-Water Measurement
Reference all water level measurements to the survey mark at the top of the casing. The reference point must be surveyed and marked as detailed in Subsection 6.6.2, Well Survey. Use either a weighted steel tape with chalk or an electronic water level indicator to measure the depth to water (USEPA, 2002b and USEPA, 1999a). Select the measuring device carefully for wells deeper than 200 feet to ensure that the tape does not stretch (USEPA, 2002b). The measurement must be taken with an accuracy of ±0.01 feet.
Wells with submerged screens should have the well cap removed at least 15 minutes prior to gauging to eliminate the effects of rising or falling water levels prior to the gauging event. Rising or falling water levels prior to removing the well cap will create either pressure or a vacuum on the well that will impact the water level in the well unless sufficient time is allowed for the well to equilibrate. In addition, wells with submerged screens should be gauged continuously for several minutes to document that the water level has equilibrated.
If groundwater sampling is to be completed on the same day, measure the depth to water prior to sampling.
Calculate the water table/potentiometric surface elevation by subtracting the depth to water from the reference point elevation. Correct elevations for tidal, barometric and free phase density influences.
Return to the Top of the Page
6.6.4.3 Total Well Depth
Measure the total well depth by lowering the probe to the bottom of the well and referencing the depth to the surveyor’s mark. Note whether silt is encountered at the bottom of the well. Repeat the total well depth measurement at least once to confirm the measurement (USEPA, 1999a).
If groundwater sampling is to be completed on the same day, measure the total well depth after sampling has been completed to prevent suspension of silt into the water column (USEPA, 1999a).
Return to the Top of the Page
6.6.4.4 Free Product Measurement
Measure wells with free phase product last. Use an oil-water interface probe manufactured for use in free-phase product (See example in Figure 6-21). Measure the depth to the top and bottom of the free phase in reference to the surveyor’s mark at the top of the casing. In LNAPL plumes, this would be on top of the water column; in DNAPL plumes at the bottom of the well.
Correct the water table elevation for the thickness of the free product floating on top of the water column. The corrections have to be based on the actual density of the LNAPL present at the site.
Return to the Top of the Page
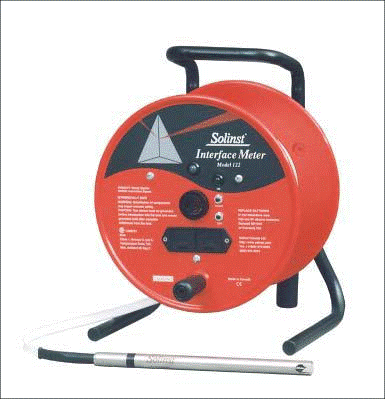 Figure 6-21. Oil-water Interface Meter. [Source: Solinst, 2008] |
6.6.4.5 Well Gauging Log
At a minimum record the following information on groundwater monitoring logs:
- Date;
- Project name and location;
- Field personnel;
- Measuring devices used;
- Calibration of measuring devices against each other;
- For each well record;
- Time of measurement;
- Depth to free product;
- Depth to groundwater;
- Depth to bottom of well;
- Observations (casing condition, well head condition, odor, color, sheen, silting, etc.);
- Activities that may influence water level (groundwater pumping, irrigation, etc.);
- Decontamination procedures.
6.6.4.6 Determination of Gradient and Flow Direction
Determine the vertical hydraulic gradient and flow direction on sites where vertical groundwater flow is significant. A deep vertical extent of a dissolved contaminant plume is an indication that vertical groundwater flow is significant.
To determine the vertical component of groundwater flow, install multiple piezometers or wells in clusters or nests, or multi-level wells or sampling devices. A piezometer or well nest is a closely spaced group of piezometers or wells screened at different depths, whereas a multi-level well is a single device providing access to more than one depth in a single well.
Both piezometer/well nests and multi-level wells allow for the measurement of vertical variations in hydraulic head. To obtain reliable measurements, consider the following criteria in the evaluation of data from piezometer/well nests and multi-level wells (USEPA, 1992d):
- Data obtained from multiple piezometers or wells placed in a single borehole may be erroneous. Sealant from one piezometer or well may migrate into the screened interval of another.
- Drilling and installing a piezometer close to others in a cluster may cause disturbance in the formation around neighboring piezometers.
- Water levels measured in piezometers that are closely-spaced, but separated horizontally, may produce imprecise information regarding the vertical component of groundwater flow
Installation of multiple piezometers closely spaced or within the same borehole is difficult and evaluation of the data has large uncertainties. The limitations can be overcome by installing a single multi-level monitoring well or sampling device in a single borehole. Refer to the USEPA document Handbook of Suggested Practices for the Design and Installation of Groundwater-Monitoring Wells (USEPA, 1991a) for a discussion of the advantages and disadvantages of these types of devices.
Install a minimum of two piezometer nests or multilevel monitoring wells on site. The two or more measurement points must be aligned parallel to the horizontal groundwater flow direction. During groundwater gauging in the piezometers, follow the procedures for groundwater gauging detailed above.
Calculate the vertical groundwater flow directions and hydraulic gradient using the water level measurements. Generate a vertical cross section across the measuring points depicting the flow net, piezometer screen depths and length of screen interval, geological units and water bearing units.
Refer for guidance (USEPA, 1989a; Cedergren, 1977; and Freeze et al., 1979) and more recent references on construction and evaluation of flow nets in cross sections (vertical flow nets). The design of the piezometer arrangement must be discussed in the SAP.
Return to the Top of the Page
6.6.5 Monitoring Well Purging
6.6.5.1 Objectives of Well Purging
The guidance presented is largely adapted from (CalDWR 1990); (USEPA 1991), (CalEPA 1995b), (SDDEH 2009) and (USEPA 2013), (USEPA 2017) in additional to experience gained at sites in Hawai′i. Refer also to the ASTM document Standard Guide for Purging Methods for Wells Used for Ground Water Quality Investigations (ASTM 2018b).
Well purging refers to the removal of groundwater from a well prior to the collection of samples. This is required if it cannot be demonstrated or reasonably assumed that water in the screened interval of the well and the surrounding filter pack is representative of water in the surrounding formation.
Variables controlling equilibrium of the water in the well with the surrounding formation include well diameter, sampling device, groundwater geochemistry, pump flow rate, formation permeability and recharge rate and whether the devices are used between different wells or dedicated to a specific well. Water within a monitoring well can become unrepresentative of water in the surrounding formation over time when the flow rate through the well screen is inadequate to prevent warming, off gassing or other changes.
Avoid excessive drawdown that could distorts natural flow patterns through the well. Excessive purging and drawdown can cause formation water to cascade into the screened interval of the well. This can lead to off gassing of VOCs and as well as oxidation of the water in the well. The latter can lead to a change in the redox state and cause the precipitation of originally dissolved-phase metals.
Keep the contaminant characteristics in mind when selecting a purge device, for example, do not choose a purge device that will cause volatilization if the contaminant of concern is a volatile compound. Also ensure that the purging device material is chemically inert and that it does not adsorb contaminants (USEPA, 2002b). Preferred device materials are PVC, stainless steel and Teflon®.
Choose a purging device that will not alter the geochemical and physical parameters of the groundwater and dissolved contaminants or increase turbidity. If practicable, use low-flow submersible or positive displacement pumps with variable-speed control. Other purging devices include suction lift pumps or peristaltic pumps and bailers, though due to the greater potential to alter geochemical and physical parameters of groundwater and other limitations, their use is generally limited to monitoring wells with specific characteristics and/or contaminants. Pumps and other purging/sampling devices are described in Subsection 6.6.6. Use purging devices dedicated to the well whenever possible to avoid contamination. If downhole equipment must be used in more than one well, decontaminate the equipment between wells. Choose decontamination procedures appropriate for the contaminants present.
There are two potential intake positions for well purging, above the well screen or within the well screen. If purging above the well screen (if the screen interval is below the water table), start purging at the water table and gradually lower the pump so that it sits just above the top of the well screen at the end of purging. This will ensure that the stagnant water above the screen has been purged. It also ensures that during sampling, the groundwater has the shortest riser length to pass (USEPA, 2002b).
Return to the Top of the Page
6.6.5.2 Water Monitoring Parameters
Throughout purging, regularly measure and record water quality parameters. Stabilization of temperature, ORP and DO are especially important for testing of petroleum-contaminated sites. Preferably, water quality parameters should be measured with a device that prevents contact with air, such as a flow through cell. The following criteria are typically used to indicate that stable conditions have been met during well purging:
- Well water pH stabilizes to within ±0.1 pH units for three successive readings;
- Well water temperature stabilizes to within ±1 degree Celsius;
- Well water conductivity stabilizes to within ±3 percent;
- Well water oxidation reduction potential (ORP) stabilizes to within ±10 millivolts;
- Well water dissolved oxygen (DO) concentration stabilizes to within ±0.3 mg/L;
- Well water is clear to the unaided eye in areas where the local groundwater is known to be clear and the turbidity readings are below 10 NTUs;
- Turbidity stabilizes to within ±10 percent at readings higher than 10 NTU in areas of known turbid groundwater.
Take a water quality reading no less than every 0.25 gallons. Make at minimum of three readings to assess stability. Beyond this recommendation, the time or purge volume required for parameter stabilization is independent of well depth or well volumes and can vary dramatically between wells.
Note that the natural heterogeneity of both dissolved-phased and NAPL-phase contaminants in groundwater can confound efforts to assess equilibrium of well conditions with conditions in the enclosing formation. The distribution of contaminants in groundwater as well as general, groundwater quality parameters is unlikely to be as uniform as might be inferred by groundwater isoconcentration maps. Few detailed field studies of natural, random variability of contaminant distribution in groundwater have been carried out. Borings drilled a few feet of each other have indicated both the presence and absence of LNAPL at some sites. Random variability of vapor emissions during purging of petroleum-impacted wells in the absence of LNAPL also suggests that contamination can be very heterogeneous at a small scale.
6.6.5.3 Low-Flow Approach
The HEER Office recommends that low-flow purging and sampling approaches be utilized whenever feasible in order to improve the representativeness of the sample data. Researchers have evaluated the relative merits of purging methods and the need to ensure sample representativeness and data precision (Nielsen 2006; ASTM 2018b). This includes the use of “low-flow” purge methods, also referred to as “micro-purging,” “low-stress purging,” “low-impact purging,” and “minimal drawdown purging”). Low-flow purging involves the same approach and equipment as low-flow sampling, as described in Subsection 6.6.6.
The purpose of the low-flow purging is to draw formation groundwater into the well at a rate that minimizes drawdown and agitation of the water column. Low-flow purging, whether using portable or dedicated systems, should be done using pump intake located in the middle or slightly above the middle of the screen interval. Placement of the pump at the top of the water column for sampling is only recommended in unconfined groundwater formations, screened across the water table, where this is the desired sampling point. Carefully place the pump into the well at the selected depth within the well screen to avoid turbulence within the well. Do not use this method with screens exceeding 10 feet in length (USEPA, 2002b).
The approach is based on the assumption that under minimal drawdown the pump will not distort natural groundwater flow and will not draw stagnant water from unscreened portion of the well portion into the pump and sample container (Puls and Barcelona, 1996, ASTM 2019). Monitor the water level throughout purging and subsequent sampling. Gauging intervals can be as short at 30 seconds or longer, depending on the hydraulic conductivity of the groundwater formation. Flow rates in the range of 0.1 to 0.5 liters per minute are typically used; however, this is dependent on the site- and well-specific hydrogeology.
The use of a variable purge rate, low-flow sampling pump greatly assists in changing the flow rates and thus minimizing drawdown. Bailers, suction-lift pumps and high-flow rate pumps cannot be used for low-flow purging and sampling. The low-flow method is applicable for all types of aqueous phase contaminants and naturally occurring chemicals in groundwater formations with low to high permeability. Low-flow purging and sampling is generally not appropriate for very low-yield monitoring wells, as noted in Subsection 6.6.6.
The HEER Office recommends the use of flow-through cells when monitoring groundwater stabilization parameters during purging. Flow-through cells contain an inlet at the bottom of a cup that purge water is pumped into. The water is allowed to overflow into a bucket during purging. The field instruments used to monitor stabilization parameters are kept in the flow-through cell to provide a continuous readout.
Return to the Top of the Page
6.6.5.4 Well Volume Approach
The well volume purging approach described below can allow more rapid purging of a well and is acceptable when testing for non-volatile chemicals (Nielsen et al., 2007). The rationale for use of this purging approach should be clearly documented in the SAP or in consultation with the HEER Office.
The purpose of the well volume approach is to remove all stagnant water or non-representative water within the well, the filter pack and the adjoining formation.
For wells where the water level is above the well screen (i.e., a fully saturated screen interval), start pumping near the water table and lower the pump slowly throughout the purging process. The final position of the pump should be just above the screen interval.
For wells where the water level is within the well screen, set the pump to a level such that the drawdown does not allow air to enter the pump. Set the pump high enough that sediment from the bottom of the well is not introduced into the pump (USEPA, 2002b). Keep the pump rate low enough to avoid turbulent flow within the well; for a 2-inch well that is typically less than one gallon per minute or 3.8 liters per minute (USEPA, 2002b).
Alternatively, use a bailer to remove groundwater from the well. Start bailing near the water table and keep lowering the bailer as purging continues. Lower the bailer slowly in order to avoid disturbing any sediment present at the bottom of the well. Avoid introducing turbulence near the bottom of the well that could lead to suspension of sediment into the water column.
Monitor water quality parameters after removal of each well volume (the well volume includes the saturated filter pack volume). Continue purging until a minimum of three well volumes are removed and the water quality parameters have stabilized.
Return to the Top of the Page
6.6.5.5 Purging Low Permeability Formations
The procedures described in this section are for use in very low permeability formations, where wells are slow to recover.
In wells that are screened below the water table, purge water in storage in the well casing from above the screen and avoid dewatering and introducing air into the well screen interval. Do not lower the pump into the well screen interval, but pump from the top of the water column, following the water level down to the top of the screen. This procedure requires pumping at low rates to prevent excessive draw down, so bailers or inertial-lift pumps should not be utilized (USEPA, 2002b).
In wells that are screened across the water table, it has been common practice to purge the well dry and let it recover for a minimum of 2 hours and until sufficient water volume is present to take a water quality sample or the well has recovered to 90%. Although it is recognized that purging to dryness may lead to significant problems such as loss of volatiles, increased turbidity and changes in dissolved gases, alternatives for these low yield wells may be limited, especially in cases with less than 4 feet of water in the well and a depth to water of more than 20 feet (USEPA, 2002b).
Another option is the use of “minimum-drawdown” purging for low yield wells as described in “Low-Flow (Minimal Drawdown) Ground-Water Sampling Procedures” (Puls and Barcelona, 1996). No-purge samplers or passive samplers (Subsection 6.6.6)) are also a potential option, although the representativeness of the sample collected with respect to water in the enclosing formation must be taken into consideration. The rationale for purging and sampling strategy selected should be described in the SAP and discussed with the HEER Office prior to the first sampling event.
Return to the Top of the Page
6.6.5.6 No-Purge Method
No-purge sampling methods (Subsection 6.6.6) omit purging of a well prior to the collection of water samples. This is also referred to as “minimal purge sampling” in some guidance, in acknowledgement of the volume of water retained in sampling equipment during sample collection (ASTM 2019).
Data base on no-purge sampling methods are acceptable for final decision making purposes only in cases where groundwater within the targeted, screened interval of a well has been demonstrated to be representative of groundwater in the surrounding formation. This is generally only applicable to testing of highly permeable formations with a relative rapid exchange of water within a monitoring well (e.g., fractured basalt or coarse-grained, sandy or gravely sediment).
In other cases, no‐purge methods are allowable for monitoring provided that the potential limitations of the data collected are noted in the report. Purge wells as describe above to collect data for assessment of potential environmental concerns and well closure.
Return to the Top of the Page
6.6.5.7 Well Purging Log
A well purging log should be documented for each monitoring well. The log should include, at a minimum, the following information:
- Project name and location
- Well designation and location
- Well construction including total depth of well and screen length
- Well purging technique
- Purging device
- Average pumping or water extraction rate
- Static water level from top of casing before purging
- Total well depth and presence/absence of sediment
- For low-flow approach: measure total well depth after purging and sampling are complete
- For well volume approach: measure total well depth before purging
- Water Volumes
- For well volume approach: calculate well volume
- For low-flow approach: calculate tube volume
- A running log of:
- Time;
- Water volume removed both incremental and totalized;
- For low-flow approach: water level and drawdown;
- Field measurement of pH, temperature, conductivity, oxidation reduction potential and turbidity;
- Field measurements of dissolved oxygen;
- Visual and olfactory observations such as color, clarity, odor, particulates, etc.;
- Total volume of water removed;
- Total time needed for purging;
- IDW inventory including type and number of IDW containers, location of IDW storage. Refer to Table 6-1<link> above for methods to determine water quality parameters during purging. Figure 6-22 presents an example Groundwater Sampling Log containing locations for recording purging parameters prior to the collection of groundwater samples.
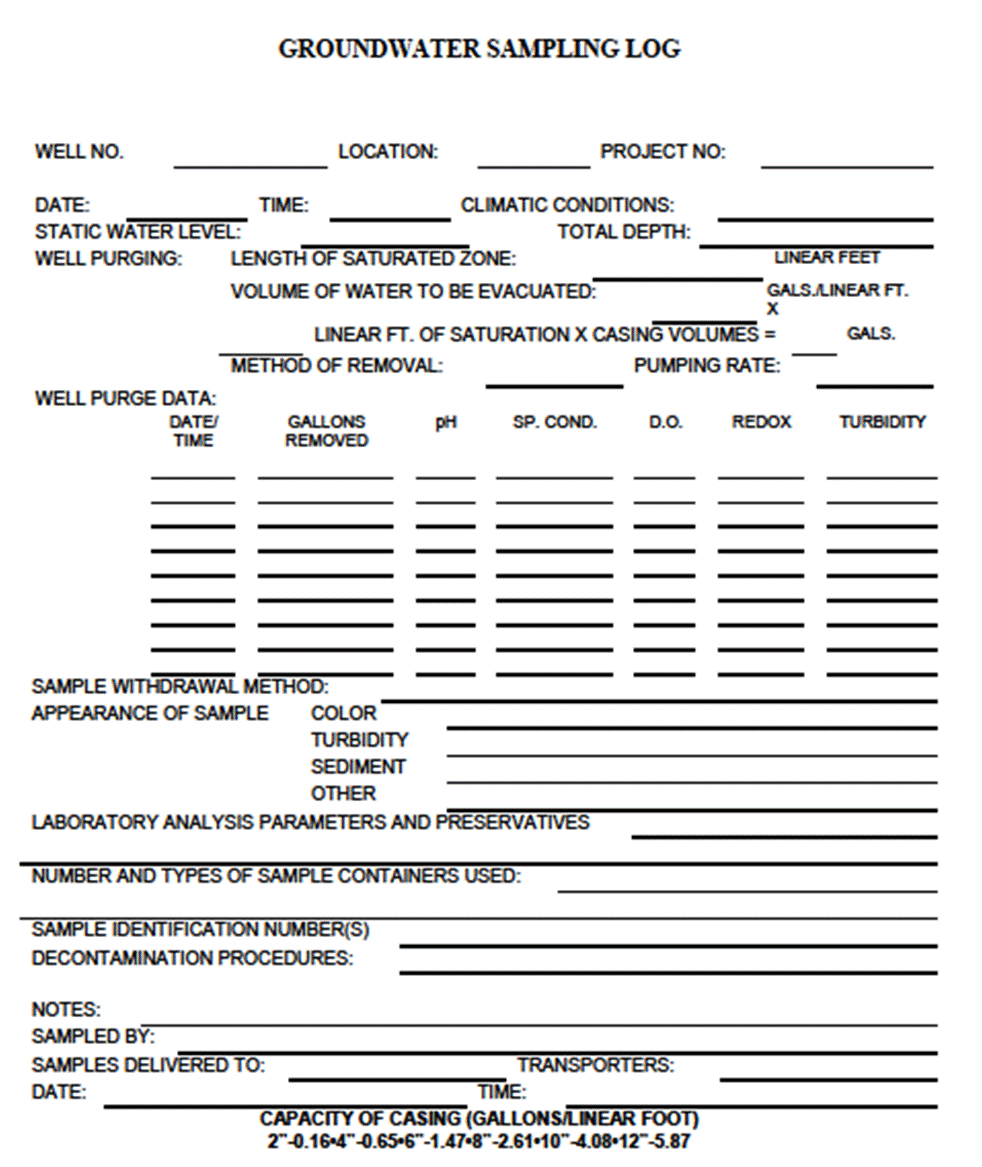 Figure 6-22. Example Groundwater Sampling Log [Source: US Navy, 2007] |
6.6.5.8 Purge Water Re-Infiltration or Disposal
All groundwater extracted from wells during purging must be properly containerized and staged for on-site re-infiltration or offsite disposal. Do not allow water to flow onto the ground prior to testing.
Disposal of purge water on ground is acceptable provided that the following conditions are met:
- The water has been sampled and tested for contaminants of concern or existing data for samples collected from the well can be reasonably assumed to be representative;
- Concentrations of contaminants of concern do not exceed action levels for groundwater that is not a source of drinking water and in consideration of the distance to the nearest surface water body (refer to Tables D-1c and D-1c in Appendix 1 of the DOH EHE guidance; HDOH 2017);
- The water otherwise does not contain free product, exhibit a sheen or otherwise pose potential odor and nuisance concerns;
- The water is allowed to re-infiltrate into the ground at the well point of origin or immediately upgradient in an area with similar or higher concentrations of COPCs in first-encountered groundwater;
- No runoff of the water onto adjacent properties or into storm drains is allowed.
Purge water can also be allowed to evaporate on-site in containers or lined and bermed-areas provided that the above conditions are met. Water should be collected in a bucket or drum first rather than purged directly onto a ground surface in order to check for sheens, free product or odors. Avoid disposing of the water near potential preferential pathways like storm drains. Avoid re-infiltration or on-site evaporation of purge water if inclement weather conditions are present or pending (e.g. don’t attempt on a rainy day).
Return to the Top of the Page
6.6.6 Groundwater Sample Collection Methods
The purpose of sample collection is to collect data representative of the specified, DU area and volume of groundwater. This has been traditionally done by the installation of monitoring wells in what can be considered “Source Area” and “Boundary Area” Decision Units (6.4.2) and the collection and testing of small-volume, “discrete” samples of water from each well. Refer to the USEPA Region 4 document Groundwater Sampling (USEPA 2017) in Attachment 3 for additional guidance on this approach.
Consider the characteristics of the groundwater formation as well as the characteristics of the contaminant(s) during selection of the sampling approach. This includes consideration of the presence of the contaminant as NAPL versus dissolved-phase only as well as volatility, solubility, density (denser or lighter than groundwater) and fate in the subsurface (adhesion to soil particles, biodegradation etc.). Ensure that the well has been adequately purged before sample collection if applicable to the subject site.
The limitations and hidden error in traditional, discrete groundwater sample data has not been well-studied. The concentration of a contaminant in porewater is invariably tied to the concentration of the contaminant in the surrounding soil. Contaminant concentrations in soil can be highly variable over very short distances due to the nature of the release and changes in soil properties. Where feasible, the use of Multi Increment sampling methods, as described below, is preferred. These methods are still under development. The guidance will be updated and expanded as more experience in the field is gained.
Return to the Top of the Page
6.6.6.1 Multi Increment-Type Sampling Methods
Two approaches can be considered for the collection of Multi Increment-types of samples from designated groundwater DUs: 1) Preparation of MI samples through the collection and combination of water from a large number of sampling points within the DU and 2) Collection of Large Volume Purge (LVP) samples from single wells. Neither method is well developed at this time but can be considered for individual projects. Preliminary guidance is provided below. The development of methods to improve for the collection of more risk-based or remediation-based groundwater sample data is encouraged and can be discussed with the HEER Office project manager.
Multi Increment Groundwater Samples
Consider the collection of groundwater increments from at least 30 points within a targeted DU area in a systematic, random fashion. This reflects anticipated low, small-scale variability of contaminant distribution within the groundwater DU, similar to that observed for soil impacted by contaminated wastewater (see Section 4.4.1). The approach is only likely to be feasible in cases where a direct-push tool can be used in the field. Methods for preparation of samples to be tested for VOCs in order to prevent contaminant loss during collection and generate a manageable sample volume have not been developed and should be discussed with the HEER Office project manager.
LVP Groundwater Samples
Large Volume Purge samples are prepared by the collection of a continuous sample from a purge stream of the targeted media from a single point. The collection of LVP-type samples for groundwater from an individual well would be carried out in a similar as described in Section 7.8.4; for subslab soil vapor. The reliability of the resulting data in terms of representing the groundwater immediately surrounding the sampling point will be far higher than for traditional, small-volume, discrete samples.
Detailed guidance on this approach has not yet been developed. Purge volumes will be significantly smaller than the overall volume of the DU itself and simply represent an improvement over traditional, small-volume, discrete sampling methods. The extracted groundwater could be tested in pools or storage tanks and the resulting data used to determine decisions for treatment, disposal or re-infiltration. This might practical in cases that involve dewatering during construction or ex situ treatment of groundwater. The use of sorption tubes or continuous testing using a field gas chromatograph might also be possible.
Logistical problems in the field can include the storage and re-injection or disposal of the purged water. Purged water could in many cases be allowed to re-infiltrate within the project area in the manner described in Section 6.6.8.
Replicate Samples
Replicate samples (triplicates) should be ideally be collected to test the overall precision of the sampling method. This would require the preparation of traditional MI samples from two independent sets of increment collection points within the DU. Two additional purges would be carried out in the case of LVP sample collection. Care must be taken to ensure that the purged water for each sample is from the targeted DU.
Field Implementation
The use of MI- or LVP-type sampling methods is unlikely to be practical for general characterization of groundwater at this time but can be considered on a case-by-case basis. Preparation of a single, Multi Increment sample from a large number of points might be possible in cases where groundwater is very shallow, a direct-push tool can be used, and the entire DU area is easily accessible. LVP-type sample collection methods might be practical for the collection of samples from active, drinking water wells or from wells where groundwater can easily be allowed to re-infiltrate on site. Regardless, it is important to improve the representativeness of the resulting data with respect to the investigation questions being asked to the extent possible.
Return to the Top of the Page
6.6.6.2 Discrete Samples
Uncertainty in representativeness of discrete sample data for individual points can be expected to be higher for groundwater than surface water. This is due to small-scale lateral and vertical heterogeneities in the formation holding the groundwater, including total organic carbon, clay content, permeability and conductivity and related variability of groundwater flow patterns through contaminated areas. The presence of LNAPL and DNAPL in groundwater can also be highly variable over very short distances (e.g., a few feet), resulting in erroneous estimates of the extent and magnitude of free product.
The use of discrete sample data for in situ characterize groundwater is unavoidable for most sites. The collection of samples that are representative of well-thought-out, targeted DU intervals of water within a monitoring well using the methods described below can help reduce uncertainty in groundwater data obtained for single points. Keep in mind that consistent data for a single monitoring well does not, however, necessarily reflect a lack of significant variability of contaminant concentrations in the immediately surrounding groundwater. Such uncertainties in the data should be taken into account when assessing the risk posed by contaminated groundwater and in the design of remedial actions.
Return to the Top of the Page
6.6.6.3 Low-Flow Sampling
The purpose of low-flow sampling is to ensure that the pump draws water only from the screened interval and does not draw stagnant water into the sample. Low-flow sampling also minimizes agitation of formation water. Low-flow sampling can be used to help target sample collection at a specific depth within the screened interval, if this is an objective of the investigation. In such cases, the purge rate should be kept low enough to ensure that the level of the water in the well does not drop more than 4 inches or 10 cm (Puls and Barcelona, 1996). Typically, flow rates on the order of 0.1 to 0.5 liters per minute are used; however, this is dependent on site-specific hydrogeology. The method is most applicable in groundwater formations with medium to high permeability. The HEER Office recommends the low-flow sampling approach be utilized where appropriate and feasible to collect representative groundwater samples. Water levels should be monitored during purging and sampling to ensure the proper purge rate is used to provide minimum drawdown and/or water level stabilization.
Low-flow sampling is preceded by low-flow purging (see Subsection 6.6.5; Low-Flow Approach). The rationale for targeting specific depths or depth intervals within a well for sample collection should be documented in the SAP. For example, if the objective of the sample collection is to assess potential vapor emissions and vapor intrusion risk associated with VOC-contaminated groundwater, then place the pump to collect a sample within the upper one to two feet of the water table. If the objective of the investigation is to assess the condition of groundwater that could migrate offsite or into trenches during excavation work, then set then place the pump intake at the depth of the formation with the anticipated highest hydraulic conductivity. Remember that the objective of sample collection is not necessarily to find the highest concentration of the contaminant within the screened, formation interval, but to collect data that are representative of the specific, investigation question being asked.
Maintain a consistent pump rate and sample collection method. Do not pause the pump between purging and sampling. Keep the pump rate throughout sampling low enough that the groundwater flow exiting from the discharge tube is laminar and does not induce turbulence in sampling containers.
Return to the Top of the Page
6.6.6.4 No-Purge Sampling
Refer to Section 6.6.5<link> for guidance on the need to purge wells to remove stagnant water prior to the collection of sample. No-purge sampling methods are an integral part of “passive sampling” devices described below. No-purge sample collection methods are acceptable for final decision making purposes only in cases where groundwater within the targeted, screened interval of a well has been demonstrated to be representative of groundwater in the surrounding formation. The most common hydrogeologic scenario for no‐purge sampling is a high-permeability formation with a conductivity of 10-5 cm/sec or greater and with upland head to ensure steady adequate flow rate through the well (e.g., fractured basalt or coarse-grained, sandy or gravely sediment).
When appropriate, no-purge samples can be collected from a well using various types of pumps or bailers, as discussed below. Some devices, however, are specifically designed to collect samples of groundwater in wells that have not been recently purged and is assumed to be in equilibrium with groundwater in the immediately surrounding formation. This is referred to as “passive” sampling.
Return to the Top of the Page
6.6.7 Sample Collection Tools
The following sections describe different methods of groundwater sample collection, including the different types of equipment for each method and details on the appropriate applications for each method. Sample collection devices commonly used in Hawai`i can be divided into four general types (after USEPA, 1992): 1) Positive displacement pumps, 2) Suction lift pumps; 3) Grab samplers and 4) Passive samplers. The first category includes bladder pumps. The second category includes peristaltic pumps. HydraSleeve™ samplers and Snap Samplers® are included in the third category. The latter category includes passive diffusion bags.
The objective of sample collection is to obtain data representative of the targeted DU interval of the groundwater formation. The representativeness of the data collected is based on several factors, including: 1) Representativeness of water collected with respect to water in the targeted interval and 2) Loss or alteration of targeted analytes during sample collection, 3) Loss or alteration of targeted analytes during sample shipment and storage and 4) Error associated with laboratory subsample collection and analysis. Error associated with sample collection is anticipated to introduce the greatest bias in sample data. Error associated with laboratory analysis is anticipated to be the smallest component of data bias.
Table 6-2 summarizes the anticipated data quality for samples collected from pumps and grab sample devices. Error during sample collection is most often associated with the inclusion of suspended sediment or alteration of the original water chemistry due to oxidation and related factors (after USEPA, 1992, 2002b; Nielson, 2006; Nielson et al., 2007). Error associated with shipment and storage is often due to biodegradation. The rankings assume proper use of the equipment as described in the individual sections.
Return to the Top of the Page
Table 6-2 Potential for Representative Analytical Results for Commonly Utilized Groundwater Sampling Methods and Common Contaminants of Potential Concern
| Tool | Coverage of DU Interval | Sample Quality vs Analyte Category | |||||
| VOCs | 1SVOCs | 1NVOCs | 1Metals | 2NAPL | 3Other | ||
| 4Positive Displacement Pump | P-G | E | E | E | E | NR | E |
| Submersible Pump | P-G | G | G | E | E | NR | E |
| Peristaltic Pump | P-G | P-G | P-G | G | G | G | P-G |
| 4Bailer | G-E | P-G | P-G | P-G | P-G | E | P-E |
| HydraSleeve | G-E | G-E | G-E | G-E | G-E | G-E | E |
| Snap Sampler | G | G-E | G-E | G-E | G-E | G-E | E |
E = Excellent
G = Good
P = Poor
VOCs: Volatile organic compounds; SVOCs: Semi-volatile organic compounds
NVOCs: Nonvolatile organic compounds; NAPL: Non aqueous-phase liquid.
- Filtering of samples normally acceptable for dissolved metals and NVOCs analysis.
- Includes LNAPL and DNAPL
- Includes pH, major ions, dissolved, gases, ORP, total dissolved solids. etc.
- Bailers prone to agitate water column and result in loss of VOCs or inclusion of suspended sediment in sample if not used properly.
Pumps draw a sample from a single intake port set within the well casing. Directly representing the entire, targeted DU interval of groundwater column requires moving the intake port up (or down) the length of screen at a steady rate. If this is not practical in the field then multiple samples at different depths within the targeted interval m initially collected in order to assess the representativeness of the sample data collected from a single point.
Return to the Top of the Page
6.6.7.1 Positive Displacement Pumps
Positive displacement pumps are normally used for low-flow sampling (Nielson, 2006). These types of pumps include:
- Bladder Pump;
- Gear Pump;
- Piston pump.
Positive displacement pumps are suitable for collecting samples for all analyses and particularly when samples are to be collected for analysis of volatile compounds (Nielson, 2006). These pumps use a pushing motion, induced by the gears, pistons or bladders and are the least likely of the well sampling methods described in this TGM to impart agitation, turbulence, or heat that could affect sample quality, particularly for volatile contaminants.
Until recently, positive displacement pumps were limited to use in wells larger than 2 inches in diameter. However, manufacturers of bladder pumps and piston pumps have developed pumps with diameters as small as 0.625 inches that can be used in micro wells installed via direct push methods. Gear pumps might still require a well diameter of at least two inches.
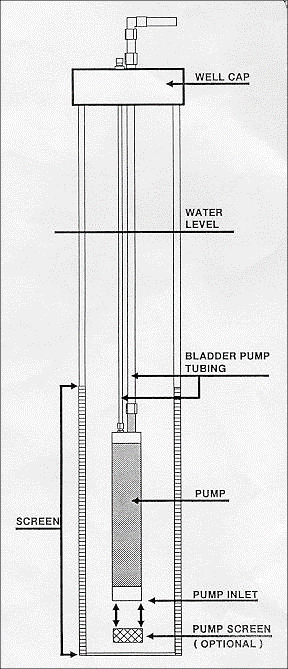
within a monitoring well
While both bladder and piston pumps can be used in a wide range of applications, piston pumps are relatively more complex and tend to be used more as pumps dedicated to individual wells (Nielson, 2006).
An example of a bladder pump set up in a well is illustrated in Figure 6-23. Consultants have reported problems with the use of bladder pumps due to their expense, slowness, difficulty in controlling the flow rate and the need for significant denomination between sampling events. A bladder pump consists of a flexible membrane enclosed by a rigid housing. In the most common application, a pump is inserted below the water table in a well and water enters the housing under hydrostatic pressure through an intake check valve. When the housing chamber is full, the intake check valve prevents the water from escaping back out to the well. The bladder is inflated from a compressed gas source or pump at the surface and the pressure generated by the inflating bladder pushes the water upwards through another discharge check valve, then through a discharge tube upwards to the surface
Setup of bladder pumps in the field typically require a compressed gas source to inflate the bladder and a controller unit to regulate the rate of inflation and, therefore, pumping. See Figure 6-23 for expanded view. Compressed gas may be supplied from a tank or compressor. For deeper applications requiring greater pressures, a compressor driven by a dedicated motor is generally used. For these instances, care must be taken to locate the motor upwind and away from the well that is being sampled. For shallower applications, some manufacturers have developed combined compressor/controller units that can be powered off of a portable battery or the battery of a field vehicle.
Return to the Top of the Page
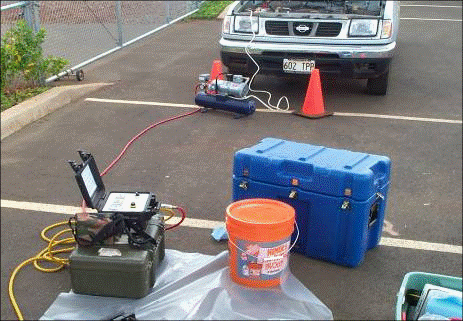 |
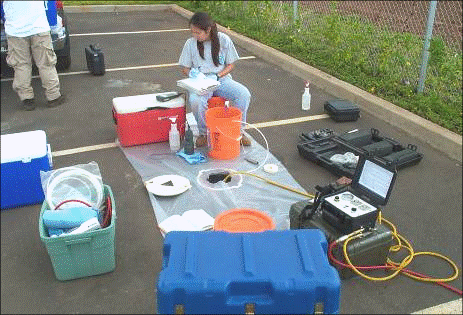 |
Figure 6-24. Field Setup for Purging and Sampling Well
An example field setup of a portable bladder pump assembly is illustrated from different points of view in Figure 6-24.
Purging and sampling of groundwater monitoring well using a portable low-flow bladder pump driven by a portable air compressor and control box.
Return to the Top of the Page
6.6.7.2 Submersible Pumps
Consultants report better success with the use of submersible or “centrifugal” pumps. Submersible pumps move water up a well by applying positive pressure; however, instead of a pushing motion, submersible pumps typically use electric-motor driven impellers to drive the water to the surface. The pressure generated by the impellor is equal to the hydraulic head in the tubing extending from the pump to the top of the well.
Submersible pumps are portable, require less setup and equipment than positive displacement pumps and do not require compressed gases or air pumps. They generally have higher discharge capacities than positive displacement pumps and may therefore be more effective as a well volume purging method and for collecting of samples for nonvolatile contaminants. The pumps can also be used to collect samples for volatile contaminants provided that the purge rate is kept slow enough to prevent turbulence. Other reported problems include the potential for the impellor motion to cavitation, inducing bubble formation that may affect pressure sensitive components such as dissolved gases or VOCs. The motors themselves may generate considerable heat that may also affect more volatile components (Nielson, 2006).
Many submersible pumps, particularly older models, may not be capable of producing sufficiently low discharge rates needed for low-flow sampling. In situations where volatile contaminants are being investigated and the investigation team selects submersible pumps as the method of sampling, the evidence and rationale for selection of this equipment over positive displacement pumps should be documented in detail in the project work plan and concurrence with the approach should be obtained from the HEER Office prior to field investigation.
Select a pump to match the required lift at the required pumping rate. Do not underrate the pump as it will start running hot, which can alter the sample chemistry. The pump must have a variable-speed control. Select the power source and pump characteristics to allow the pump to run continuously throughout purging and sampling. Select the sample tube and associated equipment to be compatible with the site contaminants. Install a device that will prevent backflow to the pump to avoid groundwater contamination.
Install the pump at a sufficient height to avoid pumping sediment from the bottom of the well. Sediment can damage smooth internal surfaces of the pump and introduce metals and other chemicals into the sample (NJDEP, 2005). In wells screened below the water table, set the pumping rate such that the water level is not drawn down into the screened section. Do not pump the well dry except as noted under limited circumstances discussed in Subsection 6.6.6 Purging Low-Permeability Formations.
Keep the pump rate low enough that the groundwater flow from the tube is laminar and does not induce turbulence in sampling containers. Choose sample containers appropriate to the contaminants of concern.
Return to the Top of the Page
6.6.7.3 Suction Lift Pumps
Peristaltic Pumps
A peristaltic pump operates by a circular motion creating a vacuum in an intake line drawing from the monitoring well. The vacuum draws groundwater up to the pump, where the water is dispensed from the end of the tubing. Tubing used for peristaltic pump sampling should be disposed of after one use. A diagram of the working end of a peristaltic pump is illustrated in Figure 6-25.
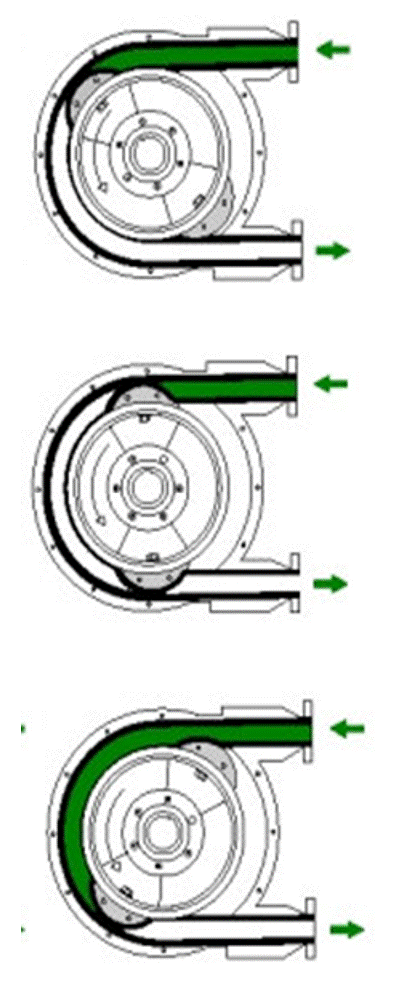
[Source: Environmental Pumping, 2008]
Peristaltic pumps have advantages in that they are inexpensive, have few moving parts, do not need compressed gas or pumps, are generally very portable, are easily set up and used and allow for low flow rates and laminar flow of formation water into the well. The tubing and pump heads can easily be replaced (USGS, 2002).
Peristaltic pumps can produce a maximum lift of up to 20 to 25 feet and provide a pump rate of up to1 to 2 liters per minute. Alternative devices must be used for the collection of water samples from greater than 20-25 feet below the ground surface. Higher flow rates are acceptable for purging. Flow rates of 100-200 ml/minute should be used for collection of samples.
Peristaltic pumps do, however, have limitations in use and ability to collect representative samples for some contaminants. The vacuum induced in the downhole tubing can result in loss of dissolved gases or volatile components. Laboratory and field studies suggest a loss of up to 50% of VOCs in samples collected using suction-lift devices like peristaltic pumps when the depth to groundwater is greater than 5-6 feet below the pump Parker, 1994). In addition, the tubing could diffuse atmospheric gases sufficiently to affect some target gases. Concentrations of dissolved-phase metals can also be affected. Peristaltic pumps therefore are less likely to result in representative samples for the following analyses:
- Volatile organic compounds;
- Dissolved gases (e.g., oxygen, carbon dioxide, etc;);
- Oxidation reduction potential;
- pH;
- Dissolved metals.
Based on these limitations, vacuum-type (e.g., peristaltic) pumps are recommended only for general monitoring purposes and with the following constraints: 1) the pump is operated at a low flow rate (generally 200ml/minute); 2) contaminants of concern must have a Henry’s Law Constant of less than or equal to 0.03 atm-m3/mol (refer to Table J in EHE guidance, HDOH 2017) and 3) a 50% sampling loss is assumed for volatile contaminants. Unless otherwise directed or approved by DOH, concentrations of volatile contaminants should be reported as the laboratory analytical results for the contaminant multiplied by two for samples collected from a depth of greater than 6 feet (i.e., following the assumption that 50% of the contaminant was lost during sample collection).
Sampling methods and equipment used to collect groundwater samples should be clearly described in the text of the SAP and investigation report. Pumps should be fitted with Teflon or polyethylene tubing {or equivalent) from the well to the Tygon®/silicone tubing inside the pump. This is intended to minimize contaminant loss during sampling due to diffusion or sorption associated with the tubing.
The rationale for use of a peristaltic pump to collect groundwater sample data for final decision making must be documented in the project SAP and any limitations of the data noted. Obtain concurrence with the approach from the overseeing HDOH office prior to field investigation. Data to be used for final decision making should be based on the use of low-flow pumps or, as appropriate, non-purge sampling methods unless comparability of vacuum pump data with data collected using these methods can be demonstrated.
Return to the Top of the Page
6.6.7.4 Grab Samplers
Bailers
A bailer is an inexpensive, manual well purging and/or sampling device. An advantage of bailers is the collection of a full column of water from a well, rather than the collection of water from a single point, as would be the case for stationary pumps. Representative samples can be collected using bailers but require practice and care on the part of the sampler. Bailers can also be very useful for collection of product from a well, especially LNAPL.
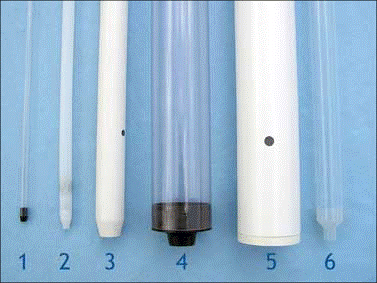
The following types of bailers are shown:
- Micro Bailer;
- Mini Bailer;
- PVC Bailer;
- PVC Bailer;
- PVC Bailer;
- Teflon Bailer.
Bailers are available in a variety of sizes and construction materials, e.g., PVC, Teflon® and stainless steel. Several different types of bailer materials, diameters and discharge applications are illustrated in Figure 6-26. The simplest bailer consists of a rigid tube equipped with a check valve at the bottom and a means to attach a line to the top. The check valve allows water in to the interior chamber of the bailer as it is lowered into the saturated zone. When the bailer is raised the check valve is forced shut and a water sample can be retrieved from the well. Larger diameter bailers may be used for well volume purging, although care must be exercised in purging as described in Subsection 6.6.6.
If utilized, the HEER Office recommends dedicated disposable bailers that have a certification of laboratory-verified cleanliness available from the manufacturer. However, bailers should be dedicated to a single well to avoid contamination.
Caution should be taken when using a bailer to collect groundwater samples to be tested for VOCs. A loss of up to 30% of VOCs in samples has been documented in some samples due to agitation of the water column in the well during insertion of the bailer and loss of VOCs as the water is discharged into the sample container (Pohlmann et al., 1990; Yeskis et al., 1988; Tai et al., 1991; USEPA, 1992). If a bailer is used to collect samples, then a bottom emptying device with a flow control check valve (tap valve) or other device specifically designed to minimize the loss of VOCs should be utilized.
Caution should also be taken in the use of a bailer to collect samples that are to be tested for highly sorptive, semi-volatile and non-volatile organic compounds and metals due to the possible suspension of sediment in the bottom of the well and bias of data intended to be compared to action levels for dissolved-phase contaminants (See Table 6-2).
For periodic, general monitoring events the use of a bailer can be more cost-effective than other sampling methods. However, in these instances, an initial comparison between data collected from low-flow pumps or other grab devices such as HydraSleeves and Snap Samplers should be carried out. Data to be used for final decision making should be based on the use of low-flow pumps or, as appropriate, non-purge sampling methods unless comparability of bailer data with data collected using these methods can be demonstrated.
When data based on use of a bailer to collect samples are proposed for final, decision making purposes, the rationale must be documented in the project work plan and concurrence with the approach obtained from the HEER Office prior to field investigation.
Return to the Top of the Page
6.6.7.5 Passive (No Purge) Samplers
An overview of passive sampler devices and sample collection methods is provided in the ITRC documents Technology Overview of Passive Sampler Technologies (ITRC 2006) and Protocol for Use of Five Passive Sampler to Sample for a Variety of Contaminants (ITRC 2007), included as Attachment 4 to this guidance. Three types of passive samplers are described:
- Devices that recover a grab well water sample (e.g., HydraSleeve Sampler, Snap Sampler);
- Passive diffusion samplers that are allowed to reach equilibrium with the surrounding groundwater (e.g., passive diffusion bags); and
- Samplers that rely on diffusion and sorption to accumulate analytes in the sampler (e.g., Semi-Permeable Membrane Devices).
Passive samplers are usually installed in a well for a time period of 10 to 14 days after which they are retrieved. At the time of retrieval, a new sampler can be deployed. An advantage of passive samplers that operate based on diffusion is that false positives due to adherence to soil particles are avoided. A disadvantage of passive samplers is that sample volume is limited to the size of the sample container or containers. Check with the laboratory to ensure that the volume of sample that can be collected using the sampler is adequate for the type and number of analyses required.
No-purge, passive sampling methods can be used for final decision making only when purging of the well has been demonstrated to be unnecessary (see Section 6.6.5<link>). When appropriate for a project, no-purge samplers can be used to target specific, DU intervals of a groundwater formation for sample collection more reliably than purge methods that involve the extraction of water from a single point. No-purge methods also minimize disturbance of the groundwater column, reduce field time and reduce investigation derived waste. When applicable, such methods are especially useful for testing of VOCs.
Sampling equipment should be carefully chosen based on the objectives of the investigation and the analytes of interest. Care must be taken to ensure that the data collected are representative of the full, targeted DU interval of the well. As described in Attachment 2, groundwater collection devices used to collect no-purge samples include devices that collect a sample of groundwater from a specific interval of the screening portion of the well by closing the device in place (e.g., Snap Sampler) or dragging the sampler up through the water column (e.g., HydraSleeve). Such samplers are normally dedicated to a single well in order to avoid contamination concerns due to inadequate decontamination from use in other wells. The sampler design and collection method should ensure collection of a representative sampled from the targeted, DU interval of groundwater (see Section 6.4.2).
Additional information on these samplers is provided below. Refer to the ITRC overviews of passive samplers in Appendix 4 for more detailed overviews (ITRC, 2006, 2007a). Refer also to McHugh et al. (2015) and ASTM (2020) for comparisons of these and other passive sampler devices.
Return to the Top of the Page
Snap Sampler
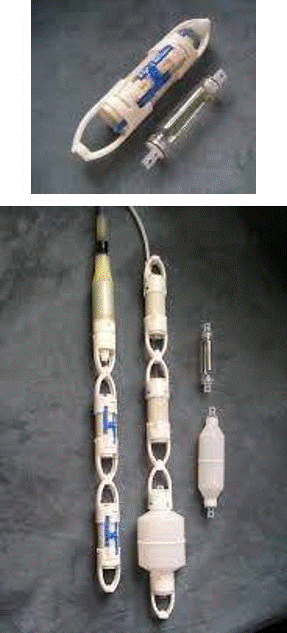
Top: Sampler bottle and holder device.
Bottom: Series of Snap Samplers configured
for deployment in a well.
The Snap Sampler is a passive groundwater sampling device that can be used to collect a sample of undisturbed groundwater within a well at a given point in time (Figure 6-27; Britt et al. 2010; QED 2018; ASTM 2020). A basic Snap Sampler consist of a 40ml to 350 ml sampling bottle open on both ends and placed inside of a holder that is lowered into a well to the targeted depth range or DU interval. The water in the well is allowed to equilibrate over a period of 10-14 days. Spring-loaded caps at each end of the sampler are then closed manually using a cable attachment.
Multiple samplers (currently up to six; check with supplier) can be connected together and used to collect separate samples for different analysis within a single, targeted DU interval. A string of multiple samplers can also be used to improve coverage of a long DU interval, with water from each sampler combined and tested as a single sample in order to improve the representativeness of the data for the targeted interval as a whole.
Refer to the manufacturer’s webpage for additional information and training videos on proper use of the Snap Sampler. Laboratory and field studies have indicated very comparable results between Snap Samplers samples collected using pumps and low-flow collection methods (McHugh et al., 2015). This suggests a similar bias between the two sampling methods. In the case of the test sites, this suggests that groundwater within the well was in equilibrium with groundwater in the immediately surrounding formation and could be used to support no-purge sampling methods at those sites and within the groundwater intervals tested.
HydraSleeve
A HydraSleeve sampler consists of a two- to five-foot long plastic sleeve with a weight attached to the bottom and a check valve at the top (GeoInsight, 2019; Figure 6-28). A collapsed sleeve is lowered to a point within the well to a depth that allows the top of the sleeve to be situate at the base of the targeted DU interval of groundwater, or otherwise situated for optimal coverage of the targeted interval of groundwater. The check valve remains closed and the HydraSleeve collapsed and empty until the sleeve is retrieved.
Return to the Top of the Page

The sleeve is pulled upward at a rapid pace in order to collect a sample. Frictional forces open the check valve and allow the sleeve to fill, ideally allowing a relatively undisturbed column of water the length of the sleeve to be collected. A subsample of the water is discharged into a sample containers provided by the laboratory for shipment and analysis.
Some field studies suggest that it can be difficult to ensure that the HydraSleeve valve opens immediately upon retrieval (McHugh et al., 2015). In such cases, the device will collect a sample of groundwater too high up within the well and the resulting data will not be reliably representative of the targeted interval of groundwater. The bias could be positive (higher than actual concentrations) or lower (lower than actual concentrations), depending on groundwater formation. Underestimation of the contaminant concentration in groundwater is more likely, since the screened interval is often placed within the interval of groundwater anticipated to be most heavily contaminated. Field studies suggest that this type of sampling errors is particularly evident when the targeted, screened interval of groundwater is overlain by a substantial thickness of stagnant water in unscreened well casing that has been naturally depleted of VOCs. This potential concern can be addressed part by the collection of replicate samples from the well following a period adequate for re-equilibration with the groundwater surrounding formation.
Passive diffusion samplers for VOCs or SVOCs are a subset of no-purge sampling devices that are placed in the well and allowed to come into equilibrium with the surrounding groundwater via diffusion. Examples of passive diffusion sampling devices that contain a medium (e.g., deionized water) into which contaminants diffuse include:
- Polyethylene Diffusion Bag Samplers (PDBSs);
- Regenerated-Cellulose Dialysis Membrane Samplers;
- Nylon-Screen Passive Diffusion Samplers (NSPDSs);
- Passive Vapor Diffusion Samplers (PVDs);
- Peeper Samplers;
- Rigid Porous Polyethylene Samplers (RPPSs).
Passive diffusion samplers are typically left in the wells for one to two weeks, depending on instructions from the provider. The samples are then removed from the well and submitted to the laboratory for analysis. The resulting data are normally assumed to reflect groundwater conditions during the last few days of sampler deployment.
Passive sampling devices that rely on diffusion and sorption of contaminants onto a solid medium (e.g., carbon) include:
- Semi-Permeable Membrane Devices (SPMDs);
- AGI Sampler (formerly Gore™ Sorber Module);
- Polar Organic Chemical Integrative Samplers (POCISs);
- Passive In-Situ Concentration Extraction Sampler (PISCESs).
The accumulated mass of a contaminant on the sorbent medium are used to estimate average concentration of the analyte in the surrounding groundwater formation over the duration of deployment.
Return to the Top of the Page
6.6.7.6 Comparison of Passive Samplers
Each of these different types of passive samplers has advantages and disadvantages and use of one type over the other should be carefully weighted depending on the goals of the study (ASTM, 2020). Groundwater capture devices can be especially effective obtaining relatively undisturbed samples from a specific, screened interval of a well. The length of devices such as HydraSleeves can be varied to match the length of targeted, DU intervals of a groundwater formation. Deployment of the device at the proper depth requires experience, however. The length of individual devices such as Snap Samplers are fixed and relatively short, but a string of samplers can be prepared to characterize longer intervals of a groundwater formation. Deployment of the Snap Sampler at a specific depth within the well is highly reliable.
Passive diffusion samplers, particularly those including a medium such as de-ionized water, can be varied in length and are particularly useful for testing of specific groundwater formation DU intervals within a monitoring well. A single, long, passive sampler (e.g., PDBS) might, for example, be placed in a well for initial testing of groundwater across the entire interval of a targeted groundwater formation. If the resulting concentration of contaminants exceed action levels, then strings of multiple, shorter passive samplers can be placed within the well to obtain a greater resolution of contaminant distribution and optimize remedial efforts. Passive samplers are also well suited for wells with low transmissivity and slow recovery after development or purging.
AGI Samplers and similar types of samplers utilize a sorbent material to capture targeted compounds in groundwater. Testing of the samplers produces a contaminant mass and not a direct concentration. Use of these types of samplers is generally limited to field screening (see Section 8). A concentration can be derived using a conversion equation, but the conversion includes assumptions that may not be applicable to actual site conditions. A detailed field study and comparison to data collected by traditional sampling methods would be required to use the samplers for routine monitoring purposes and final decision making.
The advantages and disadvantages and analyte group type of each type of passive samplers are summarized in Table 6-3. Refer to Attachment 4 for additional information.
Return to the Top of the Page
Table 6-3 Advantages and Disadvantages of Different Passive Sampler Types (see also Attachment 4 and ASTM 2020).
| Passive Sampler Type | Advantages | Disadvantages | Analytes | 1Recommended Use | Sample Volume |
| HydraSleeve
|
Variable length of sampler allows site-specific testing of targeted groundwater intervals, Large volume of water can be collected; can be used for VOCs and non-VOCs;
Low cost No upper limit to the well diameter that can be sampled, nor does there appear to be a depth limit Effective in low-yield wells Does not rely on diffusion |
Deployment at targeted depth interval requires practice,
Potential loss of VOCs during transfer of water into sample containers at the surface; Can be heavy and difficult to retrieve (pulley cranks available) Reusable stainless-steel weight needs to be decontaminated if moved from well to well Requires minimum 1 to 2 feet above bottom of well for sampling |
All analyte groups | Initial investigation and long-term groundwater monitoring when testing of long DU interval within well and/or larger sample volumes are needed
HydraSleeve samplers should be not more than the length of the well screen to assure that the sampler is completely filled by the time it exits the top of the well screen |
Varies with diameter and length of sleeve (approximately 600 ml per foot for “2-inch” sleeves) |
| Snap Sampler | Reliable location of sample from within well screen,
Minimal disturbance of water column – good for VOCs; minimal sample handling, reduced potential for sample contamination Can be used in low-yield wells and short screen wells |
Might not directly cover entire interval of targeted groundwater (requires assumption that water column is not stratified),
Small volume samples; long analyte lists requiring large volumes of water may not be practical for testing of short DU intervals of groundwater (up to 5, 40ml VOAs often required by lab for VOCs) Higher cost, need dedicated sampler for each well, Sample cannot be filtered prior to submittal to lab |
All analyte groups | Initial investigation and long-term groundwater monitoring for VOCs | Check for most updated sampler sizes;
40 ml for 1 VOA; 160 ml for 4 VOAs in line 125 mL PE bottle is available to increase sample volume capacity; 500 ml for 4 PE bottles in line |
| PDBS
|
Good for VOCs (with exceptions), relative large volume | Analyte-specific, might not to be applicable to for non-volatiles (less amenable to diffusion; e.g., MTBE and MIBK, naphthalene | VOCs with the possible exception of MTBE, MIBK, Styrene, tert-Amyl methyl ether, Naphthalene 1,2,4-Trimethylbenzene Bromoform* n-Propylbenzene 1,3,5-Trimethylbenzene | Initial investigation and long-term monitoring for VOCs and SVOCs | Variable depending on length of bag; typically, 250 to 350 ml per PDBS |
| RPPS | Good for a wider range of constituents. Both samplers are well validated (see ITRC, 2007) | Short length (max 7.5”) might not cover entire, targeted interval of groundwater | Capable of monitoring most compounds (inorganic and organic, both volatile and semi-volatile) | Initial investigation and long-term monitoring | Variable depending on diameter of sampler; typically 175+ ml. |
| AGI Sampler | Short equilibration period
Easy to install Easy to ship
|
Contaminant mass measured—not concentration (screening data only)
Needs prompt and careful handling of sorbers |
VOCs and SVOCs | Screening sampling
Plume delineation |
Not applicable |
| Regenerated Cellulose Passive Samplers | Variable length depending on project objectives,
|
Cost in comparison to other samplers,
May biodegrade if left in place for more than 2-4 weeks in some groundwater conditions |
VOCs, MTBE, major cations and anions, dissolved trace metals, dissolved gases (methane/ethene/carbon dioxide), total dissolved solids, dissolved organic carbon, dissolved silica and explosive compounds | Initial investigation and long-term monitoring | Variable depending on length, e.g., 5.1 mL/cm (31.8-mm diameter) to 31.8 mL/cm (63.7-mm diameter) |
Notes:
- No-purge sample collection methods are acceptable for final decision making purposes only in cases where groundwater within the targeted, screened interval of a well has been demonstrated to be representative of groundwater in the surrounding formation. The most common hydrogeologic scenario for no‐purge sampling is a high-permeability formation with a conductivity of 10-5 cm/sec or greater and with upland head to ensure steady adequate flow rate through the well (e.g., fractured basalt or coarse-grained, sandy or gravely sediment).
6.6.7.7 Order of Groundwater Sampling
Collect samples in groundwater monitoring wells no sooner than 72 hours after well development for high-permeability formations and 7-14 days for low permeability formations. This delay applies to newly installed wells as well as to wells that necessitated re-development due to clogging or other conditions. If a shorter time period is proposed based upon known site conditions (e.g., evidence of high hydraulic conductivity, either for the site itself or immediately surrounding area), overall project considerations, or other pertinent information, the interval, rationale and evidence supporting the proposal should be noted in detail in the SAP or by consultation with the HEER Office. See Subsection 6.6.7 for guidance concerning the timelines for drilling, well installation, development and sampling.
Sample wells in order of increasing contaminant concentrations based on existing data and the CSM developed for the site. If samples have not been previously collected at the site, then use the preliminary CSM based on suspected areas of lower and higher contamination in addition to observations and field measurements. (Note: Vapor readings from headspace in well casing can be highly unreliable of subsurface conditions.) This sampling approach minimizes the potential for contamination of equipment to bias sample data high. In addition, follow proper decontamination procedures appropriate for the site contaminants and protect the ground surface around each well with plastic sheeting (Section 6.11).
If the order of sampling must be changed, it should be described in the SAP and discussed with the HEER Office. The order in which analytical samples should be collected is as follows (NJDEP, 2005):
- Volatile organic compounds (VOCs);
- Purgeable organic compounds (POCs);
- Purgeable organic halogens (POXs);
- Total organic halogens (TOXs);
- Total organic carbon (TOC);
- Base neutrals/acid extractables;
- Total Petroleum Hydrocarbon (TPH)/Oil & Grease;
- PCBs/pesticides;
- Total metals;
- Dissolved metals;
- Phenols;
- Cyanide;
- Sulfate and chloride;
- Turbidity;
- Nitrate and ammonia;
- Preserved inorganics;
- Radionuclides;
- Non-preserved inorganics;
- Bacteria.
6.6.8 Timeline for Well Development, Purging and Sampling
The following is intended for general reference only. Refer to guidance presented by CADWR (1990); USEPA (1991a), CalEPA (1995b), USACE (1998), SDDEH (2009) and USEPA (2013) for additional information on the time of well installation and sample collection.
6.6.8.1 Drilling and Well Installation
Commence monitoring well installation within 12 hours of borehole completion for holes that are uncased or only partially cased with temporary drill casing. For holes that are fully cased with temporary drill casings, commence installation within 48 hours of borehole completion. Once well installation is begun, proceed without interruption until the monitoring well casing is installed and grouted and the drill casing removed.
6.6.8.2 Well Development
Factors controlling the length of time for adequate development of a monitoring well after installation include:
- Drilling method employed;
- Nature of the enclosing formation;
- Screen length;
- Height of water column;
- Thickness (width) of filter pack;
- Development method used.
Well development can be relatively quick and simple for wells installed in competent bedrock or require repeated actions over several days in wells installed in fine-grained soils.
In general, it is recommended that well development commence no sooner than 48 hours after well completion and no later than 7 days. This will allow time for the filter pack and annular seal to set and for water within the well to initially equilibrate with the surrounding formation. Well development and completion can commence sooner if it can be reasonably concluded that water in the well is not being affected by grout material and formation-type water flows through the well.
The timeframe for anticipated duration between well installation and development should be documented in the work plan and the well installation report. Below are factors to consider when determining waiting periods between installation and development of wells.
Grout Factor
It is estimated that neat cement (Type 1) cures within 48 hours (Gaber and Fisher, 1988<link>, State Coordinating Committee on Ground Water, 1996). <link>. Bentonite-cement grouts are estimated to set within a time frame of 24 to 48 hours. If the annular seal is located above the water column then a shorter time frame prior to well development might suffice.
If shorter time frames than 48 hours are used, justification should be documented and evidence should be supplied by the environmental professional that groundwater samples collected after a shorter time frame of well development represent formation-type groundwater with no grout contamination. A high pH typically signifies that the groundwater in the well is compromised by grout. A high turbidity could also indicate compromising of the screening interval of the well by grout, bentonite and/or clay and silt from the surrounding formation.
Curing time and the time span between well construction and development can in some cases be reduced by omitting the use of grout from the annular seal and relying instead on bentonite alone (OhioEPA, 2012). This risks the possible expulsion of inadequately hydrated bentonite at the surface during rainfall events, however and the need to reconstruct the well surface.
Formation Factor
Highly permeable formations are more likely to re-establish equilibrium within a shorter amount of time. Thick, low-permeability formations with a large percentage of silt and clay can take longer to equilibrate and are more difficult to develop. Well development in very fine-grained formations might not substantially decrease turbidity or improve groundwater flow into the well in naturally low-permeability formations (Nielsen, 2006). Fine-grained formations should only be developed with gentle action. Filtering of subsequent groundwater samples to be tested for non-volatile chemicals should be considered for highly turbid wells where the objective is to determine dissolved-phase contaminant concentrations (refer to Subsection 6.4.3).
Note that smearing of thin, clayey units within an otherwise reasonably permeable sequence of silt and sand can give the false impression that the overall formation itself is of very low permeability. As discussed in the above subsection on well development, the clayey smear zone can normally be removed by simply pumping of water from the well and allowing the water level to drop. The natural water pressure in the more permeable units will then break up and remove the clay smear and restore natural groundwater flow into and through the well.
Return to the Top of the Page
6.6.8.3 Gauging, Purging and Sampling
As default, the HEER Office recommends that groundwater gauging, purging and sampling from wells to be used for long-term monitoring be conducted no sooner than 72 hours after well development for high-permeability formations and 7-14 days for low permeability formations in order for the static water level (and NAPL thickness) to reach equilibrium conditions in the enclosing formation (SDDEH, 2009). Longer waiting periods might be required for some field conditions (Fetter, 1994; CAEPA 1995b; USACE, 1998; Nielson 2006).
Temporary wells to be used for initial screening or temporary well points installed using a direct push rig (Section 6.6.8) can be sampled immediately upon installation, although the limitations of the resulting data representativeness must be taken into consideration.
Shorter time periods can be proposed provided that equilibrium of the well with the enclosing groundwater can be supported. Guidance from other agencies for the time interval between monitoring well completion and groundwater sample collection ranges from 24 hours (US Navy, 2007) to 48 hours (SCDHEC, 2005) to several weeks (Puls and Barcelona, 1989). Generally, high permeability formations require less time (e.g., 24 to 48 hours) to equilibrate than low permeability formations (e.g., days to weeks).
If a different time frame is proposed based upon known site conditions or the need to otherwise collect samples with short-term notification, then the rationale supporting the sample collection should be documented in the SAP and potential limitations of the resulting data, if any, discussed in the monitoring report. If the project is already under the oversight of the HEER Office then the shortened time interval should be discussed with the project manager.
Return to the Top of the Page
6.6.8.4 Temporal Factors
Tidal Effects
Groundwater at sites in proximity of the ocean with water table or potentiometric surface elevations close to sea level often shows tidal influences. Daily, tidal sea level changes result in changes of hydraulic pressure at the shoreline, where groundwater flows into the ocean. As the tide rises, hydraulic pressure increases and causes backpressure in to the groundwater formation, resulting in a rise in the height of the water table.
The tidal efficiency and tidal lag of each well is dependent on its distance from the ocean and the hydraulic conductivity of the formation between the well and the shoreline. The higher the permeability or hydraulic conductivity of the groundwater formation, the farther inland the backpressure is felt.
Tidal fluctuations in the water table are unlikely to significantly affect the concentration of dissolved-phase contaminated in groundwater but can play an important role in the appearance and disappearance of Light Nonaqueous Phase Liquid (LNAPL) in the well. A smear zone marking the range of the daily and seasonal water table typically develops at sites where a release of fuel has reached groundwater. If the formation is sufficiently permeable, LNAPL within the smear zone can drain into the well as the water table falls and become re-trapped below groundwater as the water table rises.
Vapor emissions can also rise and fall as the smear zone becomes exposed and re-submerged. This must be taken into account in the collection of representative, soil vapor samples (Section 7) and assessment of potential vapor intrusion risks (Section 13).
It is important to recognize these effect when investigating the presence of LNAPL at a site and assessing associated risks. Check for additional guidance on the nature and investigation LNAPL anticipated to be published by the HEER Office in 2020.
Tidal Study
Completion of a tidal study may be necessary at sites that are tidally influenced. Continually gauge and record groundwater elevations at the site for a minimum period of 72 hours. Gauge at least three monitoring wells on small sites and more wells on larger sites. In addition, measure the water elevation in the ocean in a place protected from wave action. Enclose the pressure gauge in a stilling well to filter out most of the surface ripples. If gauging in the ocean is not possible or no protected area can be found nearby, use tidal charts corrected for the site. Record gauging data at a frequency of six minutes or less. Synchronize data logging between all pressure gauges.
Compare the times of tidal fluctuations between the ocean and each monitoring well to determine the tidal lag of each well. Compare the groundwater elevation changes within each well to the sea level changes to calculate the tidal efficiency (percent of groundwater elevation change compared to sea level change).
Calculate the groundwater gradient and flow direction for each sampling time. Calculate the net groundwater gradient and net flow direction. On a map, present the groundwater flow directions as they change throughout one tidal cycle. Present the groundwater gradient for each flow direction. In addition, present the net groundwater flow direction and gradient on the same map. If variations are seen between tidal cycles, present each tidal cycle on a map.
Gauging at Tidally Influenced Sites
Groundwater gauging at tidally influenced sites requires careful planning. Choose the date and time of gauging according to tide charts. Choose the date when tidal fluctuations are minimal, such as on quarter moons. Choose the time of gauging when fluctuations in the wells are minimal. For example, bracket the time of high tide or low tide. Correct the times for tidal lag. Follow the same criteria for each gauging event.
Involve sufficient field personnel to accomplish gauging within a period of no more than 2 to 3 hours. Choose a reference well. Use the reference well to calibrate the field instruments against each other. Gauge the well at a minimum every half an hour between gauging other wells.
Assume that the change in groundwater elevation within the reference well is linear throughout the half hour between measurements. Use the linear regression of the groundwater elevation change in the reference well to correct the groundwater elevations for all wells for tidal influence. On sites with large variations in tidal efficiency choose more than one reference well.
Seasonal Effects
Groundwater levels, flow rates and directions can vary significantly between the dry season (e.g., May through October) and the wet season (e.g., November through April) in Hawai`i. The elevation of the water table can fluctuate by to 10 to 20 feet in some inland areas of the islands. This can create a large smear zone and significantly affect both the concentration of both dissolved-phase contaminants in groundwater as well as the presence or absence of LNAPL in monitoring wells. Significant, seasonal fluctuations in vapor emissions can also occur and must be considered in the collection of soil vapor samples (Section 7) and assessment of vapor intrusion risk (Section 13).
Quarterly monitoring is recommended to initially assess seasonal variability of groundwater trends. Long-term groundwater monitoring data exhibiting seasonal peaks and valleys should be graphed separately for dry and wet seasons and intermediate stages. Trends of increasing or decreasing contaminant concentrations should be based on season-specific data and used to determine the need for an expanded investigation or active remedial actions.
Other Temporal Variations
In addition to tidal and seasonal variations, the following processes can introduce temporal variations in the groundwater table/potentiometric surface and possibly in the groundwater flow direction (USEPA, 1992d; CalEPA, 1995):
- Barometric effects;
- Changes in onsite or adjacent land use by altering recharge or discharge patterns (e.g., paving, construction or demolition of buildings);
- Operation of nearby production or injection wells.
Identify and evaluate factors that result in short- or long-term variations in groundwater elevations and flow patterns. Measure the water levels frequently enough to detect and characterize long-term, temporal variations in groundwater flow.
Return to the Top of the Page
6.6.8.5 Frequency and Timing of Long-Term Groundwater Monitoring
Long-term monitoring of groundwater should be carried out at a frequency adequate to assess trends in potential environmental concerns and guide and monitor the effectiveness of remedial actions. This will necessarily be site-specific. Factors to consider include:
- Potential environmental concerns posed by the presence of the contaminated groundwater;
- Short- and long-term, temporal variability of groundwater elevation, flowrate and impacts;
- Potential for offsite migration; and
- Data required for monitoring of remedial actions.
This also helps to ensure that the need to monitor and manage contaminated groundwater at the site is not forgotten. Use of Temporary Wells, Micro Wells and Existing Production Wells
The following discussions reflect a compilation of guidance from CalDWR (1990; USEPA (1991a), CalEPA (1995b) and SDDEH (2009) in additional to experience gained at sites in Hawai′i. Refer to these documents and other references noted for additional information.
Return to the Top of the Page
6.6.9 Use of Temporary Wells, Micro Wells and Existing Production Wells
6.6.9.1 Temporary Monitoring Wells
Temporary monitoring wells are distinguished from permanent monitoring wells, both in terms of their construction and duration of time that they are in place. Temporary monitoring wells usually consist of pre-constructed well points or pieces of PVC pipe that are installed in soil borings or by direct push drilling methods to collect a groundwater sample or to measure groundwater levels (ASTM 2012). The wells or sampling points can be installed by hand auger, conventional drilling methods such as hollow-stem auger and in boreholes driven by direct push technology (DPT).
After completion of the borehole, a well casing consisting of a solid riser, well screen and bottom cap is inserted into the borehole. The well screen should be set to conform with site investigation objectives and allow the collection of samples from targeted, DU intervals of the surrounding groundwater formation (see Section 6.4.2). A filter pack and annular seal might or might not be installed.
Be aware that placement of the screened interval of a temporary monitoring well has an important effect on the nature of the groundwater sample collected (Figure 6-29; modified from: Wisconsin Department of Water Resources, 2012). Samples collected from temporary wells might not be reliably representative of the surrounding groundwater in terms of the investigation questions being asked. Refer to Figure 6-29:
- Short screen in temporary well point is set below a shallow light non-aqueous phase liquid (LNAPL) hydrocarbon plume.
- Short screen in a temporary well point is set above a gradational sloping dense non-aqueous phase (DNAPL) chlorinated solvent plume.
- Short screen of temporary well point intercepts the plume and would be expected to produce a sample with a higher contaminant concentration than would a permanent monitoring well where contaminant dilution would occur across a longer screen interval.
 Figure 6-29. Illustrations of Why Water Quality Results May Differ from Permanent and Temporary Monitoring Wells |
Temporary wells can be useful and appropriate under the following circumstances:
- Initial screening during a preliminary assessment to identify presence or absence of contamination and identify potential contaminants of concern;
- To acquire a “grab” groundwater sample over a 24- to 48-hour period when not enough sample volume can be collected by low-flow (micropurge) techniques;
- Use of multiple temporary wells for initial vertical profiling of a contaminant plume, such as for one or more DNAPL contaminants;
- Initial monitoring of a fluctuating or instable groundwater flow path;
- Need for limited additional analytical data to supplement an existing data set, such as for confirmation sampling of minor contaminant concentrations or one-time anomalous results.
Temporary wells generally are not appropriate under the following circumstances:
- Closure decisions – data from temporary wells should only be used to supplement the data acquired from permanent monitoring wells;
- Conditions where very fine-grained soil particles could block or enter into the well screen;
- Long-term monitoring.
In general, temporary monitoring wells can provide a lower cost alternative to the initial characterization or delineation of potential groundwater impacts and help optimize long-term sampling and monitoring activities. Water samples can be collected immediately upon installation. Data collected from temporary wells should, however, be used in a qualitative, “presence” or “absence” manner.
While the use of temporary monitoring wells may be advantageous in some instances, they are not suitable for long-term monitoring of groundwater or for final decision-making purposes. The intended use of data collected from temporary monitoring wells and the specific details of temporary well construction, use, duration and well closure procedures should be described in the SAP and discussed with the HEER Office. Temporary wells can be installed and used without approval by HEER Office personnel, but must be removed once the groundwater samples have been collected and within 72 hours of construction. This is necessary to ensure that the wells do not serve as a conduit to the subsurface in the case of future spills of hazardous chemicals at the surface or otherwise jeopardize the integrity of the underlying groundwater.
Refer to Subsection 6.9 for guidance on well closure. When practicable, a temporary well should be destroyed by removing all material within the original borehole, including the casing, filter pack and annular seal. The borehole should be filled from the bottom to the ground surface with an approved sealing material.
Return to the Top of the Page
6.6.9.2 Micro Wells
Installation and Use
Micro wells, also referred to as small diameter monitoring wells, are generally defined as wells with a diameter of less than 2 inches (USEPA, 2005). Small-diameter wells are often installed by direct-push methods to permit short-term or long-term monitoring of groundwater.
When installed properly, these small-diameter wells meet HEER Office requirements for a permanent monitoring well (Geoprobe Systems, 2011; ASTM, 2010c). There is no set, minimum or maximum diameter for a monitoring well. Installed and sampled properly, data collected from a micro well can be used for final decision making in the same manner as larger diameter wells. Micro wells can provide a quick and cost-effective alternative to conventional monitoring wells, given the proper hydrogeologic setting, data quality objectives and regulatory framework. As is the case for permanent and temporary wells, it is important that the well screen be placed in a manner that allows the collection of samples from pre-determined, DU intervals of the surrounding groundwater formation (see Section 6.4.2).
Following micro well installation and development, slug testing can be used to estimate hydraulic properties, such as hydraulic conductivity and transmissivity, near the micro well and to verify that well development is successful and complete. Low-flow (micropurge) sampling, as well as other active and passive sampling techniques may be used to obtain groundwater quality samples provided that the data are demonstrated to be representative (ASTM, 2010c).
Micro wells installed by the direct push method should be constructed using a pre-packed well screen. An example of a pre-packed well assembly designed to be installed via direct push equipment, as well as a photograph of a micro well installation are illustrated respectively in Figure 6-30a and 6-30b. If the well is to be used for long-term monitoring, then a proper annulus seal and well head completion should also be included.
Return to the Top of the Page
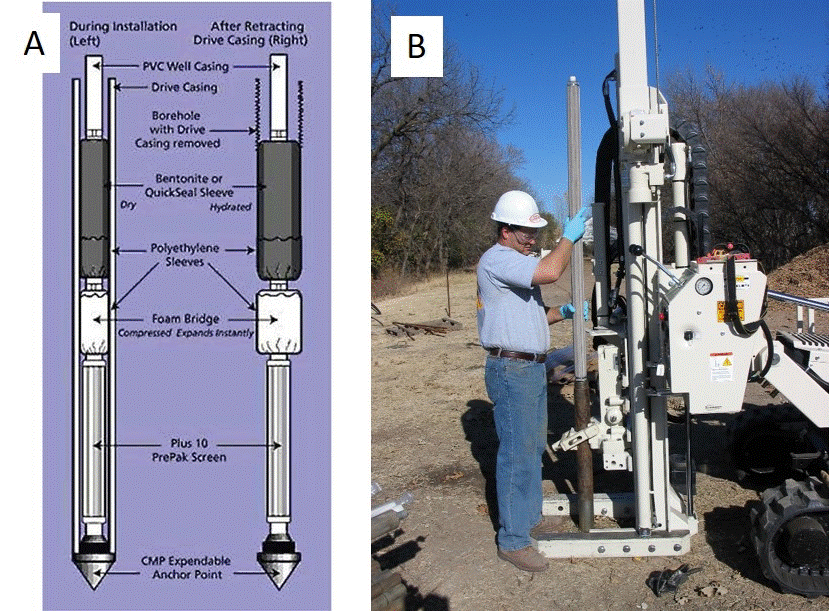 |
| Figure 6-30a. Diagram of Pre-Pack Monitoring Micro Well Assembly. Assembly during installation (left) and following retraction of drive casing (right).[Source: USEPA, 2005] |
Figure 6-30b. Photograph of Pre-Pack Monitoring Micro Well Installation. The operator inserts the pre-packed screen through the casing to the bottom of the borehole.[Photo courtesy of Geoprobe Systems®, Salina, KS.] |
Published studies indicate that water quality data from direct push wells compare favorably to data from traditional drilled wells, given the proper well installation and suitable hydrogeologic conditions (USEPA, 2005; County of San Diego, 2010; McCall, et al., 2013). A limitation of micro wells can be the inability to collect enough groundwater to permit all of the desired laboratory tests to be carried out. This can especially be a problem in low-permeability, silty or clayey units where testing for chemicals that require the collection of relatively large sample volumes is required. For example, testing of samples for Total Petroleum Hydrocarbons and polynuclear aromatic hydrocarbons often requires the collection of one or more liters of water. Micro wells can also be too narrow for the insertion of pumps or other tools necessary to test and sample the groundwater. Use of the wells for product recovery is likewise not generally practical.
The applicability, advantages and disadvantages of pre-packed, micro wells can be summarized as follows:
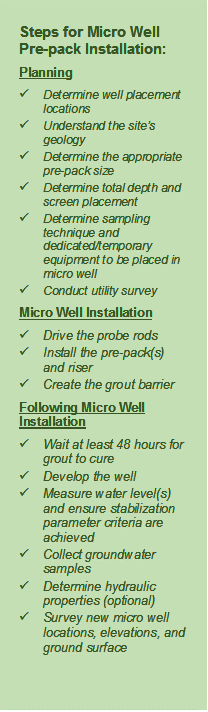
Applicability:
- Targeted interval groundwater sample collection;
- Groundwater formation property testing;
- Remediation – air sparging, venting, monitored natural attenuation;
- Limited access.
Advantages:
- Faster, economical well installation;
- Minimize or eliminate drill cuttings and investigation-derived waste;
- Targeted sampling interval for improved data representativeness;
- Installation through cased borehole provides high integrity well construction and sample quality;
- Minimal clearance between pre-packed screen and installation rod inner diameter effectively centralizes well;
- Minimal site disturbance;
- Minimal materials and space requirements for installation enables access in remote properties or tight places;
- Less chemical exposure to workers during well installation – safer environment.
Disadvantages:
- Installation by push rig limited to unconsolidated materials;
- Well diameter limitations could limit sampling options in comparison to use off larger-diameter wells;
- Collecting an adequate volume of water from micro wells that are slow to recharge can be very time consuming;
- Smearing of borehole sidewalls during installation could inhibit groundwater flow;
- Thin filter pack could inhibit effective development in fine-grained formation and lead to increased turbidly and breakthrough of clays and silt.
Well Placement Considerations
Site characterization and well placement considerations for micro wells are similar those for larger diameter wells. The following factors should be considered in a determination of the applicability of micro wells installed by DPT methodologies versus traditional permanent monitoring wells (ASTM 2010):
- DPT procedures and micro well installation are not applicable for monitoring well installation in bedrock or other dense consolidated materials;
- Well installation may be limited to relatively shallow depths (generally <25-100 feet below ground surface), dependent upon the geology and the drilling technique employed;
- Depth to groundwater and potential for the water level in the borehole to rise above the screened interval will affect the pre-pack micro well construction and must be determined ahead of time for proper well design (County of San Diego, 2010);
- Development of micro wells to a degree that produces turbidity-free samples can be more challenging than standard wells when installed in fine-grained formations.
Micro wells can also be used as observation wells in groundwater formation performance tests. Field tests have also shown that micro wells can be used to obtain comparative measurements of localized formation hydraulic conductivity from slug tests.
Micro Well Construction Procedures
Detailed information for installation of a pre-packed micro well using DPT techniques is provided in ASTM Standard Practice for Installation of Pre-packed Screen Monitoring Wells in Unconsolidated Aquifers (ASTM, 2010c). Standard operating procedures for micro wells with pre-packed screens are available on-line from various manufacturers (for example, at https://geoprobe.com/pre-packed-screen-monitoring-well-installation).
The subsurface geology, depth to groundwater and relative fluctuations in groundwater levels at the site must be sufficiently understood to determine the proper choice of a filter pack and selection of a screened interval prior to construction of a micro well.
A protective outer casing tube is first advanced to depth using DPT. The micro well is then constructed inside the casing with the pre-packed well screen(s) and riser pipe. The casing tube is retracted to set the well at the desired depth in the formation. To ensure a complete seal of the annual space from the top of the annular seal to the ground surface, the grout or slurry should be installed from the bottom up. Bentonite chips, granules, or pellets may be used to construct the annular seal when the field conditions and size of the well annulus permit (ASTM, 2010c). By using a pressure grout pump and nylon tremie tube bottom-up grouting can be performed in the small annular spaces of DPT equipment (USEPA, 2005). Gravity or tremie installation of dry bentonite materials using a small-diameter tremie tube and grout pump to convey bentonite slurries is most successful when the top of well screen is at or near the water table. Bentonite slurries ranging from 20 to 30 percent solids by weight are recommended (ASTM, 2010c). Bottom-up tremie installation of the annular seal and grout is conducted through the outer casing as it’s retracted; this grouting method is recommended to obtain the highest integrity well construction (ASTM, 2010c).
Figure 6-31 shows a micro well construction diagram of a completed pre-packed screen micro well, exemplifying a surface completion and other considerations, such as clearance for the sampler. Since the pre-packed well screen assembly includes a filter pack, the volume of loose sand required for well installation is minimized (ASTM, 2010c). A sand grout barrier, installed directly above the pre-packed well screen, prevents grout from entering the screens. Although sand must still be conveyed through the well casing annulus to provide a 2-foot barrier, this volume is significantly less than for the entire screened interval. In some circumstances, natural formation collapse will provide the required barrier. However, if the formation is stable and does not collapse around the riser pipe as the probe rods are retracted, then environmental grade sand may be installed through the probe rods to provide the grout barrier.
Return to the Top of the Page
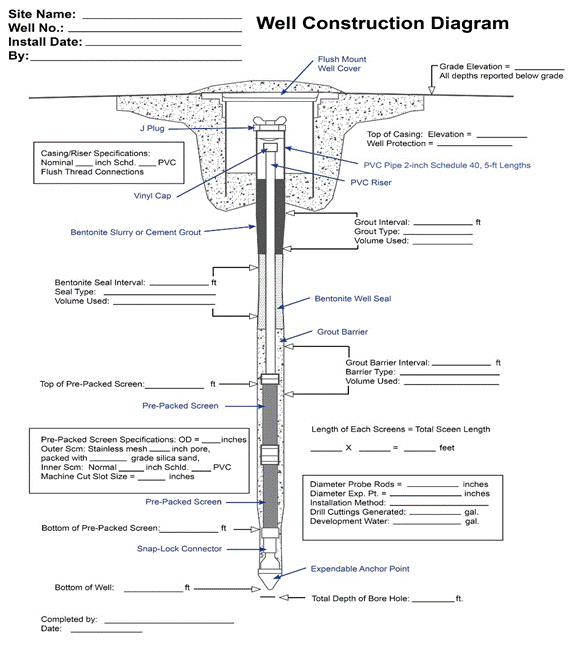 Figure 6-31. Example micro well construction diagram [Modified from: ASTM, 2010c; McCall et al., 2013) |
An annular seal extending from the filter pack to the top of the well should be installed in general conformance with Subsection 6.6.2. The annular seal must prevent vertical migration of liquids into the borehole annular space. Installation requirements presented in Subsection 6.6.2 apply to the construction of micro wells.
Micro wells may be developed using bailers, peristaltic pumps, bladder pumps or an inertial check valve system (ASTM, 2010c). The inertial check valve system which simultaneously surges and purges fines from the pre-packed screen interval is reported to be most effective when used to develop micro wells placed in medium- to coarse-grained groundwater formations.
Methods for advancing direct push tools for initial characterization and to install pre-packed micro wells include (summarized from ASTM, 2010c):
- Percussion—Direct-push equipment can be mounted on trucks or other vehicles to facilitate site access and use hydraulic, pneumatic and mechanically operated hammers together with hydraulic slides and vehicle weight to advance tools. Percussion methods are advantageous as they enable access to areas that would otherwise be logistically difficult to reach or install wells. Percussion methods are some of the most widely used direct push methods. These methods are capable of penetrating most unconsolidated groundwater formation materials, including clays, silts, sands and some gravels. Monitoring wells are routinely installed at depths of 20 to 50 feet with percussion methods and may be installed at depths exceeding 200 feet, given optimal alluvial environments. However, densely packed cobbles or boulders, thick zones of caliche or dense lava, or bedrock may make penetration with percussion methods difficult or impossible. Some percussion-type direct push units may also be equipped with rotary drilling capabilities that make it possible for direct push methods to be used where a significant gravel, cobble, or caliche layer may have previously limited their use.
- Static Weight—Hydraulic rams are used to advance tool string into the subsurface using the static force of the vehicle weight. Cone penetration test (CPT) systems are the most commonly used static weight method for advancing DPT tools and installing micro wells. Static weight methods have similar capabilities and limitations as those for percussion methods.
- Sonic or Resonance Drilling—High frequency, high-force vibrations are conveyed into a steel drill pipe with rotary and oscillatory forces to fluidize the formation at the drill bit that enables collection of continuous, relatively undisturbed cores without requiring mud, air, water, or other circulating medium for penetration. As a result, resonant sonic drilling can be used to access greater depths and penetrate through consolidated as well as unconsolidated formations. Disadvantages to this method include relative cost and the potential to alter the texture, moisture content, or contaminant conditions as a result of the heat created at the drill bit. However, using drilling fluid can be used to control these potential alterations.
- Rotary Drilling—Conventional rotary drilling methods, such as hollow-stem auger can be combined with DPT for sampling and micro well installation. For example, hollow-stem augers can be advanced to depth and then the hydraulic hammer may be used to advance tools or casing ahead of the augers.
The drilling method selected and whether conventional wells or micro wells are used is determined by the environmental conditions at hand, including site accessibility, formation materials, depth to groundwater, site access considerations and budget.
Considerations regarding the micro well design include the length, placement and diameter of the pre-packed well screen. Well screen/filter pack placement will be determined based on whether the known or suspected contaminants are miscible LNAPLs (such as hydrocarbons), suspended in solution, or DNAPLs (such as chlorinated solvents), or a combination of these conditions. Micro wells are advantageous to collect targeted interval samples in heterogeneous unconsolidated groundwater formations, where recharge is slow, or information from a specific sample interval is desired (as long as the other general prerequisites for unconsolidated sediments and small-diameter wells are met). Micro wells may not be appropriate when the small-diameter well screen criteria can’t be met.
Factors to consider when selecting well diameters and screen slot size include the subsurface foundation materials, grain size and the applicability of or access to dedicated sampling equipment, such as dedicated pumps, samplers, pressure transducers or other continuous monitoring equipment. The well diameter and vertical space in the protective casing must be selected to accommodate both the diameter and additional tubing or wiring of any dedicated equipment housed in the well. The table below provides a guide to relative screen diameters and lengths for pre-packed well screens (Geoprobe Systems, 2011).
| Pre-pack Screen Size OD | Slotted Pipe / Min. ID | Sand Pack | Length | Rod Size OD | Rod Size ID | ||||||||||||||||
| 2.0 in. ID x 3.4 in. | 2.0 in. Sch. 40 PVC; 0.010 in. slots | 20/40 mesh sand factory packed | 60 in.
(1.5 m) |
3.4 in.
(86 mm) |
2.0 in.
(51 mm) |
||||||||||||||||
| 1.5 in. ID x 2.5 in. | 1.5 in. Sch. 40 PVC; 0.010 in. slots | 20/40 mesh sand factory packed | 60 in.
(1.5 m) |
3.25 in.
(82.5 mm |
2.625 in.
(66.7 mm) |
||||||||||||||||
| 1.0 in. ID x 2.5 in. | 1.0 in. Sch. 40 PVC; 0.010 in. slots | 20/40 mesh sand factory packed | 60 in.
(1.5 m) |
3.25 in.
(82.5 mm) |
2.625 in.
(66.7 mm) |
||||||||||||||||
| 1.0 in. Sch. 40 PVC; 0.010 in. slots | field packed | 60 in.
(1.5 m) |
3.25 in.
(82.5 mm) |
2.625 in.
(66.7 mm) |
|||||||||||||||||
| 0.75 in. ID x 1.4 in. | 0.75 in. Sch.40 PVC; 0.010 in. slots | 20/40 mesh sand factory packed | 36 in.
(1 m) |
2.25 in.
(57 mm) |
1.5 in.
(38 mm) |
||||||||||||||||
| 0.75 in. Sch.40 PVC; 0.010 in. slots | 20/40 mesh sand factory packed | 60 in.
(1.5 m) |
2.25 in.
(57 mm) |
1.5 in.
(38 mm) |
|||||||||||||||||
| 0.5 in. ID x 1.4 in. | 0.5 in. Sch.80 PVC; 0.010 in. slots | 20/40 mesh sand factory packed | 36 in.
(1 m) |
2.25 in.
(57 mm) |
1.5 in.
(38 mm) |
||||||||||||||||
| 0.5 in. Sch.80 PVC; 0.010 in. slots | 20/40 mesh sand factory packed | 60 in.
(1.5 m) |
2.25 in.
(57 mm) |
1.5 in.
(38 mm) |
|||||||||||||||||
Notes:
|
|||||||||||||||||||||
Screens are available through various manufacturers in a variety of lengths and diameters can be adjusted for desired intervals by adding multiple sections of screens. Screens less than one-inch in diameter should generally be avoided due to the difficulty in sample collection and an inability to collect adequate volumes of water for sample analyses. Filter packs are normally installed in the factory and consist of uniformly packed sand. Alternatively, if desired, the sand pack can be added to the pre-constructed micro wells in the field to adjust sand grain size based on field conditions.
Micro Well Closure
A micro well must be decommissioned when it is no longer needed, sustains damage serious enough to potentially affect the well’s structural integrity, or is determined to be improperly installed. Micro wells are closed in a similar manner as conventional monitoring wells. Refer to Subsection 6.8 for detailed guidance on well closure.
Return to the Top of the Page
6.6.9.3 Existing Water Production Wells
Collection of water samples for analysis from wells other than groundwater monitoring wells should be approved by the HEER Office. The request should be accompanied by the following information:
- Well installation date;
- Well construction logs including casing material, well depth, depth of bottom and top of well screen, filter pack material and depth, seal material and depth;
- Elevation of screen interval;
- Depth to groundwater table and bottom of unconfined groundwater formation;
- Depth to top and bottom of confined groundwater formation (s);
- Contaminants of concern;
- Characteristics of contaminants of concern (LNAPL, DNAPL, solubility etc.);
- The depth at which contaminants are expected to occur. The depth estimate should be supported by existing site-specific data;
- A description of how the sampling data will be used.
Collect raw water samples from a supply well as close to the well head as possible (before any treatment). Purge the well long enough to obtain a representative sample of groundwater with a minimal residence time in the collection/distribution system. The purge volume may be substantial for large diameter wells with long screen intervals.
Return to the Top of the Page
6.6.10 Additional Monitoring Well Considerations
Consider special designs for:
- Monitoring wells that are intended to permanently hold downhole equipment.
- Monitoring wells where free-phase LNAPL or DNAPL plumes are anticipated.
- Monitoring wells that are installed in fractured bedrock.
- Monitoring wells that are installed in semi-confined caprock.
6.6.10.1 Monitoring Wells with Permanent Downhole Equipment
Dedicated sampling equipment that will reside within a groundwater monitoring well must not alter the chemistry of the groundwater and must be resistant to chemical or physical deterioration. Inspect the equipment periodically for damage, deterioration and proper operation. The equipment must not interfere with groundwater formation tests, well maintenance and water level measurements (CalEPA, 1995b).
6.6.10.2 Monitoring Wells at Sites with LNAPL Plumes
If free phase LNAPL plumes are present or suspected to be present, design and install wells to provide access to the part of the groundwater formation where the free-phase plumes reside. For LNAPL plumes, provide sampling access across the water table and capillary fringe of the uppermost water bearing unit. If the unit in question is tidally influenced, free phase liquid may be trapped in pore spaces below the capillary fringe when the water table is at its highest and above the capillary fringe when the water table is at its lowest.
In addition, provide access to the part of the water bearing unit where dissolved phase contaminants are expected. To delineate the dissolved contaminant plume vertically, screen wells below the depth of the LNAPL plume. In a tidally influenced groundwater formation and areas with large, seasonal fluctuations in the water table, the lowermost sampling interval for dissolved contaminants must be below the free phase plume smear zone. In addition, install wells cross, up and down gradient to delineate the horizontal extent of the free phase and dissolved contaminant plumes.
Return to the Top of the Page
6.6.10.3 Monitoring Wells at Sites with DNAPL Plumes
Most DNAPLs that are commonly found in soil and groundwater contamination fall into four groups (USEPA, 2004c):
- Chlorinated solvents used in metal finishing, semiconductor manufacturing, dry cleaning, chemical manufacturing and equipment maintenance;
- Creosote mixtures used in treating wood products;
- Polychlorinated biphenyls (PCBs) used primarily in electrical transformers and condensers;
- Byproducts (e.g., coal tars and oils) from manufactured gas plants.
The tendency of DNAPLs to move independently of groundwater flow makes it difficult to delineate and remediate free phase DNAPL plumes. Most DNAPLs are slightly soluble or contain components that are soluble. Some of these soluble ingredients are deemed to be a great health risk and environmental risk and clean up goals are set at low dissolved concentrations. If a free phase DNAPL plume resides in the saturated zone, it becomes a constant source for dissolved contaminants. Therefore, it is important to locate and remediate the free phase plume.
Most DNAPLs are relatively immiscible in water and tend to remain in a separate non-aqueous phase due to their low solubility. If their density is sufficiently high compared to water density and they are present in a great enough free phase volume, they will sink through the saturated zone and pool on the uppermost confining unit. DNAPLs with a high enough density, therefore, migrate vertically rather than following groundwater movement. In addition, they may migrate according to the slope of the uppermost confining unit, which may differ from the regional groundwater flow direction. The migration of DNAPLs with a density (specific gravity) closer to 1 will be influenced by groundwater movement to a greater degree.
The USEPA document Site Characterization Technologies for DNAPL Investigations provides guidance for delineation techniques at DNAPL-contaminated sites (USEPA, 2004c). Techniques entail geophysical as well as non-geophysical methods for characterization. The following DNAPL properties help in selecting the appropriate delineation techniques:
- As a chemical class, DNAPLs are electrically resistive (non-conductive).
- Chlorinated solvents are generally volatile and may be found in soil gas plumes.
- The dissolved phase of chlorinated solvents is relatively mobile and sufficiently soluble to be readily detectable.
- Most PCBs are not volatile and are not sufficiently soluble to be readily detectable in groundwater. The lighter end PCBs do have some solubility [3 mg/L range] and will volatilize to some extent.
- Coal tar byproducts are a mixture of phenols and cresols; the aromatics benzene, toluene, ethylbenzene and xylenes (BTEX); naphthalenes and light oils; and tars and heavy oils rich in polynuclear aromatic hydrocarbons (PAH). The aromatics and smaller polynuclear aromatics are volatile and sufficiently soluble to be detected as a groundwater plume.
- Coal tar creosote mixtures are very diverse and may or may not be associated with groundwater plumes. They may contain several chemicals that fluoresce.
The HEER Office requires that both the free phase and dissolved plumes are delineated at DNAPL sites. Borings and groundwater monitoring wells should be designed to accommodate the selected investigation techniques.
Return to the Top of the Page
6.6.10.4 Monitoring Wells in Bedrock
Refer to Subsection 6.2 for an overview of the nature of basal aquifers in Hawai`i. The volcanic cores of the Hawaiian Islands are characterized by fractured basalt interlayered with permeable units of a’a flows and weathered zones. In combination, these features create exceptionally productive, large-scale aquifers.
Permeability and predictability of groundwater flow can vary dramatically at small scales, however, due to a low density of fractures or lack of more permeable interbeds. This can make the installation of productive monitoring wells or monitoring wells that capture and represent a contaminant plume problematic (Domenico et al., 1990; USGS, 2008).
Discuss the investigation objectives with a driller experienced with the installation of wells in the subject area. An understanding of stratigraphy of the subsurface, volcanic units as well as fracture orientation, fracture spacing and density, degree of connectivity and aperture opening is important for successful placement and installation of monitoring wells. The rational for the well placement and installation method should be discussed in the SAP. If the targeted groundwater is currently used as a source of drinking water then additional oversight or input from the Safe Drinking Water Branch of the HDOH might be required.
Return to the Top of the Page
6.6.10.5 Monitoring Wells in Confined Aquifers
Refer to Section 6.2 for an overview of large-scale, confined conditions in areas where the basal aquifer us overlain by low-permeability, caprock formations and small-scale confinement of groundwater within caprock sediment itself. Small-scale, confined aquifers can also be common in hilly, non-coastal sites.
Confined aquifers are aquifers that occur below a confining geological unit or between confining units. The confining unit, referred to as an aquitard, prevents water contained in the aquifer from rising to its elevation of natural, hydraulic equilibrium. The elevation of hydraulic equilibrium for a confined aquifer is referred to as the potentiometric surface. The potentiometric surface for a fully saturated confined aquifer lies somewhere above the top of that unit.
The aquitard prevents hydraulic communication between a confined aquifer and an overlying or underlying aquifer. The degree of hydraulic separation of the aquifers adjoining the same aquitard depends on the difference in permeability between the aquitard and aquifers. Hydraulic separation also inhibits (but does not necessarily prevent) cross contamination between the aquifers.
Any boring and well installation that penetrates a confining unit becomes a potential pathway between the water bearing units and can result in contamination of previously un-impacted aquifers. This must be prevented. Experience in installing wells in these types of geologic environments and working with experienced drillers is therefore critical.
An aquitard can help protect the underlying, confined aquifer from contamination by an overlying plume of dissolved-phase contaminants or contamination associated with light fuels (LNAPL). This can be in part assessed by collecting and testing soil cores from the aquitard for permeability. Potential heterogeneities within the aquitard (e.g., fractures, pockets of more permeable material, etc.) can limit the reliability of this approach, however. Pumping tests are more definitive to prove hydraulic separation and might be required by the HEER Office at sites where highly sensitive aquifers are present (see Subsection 6.6.4).
Further investigations of the confined aquifer will be based on the outcome of the permeability test and pumping test. Design borings and wells that penetrate into the confined aquifer such that they do not open vertical water and contaminant pathways. Keep in mind that a well installed into a confined aquifer may be artesian and plan accordingly.
Return to the Top of the Page
6.7 Data Quality Evaluation
6.7.1 Review of Sample Collection and Processing Methods
The quality of the sample data generated must be reviewed to determine if the data are reliable to answer the risk and/or remediation-based questions prepared at the beginning of the project. This requires a review the sampling plan design and the methods used to collect the samples. This is referred to as sample data verification (USEPA 2002). The precision and reproducibility of the data generated by the laboratory must also be reviewed. This is referred to as data validation (see USEPA 2002). Most error in data occurs due to improper collection of a sample, rather than improper test methods in the laboratory.
Data verification is a completeness check that all specified activities involved in data collection and processing have been completed and documented and that the necessary records (objective evidence) are available to proceed to data validation. For example, if the sampling plan called for the collection of a sample representative of the 0-2 foot DU interval of groundwater in the well but a pump was used to collect a sample from five feet below the water table, then the resulting data would be flagged during the data verification process as potentially not representative of the investigation objectives. Methods used to collect, preserve, store and ship samples must also be reviewed. Review data for equipment blanks, trip blanks and temperature blanks must also be reviewed and data qualified as appropriate.
Return to the Top of the Page
6.8 Groundwater Transport Data Collection Methods
This section provides general guidance for the collection of hydrogeologic data that can be used to assess contaminant transport through groundwater. Common parameters measured include hydraulic head, permeability, hydraulic conductivity, transmissivity and storativity (Freeze and Cherry, 1979); (Fetter, 1994).
Permeability is a measure of the ability of rock or soil to allow the passage of fluids. Hydraulic head is most commonly represented by groundwater elevation. Hydraulic conductivity is a measure of the formation’s ability to transmit water. It is therefore dependent on the permeability of the formation and the fluid properties. Transmissivity reflects the average water transmission potential for a specific groundwater formation. Storativity or specific yield represents the amount of water that will drain from a confined or unconfined formation for a certain change in hydraulic head.
The permeability of soil or rock can be estimated by testing samples in the laboratory. This can be converted to hydraulic conductivity using the density and viscosity of the fluid being transmitted, in this case water or free-phase product.
Data for individual soil or rock samples collected from borings might not be representative of the large-scale characteristics of the formation holding the groundwater, however. Commonly used field test methods for more accurate estimation of large-scale, hydrogeologic characteristics include slug tests and pumping tests. Slug test are normally used to test unconfined groundwater formations. Pumping tests can be used to test either unconfined or confined formations. Both tests require access to one or more groundwater monitoring well(s) on a site. Wells used in the tests should be properly developed and in equilibrium with the surrounding groundwater formation. Brief overviews of these test methods are provided below. Refer to Freeze and Cherry (1979) and Fetter (1994) or related texts on hydrogeology for more detailed guidance.
For sites that are tidally influenced or show temporal groundwater fluctuations, monitor groundwater fluctuations in background wells throughout the duration of the formation test. The background wells must be placed outside the zone of the stressed formation, but close enough to be representative of the temporal fluctuations expected in the test wells. Use the background monitoring data to correct for changes in the water table and potentiometric surface that are not related to the formation test. Methods are available for correcting for most seasonal and temporal effects. These should be considered when designing formation tests and interpreting the results (USEPA, 1992d).
On sites with stratified groundwater formations, perform multiple formation tests at different depths. Select the depths based on the stratification observed in the formation during drilling. Determination of the vertical hydraulic conductivity may also be required at sites with stratified formations or those sites where vertical groundwater movement is significant.
Return to the Top of the Page
6.8.1.1 Slug Tests
A slug test is typically performed in a single well. Perform the slug test by either adding or removing an object of known volume (referred to as a “slug”) from a well and continuously monitoring the groundwater level while the well recovers to its original level (Freeze and Cherry, 1979). Addition or removal of the slug must be instantaneous and monitoring has to start immediately. Perform the slug test at least twice to confirm the results. There are commercially available software packages that can be used for evaluation of hydraulic conductivity.
If the well screen extends above the water table, use a slug withdrawal procedure (Domenico et al., 1990). Do not add water to a monitoring well at a contaminated site. A slug can be a solid cylinder or closed stainless or PVC pipe filled with an inert material such as silica sand filter pack material. Ensure that the slug is heavy enough to instantaneously sink to the bottom of the well. If a slug is to be removed from the well, insert it into the water column, wait until the water level has recovered to its original level and then remove it as quickly as practicable.
In formations of high hydraulic conductivity, water level gauging must be continuous throughout the duration of the test. In this case, install a pressure transducer in the bottom of the well to log data continuously. Ensure that the water level has recovered to its original level after inserting the instrument prior to commencing the test. Design the test such that the slug does not interfere with the downhole equipment.
Accurately record the following: slug volume; water level within ±0.01 inch before, during and after the slug test; and the time of each water level measurement.
There are several graphic/calculation methods to evaluate hydraulic conductivity using slug test data. One example is the Bouwer method (Bouwer, 1989). Another is Hvorslev’s method (Hvorslev, 1951).
Alternatively, determine the transmissivity and storativity of the formation by plotting the field data and comparing them with type curves. Cooper et al. generated type curves for slug tests (Cooper et al., 1967). Papadopulos et al. later extended the range of curves (Papadopulos et al., 1973). If different sections of the field data curve matches more than one type curve, Hvorslev’s method should be used instead.
Specify in the project plan and report the methods used to interpret slug test data.
The slug test determines the transmissivity, storativity and hydraulic conductivity of the formation in the immediate surrounding of the well that was tested. The results are, therefore, limited. Conduct the slug test at different locations at each site to define the variability of the hydraulic conductivity and other parameters across the site (USEPA, 1992d).
Compare the results of the formation test with the data on the existing geologic units and confirm consistency between the hydrologic and geologic data.
Return to the Top of the Page
6.8.1.2 Slug Tests in Stratified Groundwater Formations
In stratified aquifers and other groundwater formations, determine the hydraulic conductivity for the various strata by performing slug tests either in wells that are screened within different stratigraphic units or by performing a multilevel slug test in one well. Only the stratigraphic units important for contaminant transport need to be tested.
The multilevel slug test data will only be reliable if the investigator succeeds in isolating portions of the groundwater formation, which is accomplished using two packers separated by a length of perforated pipe. The test is then performed by inducing water into the isolated section. The procedure provides reliable data when performed properly (USEPA, 1992d). Do not introduce water into a monitoring well that extends into a contaminant plume.
Return to the Top of the Page
6.8.1.3 Pumping Tests
An accurate method of determining the hydraulic properties of water-bearing substrate is the pumping test. Pumping tests tend to involve a comparatively larger volume than slug tests and may be used as an alternative where large areas are of concern. Pumping tests also tend to involve greater effort and greater expense. Pumping tests involve the use of one or more pumping wells and may or may not include a varying number of observation wells. The change in hydraulic head is monitored, usually in terms of drawdown, or change in groundwater elevation in response to pumping and removal of water from the formation. The magnitude and rates of drawdown in the well and rates of recovery after pumping has stopped can be used to evaluate the properties of transmissivity, storativity and hydraulic conductivity of the aquifer surrounding the well.
Return to the Top of the Page
6.8.1.4 Single Well Pumping Test
Single well pumping tests involve the measurement of water levels over time in a single monitoring well at different rates of pumping.
Measure the original water level in the well. Then pump down the well for a period of time. Record the time when pumping stops. At the time when pumping stops, start monitoring the recovery of the water level in the well as a function of time (Domenico et al., 1990).
Storativity cannot be determined using a single well pumping test. The limitation of this single well test is that it determines only the transmissivity of the formation adjacent to the well. Perform the test in wells across the site to determine the variability in the groundwater formation transmissivity.
Return to the Top of the Page
6.8.1.5 Multi-Well Pumping Tests
Multi-well pumping tests involve one pumping well and one or more observation wells. The tests are based on the relationship between the observation well and the pumping well, which stipulates that the water level change in the observation well, at a specified distance from the pumping well, is a function of the pumping rate, the properties of the groundwater formation and time. The advantage of using a multi well pumping test is that the formation parameters determined in this fashion represent average values for the formation between the wells.
The pump test methods described are, strictly speaking, only applicable to cases where the wells fully penetrate the groundwater formation. However, Hantush and Walton have conducted research for partially penetrating wells (Hantush, 1956; Hantush, 1961; 1964; Walton, 1970). Hantush supplies some general guidelines for pump tests in partially penetrating wells. As long as the observation well is at a minimum distance from the pumping well, the partial penetration will not affect the test results. The distance must be:
r > 1.5m (K/K’)
r = distance between pumping and observation well
m = groundwater formation thickness
K = horizontal hydraulic conductivity
K’ = vertical hydraulic conductivity
If the horizontal and vertical conductivity are of the same magnitude, the condition is r > 1.5m.
Confined Groundwater Formations:
For confined aquifers and other groundwater formations, plot the pump test drawdown data versus time site curve on logarithmic paper of the same scale as the Theis non-equilibrium type curve. Match the graphed investigation curve to the type curve by superimposing it. Choose a matching point anywhere on the overlapping sheets. Characteristics read off the Theis curve for the match point are used to estimate transmissivity and storativity of the formation based on the response observed in the pumping test (Domenico et al., 1990).
Leaky Groundwater Formations:
Leaky aquifers and other groundwater formations are confined by a low permeability unit that will still allow some leakage into the formation. Leakage may also arise through other sources such as connected bodies of surface water etc. In general, the first part of the drawdown will resemble that of a confined formation until the hydraulic gradient is large enough to induce leakage. So that the first part of the drawdown versus time curve can be analyzed with the Theis non-equilibrium type curve as discussed above.
At the time that leakage starts, the drawdown versus time curve will deviate from the Theis non-equilibrium type curve.
For leaky groundwater formations, plot the pump drawdown data versus time on logarithmic paper of the same scale as the type curve for leaky formations in the same fashion as for confined formations, but the data are compared to different type curves based on values for a given leakage (Hantush et al., 1955; Hantush, 1956). The vertical hydraulic conductivity for these solutions is a measure of the leakage into the formation. The thickness of the boundary low permeability formation must be taken from well boring logs (Domenico et al., 1990).
Unconfined Groundwater Formations:
When water is withdrawn from confined groundwater formations, the formation does not undergo dewatering unless the groundwater elevation/head is lowered below the confining layer. The water is released from storage through elastic compression of the matrix and expansion of the water. In unconfined formations lowering of water levels actually causes some dewatering and the value of storativity increases by several orders of magnitude. In an unconfined formation, the storativity is referred to as specific yield (Domenico et al., 1990).
In an unconfined groundwater formation the transmissivity can decrease during pumping due to the decrease in saturated formation thickness. This is inherent in the definition of transmissivity:
T = Km,
Where:
T = transmissivity
K = hydraulic conductivity
m = groundwater formation thickness
Therefore, T is not a constant as assumed by the Theis equation. Another assumption of the Theis equation is that water is instantaneously released from storage with decline in head. If this does not hold true, then the response will deviate from the response of a confined formation and the Theis type curve does not apply. For unconfined formations, the time-drawdown curve has three sections. The early section follows the Theis non-equilibrium type curve, followed by an intermediate section where the slope of the curve decreases similar to that in a leaky groundwater formation and the curve at later time will reveal a slope increase that will again follow a Theis non equilibrium type curve. The early part of the curve represents the storativity of the formation while the late part represents the specific yield.
Use the equation K = T/m to derive the horizontal hydraulic conductivity K.
Return to the Top of the Page
6.9 Groundwater Monitoring Well Closure
A groundwater monitoring well that is no longer needed, sustains damage serious enough to potentially affect the well’s structural integrity or is determined to be improperly installed must be decommissioned or “closed.” This is sometimes referred to as “abandonment,” although in fact strict protocols are required to properly remove or fill a well when it is no longer needed.
The HEER Office will typically only issue “No Further Action” letters after submittal of sufficient documentation to verify that monitoring wells and soil borings are properly closed in accordance with this guidance. Any exceptions are judged on a site by site basis and approved by the HEER Office. The need for a workplan for well closure will be decided on a site-by-site basis.
Return to the Top of the Page
6.9.1 Closure Considerations
Appropriate well closure methods will necessarily be site-specific. The objectives and approach of well closure will vary depending on the nature of the groundwater that the well is installed into, the surrounding lithology, the potential for contaminant migration and the planned use of the subject area. Specific objectives can include (see also USEPA, 1991, HDLNR, 2004):
- Restoration of the subsurface to it’s original, hydrogeologic conditions;
- Prevent the vertical migration of contamination to un-impacted aquifers that either serve as current or potential drinking water aquifers or as conduits to an aquatic habitat;
- Prevent the well from being used for disposal of wastes or as a conduit for the infiltration of surface spills into the subsurface;
- Avoid disruption or obstruction of future site development or construction work;
- Prevent borehole collapse and settling of the ground surface or pavement; and
- In conjunction with the above, reduce potential for future liability.
The need to address these individual concerns and other concerns should be reviewed on a site-specific basis and used to design a well closure strategy most appropriate for the site. Property owners and operators are responsible for any groundwater contamination resulting from improperly closed monitoring wells.
Return to the Top of the Page
6.9.1.1 Low-Risk Monitoring Wells
Most monitoring wells installed as part of an environmental investigation in Hawai`i are typically less than 30 feet deep and 4 inches in diameter and not installed in a drinking water aquifer. Relatively simple well closure approaches as described below are normally acceptable for these types of low-risk wells.
The primary objective of the closure of low-risk wells is to prevent the well from serving as a conduit for future surface spills and to avoid disruptions in future site development or construction work. Although preferable when possible, complete removal of the well casing and ensuring a tight seal within the former boring, other than at the surface, is less important for low-risk wells than for wells that could impact a drinking water aquifer or exacerbate the discharge of contaminated groundwater into a nearby, surface water habitats.
Full removal of a well or at least the upper portion of the well that could be encountered during future development or construction work should be considered when possible at all sites. For example, at a minimum, break and remove the upper portion of the well at the first joint below the ground surface. Fill the well as described below and complete to match the ground surface. This will avoid confusion over the presence of the well in the future and possible delays and added costs for landowners.
Return to the Top of the Page
6.9.1.2 High-Risk Monitoring Wells
More stringent closure procedures will be required in less common scenarios where a well is installed through shallow contamination and into underlying, un-impacted groundwater or wells otherwise installed into drinking water aquifers. Closure could include the need to fully remove the well casing and placement of impermeable seals in aquitards between groundwater units.
Additional details are provided below. The guidance is structured into general sections that address well closure planning, abandonment/sealing procedures and special considerations in terms of lithology and groundwater contamination. The text concludes with examples on how to abandon wells in common situations for settings common in Hawai`i.
The well closure guidance presented in this document does not serve to absolve the owner of any responsibilities associated with past use of the well or any event that might occur after the well is decommissioned to the satisfaction of the HEER Office. Note that installation of monitoring wells into actively used, drinking water aquifers normally requires pre-approval by DOH and could require additional approval by the Department of Land and Natural Resources (DLNR). Closure of water production wells requires a permit and oversight from DLNR (DLNR 2004).
Return to the Top of the Page
6.9.2 Well Closure Planning
All groundwater monitoring wells will eventually require decommissioning and closure in accordance with the guidance provided in this document. Borings used to collect soil samples or soil vapor samples likewise require proper abandonment. The guidance provided might not be sufficient for wells with a diameter exceeding 12 inches. A workplan for closure of these types of large-diameter wells should be submitted to the HEER Office for approval.
Notify the HEER Office at least one week prior to any well closure operations. A representative from the HEER Office may elect to be on site to witness the well or boring decommissioning. If so, the potentially responsible party (PRP) will be notified. If borings/wells have been decommissioned without proper notification of the HEER Office, the PRP may be required to re-excavate the borings/wells and close them under proper HEER Office supervision.
Return to the Top of the Page
6.9.3 Pre-Closure Review
A monitoring well should be evaluated before it is decommissioned in order to assess its overall condition and construction details and potential obstacles in the well (e.g., pumps, pressure lines etc.). The selection of an appropriate method for well closure should be based on the potential risk that the well poses to the surrounding formation and groundwater, a review of the well installation and construction details and groundwater monitoring data. Related factors include:
- Casing material;
- Casing condition;
- Casing diameter;
- Quality of original seal;
- Depth of well;
- Well plumbness;
- Geologic setting;
- Level of contamination;
- Zone(s) of contamination;
- Utility of groundwater well (drinking water or non-drinking water).
Depth, diameter, casing type and casing condition give information on how much tensile stress can be applied when removal of the well piping from the ground is being considered. For example, PVC casing could break off below grade if the casing extends to a deep level or is strongly gripped by the adjacent formations. Loose subsurface formations or a weak seal around the well might, in contrast, allow all of the well material to be easily pulled. Significant high torque to remove a large diameter well. Over drilling might be easy in unconsolidated formations, but difficult in rock formations such as basalt.
Return to the Top of the Page
6.9.4 Basic Well Closure Procedures
Inspect the well prior to closure for any obstacles (e.g., sampling tools, pumps, wiring, pressure lines, debris, etc.) that could interfere with removal or sealing of the well. If necessary, the well can be sounded or visually inspected using downhole televisions and photography.
A summary of general well closure methods for low-risk scenarios is provided in Table 6-4. These methods will be adequate for closure of shallow (e.g., <30 feet) low-risk, monitoring wells installed in caprock sediment or other areas that do not directly threaten a drinking water aquifer.
Return to the Top of the Page
Table 6-4 Summary of Low-Risk Monitoring Well Closure Procedures
| Step 1: Review well construction details. |
| Step 2: Review geology, hydrogeology. |
| Step 3: Review groundwater utilization. |
| Step 4: Evaluate risk issues for closure (see Closure Considerations). |
| Step 5: Remove sampling tools, pumps, wiring, pressure lines, debris, etc. |
| Step 6: Remove surface completion. |
| Step 7: Remove casing as possible. |
| Step 8: Fill boring with bentonite grout, bentonite chips/pellets (requires subsequent hydration) as most suitable for well and formation conditions to within 2-3 feet of ground surface. |
| Step 9. Complete with neat cement grout to the ground surface, leaving space for capping with soil if in landscaped area or with matching material in paved areas (e.g., asphalt or concrete). |
| Step 10: Check and repair surface completion as needed following settlement. |
Notes
- Low-Risk Well Closure: Drinking water aquifer not threatened, <30 feet deep, <4-inch well diameter, >2-foot seal can be placed above water table, no LNAPL or DNAPL.
A single cement-bentonite mix is acceptable for both the water-bearing and vadose zone when abandoning wells in locations where load-bearing is not a concern and where groundwater is encountered at a depth of less than 20 feet below ground surface.
Additional planning and regulatory oversight are required for closure of monitoring wells that pose a potential threat to a drinking water aquifer or are being closed with significant contamination left in place (e.g., LNAPL or DNAPL). Refer to additional guidance provided in the following subsections. More stringent closure requirements might be applicable for water production or wells otherwise installed under the oversight of another state or federal agency (DLNR 2004).
Return to the Top of the Page
6.9.5 Detailed Well Closure Procedures
The following well closure information is intended for general reference only. As described above, methods to adequately close a well, including open borings after full or partial well material removal, will vary based on the subsurface geology, the nature of the affected groundwater and the potential long-term concerns posed by the presence of the well, including the structural integrity of the surface completion. Consult with the driller, the overseeing DOH project manager and the property owner for the most appropriate methods to the close wells at the site in question.
Return to the Top of the Page
6.9.5.1 Partial of Full Removal of Casing and Screen
Remove the outer protective casing to the extent practicable, as necessary. Remove the annular seal and filter pack. Remove the inner casing and screen. This is especially important in cases where the annular seal is leaking or if the filter pack connects a contaminated, water bearing interval with another interval that is otherwise uncontaminated.
Methods to remove the casing and well screen as needed and depending on the well construction include:
- Pulling the casing;
- Overdrilling using hollow stem auger;
- Drilling the casing out using a solid stem auger or rotary bit.
For overdrilling use a bit with a diameter at least 1.5 times greater than the original diameter of the borehole.
Return to the Top of the Page
6.9.5.2 Well Sealing in Place
Sealing a well in place without complete removal of the well material is acceptable if the well does not intersect or otherwise pose a threat to a drinking water aquifer or surface water body or in the case of anticipated, technical difficulties in the field (e.g., collapse of borehole). If in situ closure of the well is proposed, then the casing should be cut below land surface whenever feasible and filled with material and sealant as outlined below.
6.9.5.3 Well Sealing Material
Different materials and procedures apply to different situations (e.g., permeability of adjacent formation, placement below or above groundwater, etc.). The most structurally- and cost-effective material to fill a well or open boring will normally be neat cement grout (i.e., grout consisting of only cement and water; +/- bentonite additive), bentonite grout and/or bentonite chips or pellets that are subsequently hydrated.
Bentonite swells more and shrinks less than neat cement grout and serves as a useful material to fill the lower portions of a well or boring. Neat cement sets more quickly and solidly and prevents eruptions of inadequately hydrated bentonite at the ground surface. Grout should have a minimum design strength of 2,500 pounds per square inch or as otherwise appropriate for the site when future load bearing strength is a concern. Strength capabilities may be demonstrated by documenting proper mix proportions and procedures based on the specific type of grout used.
Bentonite chips or pellets are more appropriate than bentonite grout for filling boreholes installed in highly permeable formations (e.g., coralline gravels). Clean gravel or sand may also be appropriate in these settings. Inert material such as sand can be added to 1 foot above the screen if the formation adjacent to the screened interval is highly permeable. Top the sand with 1 foot of bentonite grout, chips or pellets in a manner to avoid bridging (tremie pipe or tampering). Hydrate bentonite placed above the water table following instructions from the manufacturer.
Powdered bentonite should not be used as a sealing material in zones of fractured rock. Drilling mud or drill cuttings area not acceptable as any part of sealing materials for well abandonment. The use of soil is not recommended due to compaction and settlement problems, as well as the potential for contamination.
Additional details on recommended well and boring sealing materials are discussed below in terms of their properties, recommended uses and disadvantages.
- Neat cement grout: Neat cement grout is a mixture of Portland cement with water. Prepare the needed volume of grout by adding no more than one gallon of water per approximately 15 pounds of cement of cement (2 liters of water per kilogram), for example no more than 6 gallons of water per standard, 94-pound bag of cement. Recommended use:
- Sealing of small openings;
- Sealing below water table;
- Penetrating annular space outside the casing;
- Filling small voids in surrounding formations;
- Sealing artesian wells (pressure application);
- Sealing well in between multiple aquifers.
Potential issues:
- Shrinkage, especially in dry and surface areas;
- Heat of hydration can potentially damage some plastic casing materials.
- Grout additives: Additives may prevent shrinking of neat or grout cement (e.g., 2 to 6 % of bentonite) or alter curing time (e.g., calcium chloride- accelerated curing). Recommended use:
- Accelerated curing;
- Increased expansion capacity while improving strength of seal over bentonite-only grout.
Potential issues:
- Calcium in grout could replace sodium in bentonite and lead to calcium bentonite which has low or no expansive capacity.
- Bentonite: Bentonite powder or mix of pellets/chips and powder. Sodium bentonite chips/pellets emplaced above groundwater table need hydration prior to emplacement, because of its expansive capacity and associated potential for bridging. Recommended use:
- Shallow wells;
- Above groundwater table.
Potential issues:
- Bridging during emplacement;
- Can be cost-prohibitive for sealing of deep wells.
- High-solids sodium bentonite: High-solids bentonite is a mixture of powdered bentonite, granular bentonite and water. The recommended percentage of total bentonite weight to total weight of the mixture is 15 to 20%. Recommended use:
- Below groundwater table.
Potential issues:
- Hydration before bentonite is placed in the right location; to delay hydration, either use additives with dry bentonite or in water; mix calcium bentonite (expands less) with sodium bentonite; or use granular bentonite (less surface area);
- Pumps, such as centrifugal pumps, can shear grout, which will accelerate congealing of bentonite; to avoid, use paddle mixer and positive displacement pumps such as piston or gear pumps.
- Chip/Pellet bentonite: Chip or pellet bentonite is coarse grade or pelletized bentonite that needs to be hydrated to form a seal. The bentonite chips or pellets are poured directly down the borehole. Recommended use:
- Shallow wells;
- Highly permeable gravel and sand formations;
- Can be cost-prohibitive for sealing of deep wells.
Potential issues:
- Bridging during emplacement of chips; to avoid, use in shallow wells and use chips no larger than ¼ the minimum well diameter that chips have to pass through.
- Clean Sand, Soil, or Gravel (optional with DOH approval): Clean inert sand and gravel can be used as filling material when the groundwater formation in the location of the decommissioned well has a comparably high porosity and permeability of the filling material. Seals on top and/or bottom need to be placed if there is a potential of surface water or contaminated groundwater from other groundwater formations to use the filled borehole as a potential pathway. Recommended use:
- High porosity formations (e.g., potential excessive loss of sealing materials);
- Ensure minimal disruption of natural groundwater flow (although variability within the narrow well boring is unlikely to affect area-wide groundwater flow);
- Neat cement or bentonite sealing materials could affect water quality of nearby monitoring wells.
Potential Issues:
- Sealing difficulties in contact with other formation and or surface;
- Placement of aggregate or heavy sand above sealant too early can cause seal to break (curing time for sealant typically 12 to 48 hours).
The rationale for the choice of sealing material should be documented in the project-specific work plan and/or well closure report and include consideration of factors such as depth and width of the soil boring or well borehole, lithology of the surrounding formation and water composition (salinity) and utility in the saturated zone. For projects being overseen by DOH, consult with the project manager to determine if submittal of a draft work plan for review and approval is required.
If cement or grout is ordered as a ready mix from a vendor, a verification of mixture (e.g., purchase order or receipt with order specification) should be submitted as part of the documentation of soil boring or well closure in the investigation report. The receipt must document that the grout was mixed as specified in this document and that it had the specified design strength.
Return to the Top of the Page
6.9.5.4 Placement Method
Sealing material should be placed by methods that avoid bridging and prevent freefall, voids and dilution of fill material, for example, by gravity pouring or using a pump and a tremie pipe. Tamping every few feet reduces the potential of bridging and voids further. Filling should be conducted from the bottom to the top of the borehole in a continuous motion (or “pour”) that avoids bridging.
The most appropriate procedure, or combination of procedures, should be selected based on the nature of potentially affected groundwater and site-specific objectives discussed above. Alternative approaches can also be proposed. A workplan should be provided to the HEER Office (or other, overseeing regulatory agency) for review for closure of monitoring wells installed through known contamination and into deeper, geologically isolated and uncontaminated groundwater.
6.9.6 Common Aspects of Monitoring Well Closure
Certain aspects of monitoring well closure are common to all site scenarios. These include:
- Retain a geotechnical or environmental consultant to plan, supervise and document the closure procedures.
- Notify the HEER Office at least one week in advance of the fieldwork.
- Calculate the required volume of material to fill the well based on the depth and diameter of the borehole and record. Also record the volume actually used. Explain any discrepancy between the calculated and actual volume. This helps determine whether the well has been properly closed and that no jamming or bridging of the fill or sealing material has occurred.
- Remove the surface seal and protective surface box. Remove all well material, if possible. At a minimum attempt to remove the first 2 to 5 feet of well casing below ground surface.
- If work is interrupted (i.e. overnight shutdown, weather events, required waiting periods), cover the well opening at the surface to ensure public safety and prevent foreign materials, water, pollutants and contaminants from entering the well. The cover should be held in place by bolts or weighted down with heavy equipment so it cannot be easily removed by people not associated with the project.
- Grouting/sealing must proceed from the bottom of the well up using a tremie pipe in one continuous operation (or “pour”). Avoid open gaps within seal (“bridging”) except in cases where intentionally induced to bridge large cavities or voids that otherwise could not be effectively filled and sealed. At least 1 foot of sealing material must be applied at the top of the well to prevent surface water from entering the borehole/well.
- If fine-grained sealing material (e.g., grout, powder bentonite) is to be placed onto coarse grained material (e.g., inert gravel), a transition zone should be created with material that prevents fine grained material sinking into coarse-grained material at the bottom of the well. This can be accomplished by using inert sand to fill the large pores or by using bridges before the fine-grained material is used.
- If it is anticipated that the remaining portion of a well left in place might need to be located in the future, a metal target can be embedded into the grout near the surface to allow locating of the well location via electromagnetic toning.
- Grout the borehole to within 2 to 5 feet of ground surface or to above the groundwater table, whichever is shallower (e.g., CalEPA, 1995b). For low- to moderate-permeability formations, this will typically include pressure or gravity-fed injection of a grout slurry into boring or well casing. The use of bentonite chips or pellets is more appropriate for high-permeability formations.
- In the upper 2 to 5 feet, backfill the top of the borehole with clean soil if vegetative growth is desired or in a manner otherwise compatible with existing site conditions.
- Check the seal 24 hours after installation for settling. Add additional grout or other material as needed to accommodate settling.
- Closing is complete when the final lift for the well and any ancillary excavations is compacted and its finished grade matches the surrounding grade. Surface completion should match the surroundings or as otherwise directed by the property owner (asphalt, concrete, soil, other).
- Documentation must, at a minimum, include the information noted in the “Closure of Monitoring Well Summary Report” information provided in Section 6.8.10.
6.9.7 Additional Hydrogeologic and Location Considerations
6.9.7.1 Wells Penetrating Contaminated Soil or Groundwater and Drinking Water Aquifers
Considerable expertise is required to properly close a well that penetrates contamination and is installed in or through a groundwater formations that is a current or potential source of drinking water or that that discharges into a nearby surface water body. Vertical migration of contaminants through the well casing or annulus space must be prevented.
Closure of such wells must be coordinated with the overseeing DOH office. Detailed guidance on specific closure designs is beyond the scope of this guidance but could include:
- Sealing of well and well annulus throughout intervals that cross contaminated formations;
- Placement of impervious plugs above and below un-impacted, producing formations;
- Placement of a seal within a confining layer that overlies producing formations under artesian conditions;
- Placement of a seal directly above the uppermost productive zone in order to prevent the downward infiltration of surface water.
- Placement of permeable material between groundwater formations where the interchange of water will not be detrimental.
6.9.7.2 Wells Penetrating Creviced or Fractured Rock
Filling and sealing of large voids crossed by a well might not be practical. This includes lava times in basaltic rock and solution caverns in carbonate rocks. Consult a drilling expert if sealing of the borehole above and/or below the void is necessary to prevent adverse, vertical migration of contamination. Filling the casing in-place with bentonite grout will be the most optimal solution in many instances, since sealing of the annulus space was presumably taken into consideration during initial construction of the well. Bridging materials might otherwise be needed to prevent loss of overlying sealing material into the void if the well casing must be removed.
6.9.7.3 Deeper Wells/Wells in or Above Drinking Water Aquifers
Use a tremie pipe or equivalent to fill the well with the appropriate sealing and fill material. Feed the grout into the borehole/well under pressure to ensure adequate penetration of the annular space and surrounding formation. Pressure required for the placement of cement-based grout should be maintained long enough for this grout to set. Submerge the tremie pipe opening in the grout by two feet or more to prevent bridging, fill voids, prevent dilution of sealing materials, or separation of aggregate from sealants. Free-fall placement of grout into the borehole is not acceptable (USEPA, 1991; CalEPA, 1995b; USACE, 1998).
When the grout has reached to 5 feet below surface, allow it to settle and cure. After 24 hours, check the grout for settling and add additional grout as needed. Repeat checking and adding of grout as needed (USACE, 1998). The HEER Office will consider the grouting complete when the neat cement has hardened and no settlement has occurred.
Return to the Top of the Page
6.9.7.4 Shallow Wells in Caprock Sediments
Refer to discussion of “Low-Risk Wells” for guidance on closure of shallow monitoring wells installed in coastal caprock areas that do not threaten a drinking water aquifer or nearby surface water bodies. This will be the most common scenario for most wells installed in coastal, caprock areas.
Refer to guidance for closure of “High-Risk Wells” for closure of wells installed within or otherwise posing a potential risk to producing caprock formations. This includes producing formations within the Ewa caprock area on the island of O`ahu.
6.9.7.5 Wells in Unstable Material
If the formation is too unstable and would collapse during removal of the well casing, seal the well in place or emplace sealing material while casing is being pulled.
6.9.7.6 Vapor Monitoring Wells
Soil vapor monitoring wells installed in the vadose zone typically consist of a six-inch, screened, metallic sampling point installed to the depth of interest and connected to the surface by a narrow (e.g., ¼ inch) piece of flexible tubing. Close of these monitoring points can normally be accomplished by removing the tubing to the vapor sampling point and filling the opening with neat cement. Complete to match surface conditions, including patching of asphalt or concrete pavement, if present.
6.9.8 Unanticipated Site Conditions
If unanticipated conditions arise during well closure that prevent the execution of the prescribed procedures, halt the field work until the HEER Office concurs with the procedural changes needed to complete well abandonment.
Return to the Top of the Page
6.9.9 Waste Management
Properly manage all waste generated during well abandonment. Label any containers used and stored on site pending disposal. Record the waste management method used as well as numbers and contents of any containers in the field log. Track the waste until final disposal. Complete proper disposal manifests. Any manifests should be documented in the project report files provided to the HEER Office.
Return to the Top of the Page
6.9.10 Well Closure Reporting
Report well closure to the HEER Office within 30 days of fieldwork using the “Closure of Monitoring Well Summary Report” presented in Section 18. Alternatively, if this form is included in a site closure, monitoring or investigation report, submit the report within 60 days of well abandonment. Submit the following information together with the form (i.e., Closure of Monitoring Well Summary Report):
- A copy of the original boring log;
- The well construction log;
- A closure log;
- A site map showing the location of the closed monitoring well;
- Disposal documentation for wastes generated during the closure process.
6.10 Groundwater Modeling
The discussion provided below is intended to serve as a general review of groundwater modeling only. Accurate modeling of groundwater flow and the subsurface fate and transport of contaminants requires significant training and experience. Consult with an expert familiar with the hydrogeologic and contaminant conditions of the site under investigation. Consult with the overseeing DOH office overseeing the project during all stages of model preparation.
The purpose of groundwater modeling is to generate a visual representation of a water bearing formation including the overall groundwater movement and in the case of contaminated sites, the fate and transport of contaminants. Groundwater modeling is also used to predict contaminant plume movement into the future or to predict the groundwater formation and plume response to remedial activities. Be aware of the limitations of the sample data and groundwater formation characteristics assessed as part of the investigation. This uncertainty should be taken into consideration regarding decisions for additional investigation or remedial actions.
Groundwater modeling may be done manually by using a calculator or spreadsheet and then creating a graphical depiction of the data using flow nets. Manual groundwater modeling methods may be useful for creating simple, site conceptual models intended to depict groundwater formation characteristics and the approximate extent and magnitude of a contaminant plume.
If the purpose of groundwater modeling is to predict how a contaminant plume changes over time or how it will respond to water pumping or remedial activities, modeling becomes computationally intensive and a computer model must normally be used. Computer groundwater models are based on the geologic and hydrologic field data collected during drilling, geotechnical sample analysis and groundwater formation testing. The models and site CSM must be continually adjusted and calibrated based on additional information obtained throughout the project cycle.
Return to the Top of the Page
6.10.1 Gradient and Flow Direction Determination
The simplest way to determine the groundwater gradient and flow direction is by graphically constructing a flow net for the site. A flow net is composed of two sets of lines: the equipotential lines and the flow lines. The equipotential lines connect points of equal head and the flow lines depict the interpreted groundwater flow path or flow direction.
To construct a flow net for a site, measure the hydraulic head in wells across the site following the groundwater gauging procedures detailed previously in this section. Enter the measurements onto a site map. Interpolate the hydraulic head between wells assuming that the change in head is linear between neighboring wells. Connect points of equal hydraulic head to depict the equipotential lines. Choose equipotential line intervals such that the drop in head between adjacent lines is constant. The equipotential lines represent the height of the water table or potentiometric surface above mean sea level or other datum plane.
Add flow lines to depict the movement of groundwater at the site. Groundwater follows the path of steepest groundwater gradient. At a site where the formation is isotropic and porous, the steepest groundwater gradient is the shortest path between equipotential lines. The shortest path is perpendicular to the equipotential lines. Draw flow lines such that the flow is equally divided between adjacent lines.
Calculate the groundwater gradient as follows: Measure the distance between two equipotential lines along a flow line, i.e. the shortest path. Determine the head loss between the equipotential lines. Divide the head loss by the distance.
The groundwater flow direction is along the flow lines. Depict flow lines as arrows pointing in the direction of groundwater flow, i.e., in the direction of declining hydraulic head.
Return to the Top of the Page
6.10.2 Velocity, Transmissivity, Calculations
Calculate the transmissivity, storativity and hydraulic conductivity using methods and references listed in Subsection 6.7, Groundwater Transport Data Collection Methods.
Calculate the groundwater velocity (v) using the following equation:
v = q/ne = (K dh/dl) / ne
Where:
v = actual groundwater velocity;
q = Darcy velocity;
ne = effective porosity (connected pore space through which groundwater can flow);
K = Hydraulic conductivity;
dh/dl = groundwater gradient (change in groundwater elevation in two wells over distance between the wells).
Compare the calculated groundwater velocity to the velocity range expected based on the lithology of the water bearing formation.
Note that the equation is for laminar flow through porous media. Flow through fractured rock may require a different approach. If the fractured rock is hydraulically equivalent to a porous medium, the above equation may be used. If this condition is not fulfilled, describe the flow in relation to individual fractures.
In most cases on the scale of a typical response site, the condition of hydraulic equivalence to a porous medium is not satisfied and the flow must be described in relation to individual fractures and fracture sets. This has many consequences. For example, in a hydraulically isotropic, porous formation, the groundwater flow direction is perpendicular to the equipotential lines of the water table/potentiometric map. This assumption cannot be made in a fractured formation, since the flow direction will follow the fracture orientation. The following parameters need to be known to describe flow in fractured rock: orientation, fracture density, degree of connectivity, aperture opening and smoothness of fractures (Domenico et al., 1990).
One approach to describing fracture flow was developed by Snow (Snow, 1968). He developed an equation to calculate equivalent hydraulic conductivity for a set of planar fractures. One square meter of fractured rock with an equivalent hydraulic conductivity of K will conduct as much water as one square meter of porous medium with a hydraulic conductivity of K, under identical hydraulic gradients (Domenico et al., 1990).
Return to the Top of the Page
6.10.3 Computer Models
Computer models may be used at a site for many different goals including: (1) estimating how the actual groundwater system functions; (2) selecting sampling approaches, objectives and locations; (3) predicting contaminant fate and transport at the site; (4) designing hydraulic containments; and (5) testing and designing remediation approaches and systems (USEPA, 1992a; 1995c).
Computer models may consist of analytical approaches or numerical approaches. Analytical approaches are relatively more simplistic, offer an inexpensive method to conduct preliminary groundwater analysis and may be useful during the early phases of a project. Numerical approaches are generally more complex and require specialized knowledge and software. However, numerical approaches easily deal with variability in the groundwater flow and contaminant transport parameters, which provides flexibility in representing complex subsurface geologies. Numerical approaches are also useful for predictive evaluation of proposed remedial solutions and for the evaluation of environmental hazards.
A groundwater modeling report should, at a minimum, include (USEPA, 1992a):
- Previous studies;
- Site conceptual model(s);
- Mathematical model describing the site conceptual model;
- Selection of numerical model and codes;
- Model calibration;
- Model runs;
- Model results;
- Conclusions;
- Tables, graphs, figures, maps, etc.;
- List of symbols, abbreviations, references, codes, etc.
6.11 Equipment Preparation/Decontamination/Blanks
Refer to the USEPA Region 4 document Field Equipment Decontamination and Cleaning (USEPA, 2020a) in Attachment 5 for detailed information on this topic. Decontaminate on-disposable sampling devices prior to use between monitoring wells. This includes pumps and gauging devices. Protect decontaminated equipment from incidental contact with potential contaminant sources by placing in sealed plastic bags or otherwise keeping the equipment well covered.
The use of solvents to clean equipment should be avoided in order to minimize cross contamination of subsequent samples that the equipment is used to collect. Document the decontamination procedure in the SAP and the final investigation report.
Equipment blanks should be collected from non-dedicated equipment at the beginning of each new sampling event project and for unrelated areas of contamination (USEPA, 2002b). This is done to document the effectiveness of decontamination procedures as well as confirm the absence of targeted chemicals in new, dedicated or no-dedicated sampling equipment. To prepare a blank, run clean tapwater over or through the equipment and collect a sample in the same manner as to be used for the project. Prepare a blank for at one of each set of equipment to be used to collect samples at the beginning of a sampling event.
Additional decontamination procedures might be required for the collect ultraclean water samples. Follow the procedures recommended in the USEPA document Sampling Ambient Water for Trace Metals at EPA Water Quality Criteria Levels (USEPA, 1996d) and updated guidance, as applicable. Carry multiple sets of sampling tools in order to expedite sample collection and allow decontamination of equipment in batches, ideally just once a day at the start or end of a sampling day.
Return to the Top of the Page
6.12 Investigation Derived Waste
Refer to the USEPA Region 4 document Management of Investigation Derived Waste (USEPA, 2020b) in Attachment 6 for detailed guidance on the collection, storage and disposal of investigation-derive waste (IDW) generated during site investigations, with the modifications noted below.
Waste containers must be labeled to include (at a minimum) project name, project location, date, container contents and emergency contact name and phone number. Store IDW containers in a secure location on the project site, pending receipt of analytical results and eventual disposal. During field activities, record the number of IDW containers and their contents in the field log. Track the IDW containers until acceptance at the final disposal facility. Maintain proper disposal manifests in the project records. When appropriate as described in the previous subsections, closure of monitoring wells in place with removal of only the upper portion of the well casing and material can reduce waste that must be subsequently disposed of at a landfill.
Development and purge water can be disposed of on the ground immediately downgradient of the well provided that it is generated from the uppermost groundwater unit, is not impacted above action levels applicable to the site, does not contain free product or exhibit a sheen, and is not allowed to runoff into a surface water body or storm drain (refer to USEPA, 2014; 2020a). Water used to decontaminate sampling equipment may also be placed on the ground as discussed for well development and purge water.
If these criteria cannot be met then the water must be disposed of at an offsite, regulated facility (e.g., municipal landfill or other treatment facility). Development and purge water should not be disposed in monitoring wells. Non-hazardous IDW such as drill cuttings, drilling mud, purge or development water, decontamination wash water, etc., should not be disposed of in dumpsters.